Check out the conversation on Apple, Spotify and YouTube.
Brought to you by:
Pendo: The #1 software experience management platform
Testkube: Leading test orchestration platform
Gamma: Turn customer feedback into product decisions with AI
Product Faculty: Get $550 off the AI PM Certification with code AAKASH550C7
Mobbin: Discover real-world design inspiration
Today’s Episode
Every forward-thinking product team is using AI prototyping tools.
But most are using these tools wrong.
They open Bolt or Replit, type a vague prompt, get something that looks decent, show it around, and move on:
No problem space work
No divergent solutions
No user testing
That’s why I’ve created today’s episode. I got Nadav Abrahami (Co-founder of $5.5B giant Wix, CEO of Dazl) to walk you through the complete workflow to use these tools to their maximum capability.
I’ve done three episodes on AI prototyping. This one builds on that compendium of knowledge to cover: when to prototype, how to prompt, when to go high fidelity, and how to hand off to engineers with zero open questions.
Listen or watch now:
If you want access to my AI tool stack - Dovetail, Arize, Linear, Descript, Reforge Build, DeepSky, Relay.app, Magic Patterns, Speechify, and Mobbin - grab Aakash’s bundle.
Newsletter Deep Dive
As a thank you for having me in your inbox, here’s a complete guide to AI prototyping for PMs:
When to use AI prototyping
The ideal workflow: step-by-step
How to prompt without breaking things
When to go high fidelity vs low fidelity
PRD + prototype - the new standard
How to hand off to engineers
1. When to use AI prototyping (and when not to)
Let me start with what I see happen constantly.
A PM finally gets access to an AI prototyping tool. They start using it for everything. They produce a lot of prototypes. Zero of them go anywhere.
The tool isn’t the problem. The sequencing is.
AI prototyping tools don’t replace problem space work. They accelerate solution space work. Those are two completely different things.
Before you open any prototyping tool, you need three things locked down:
The problem you’re solving
The user story you’re designing for
The rough shape of the solution
If you can’t write all three in a single paragraph, you’re not ready to prototype. Go back to discovery.
Once you have those three, there are two moments in the development lifecycle where AI prototyping really shines.
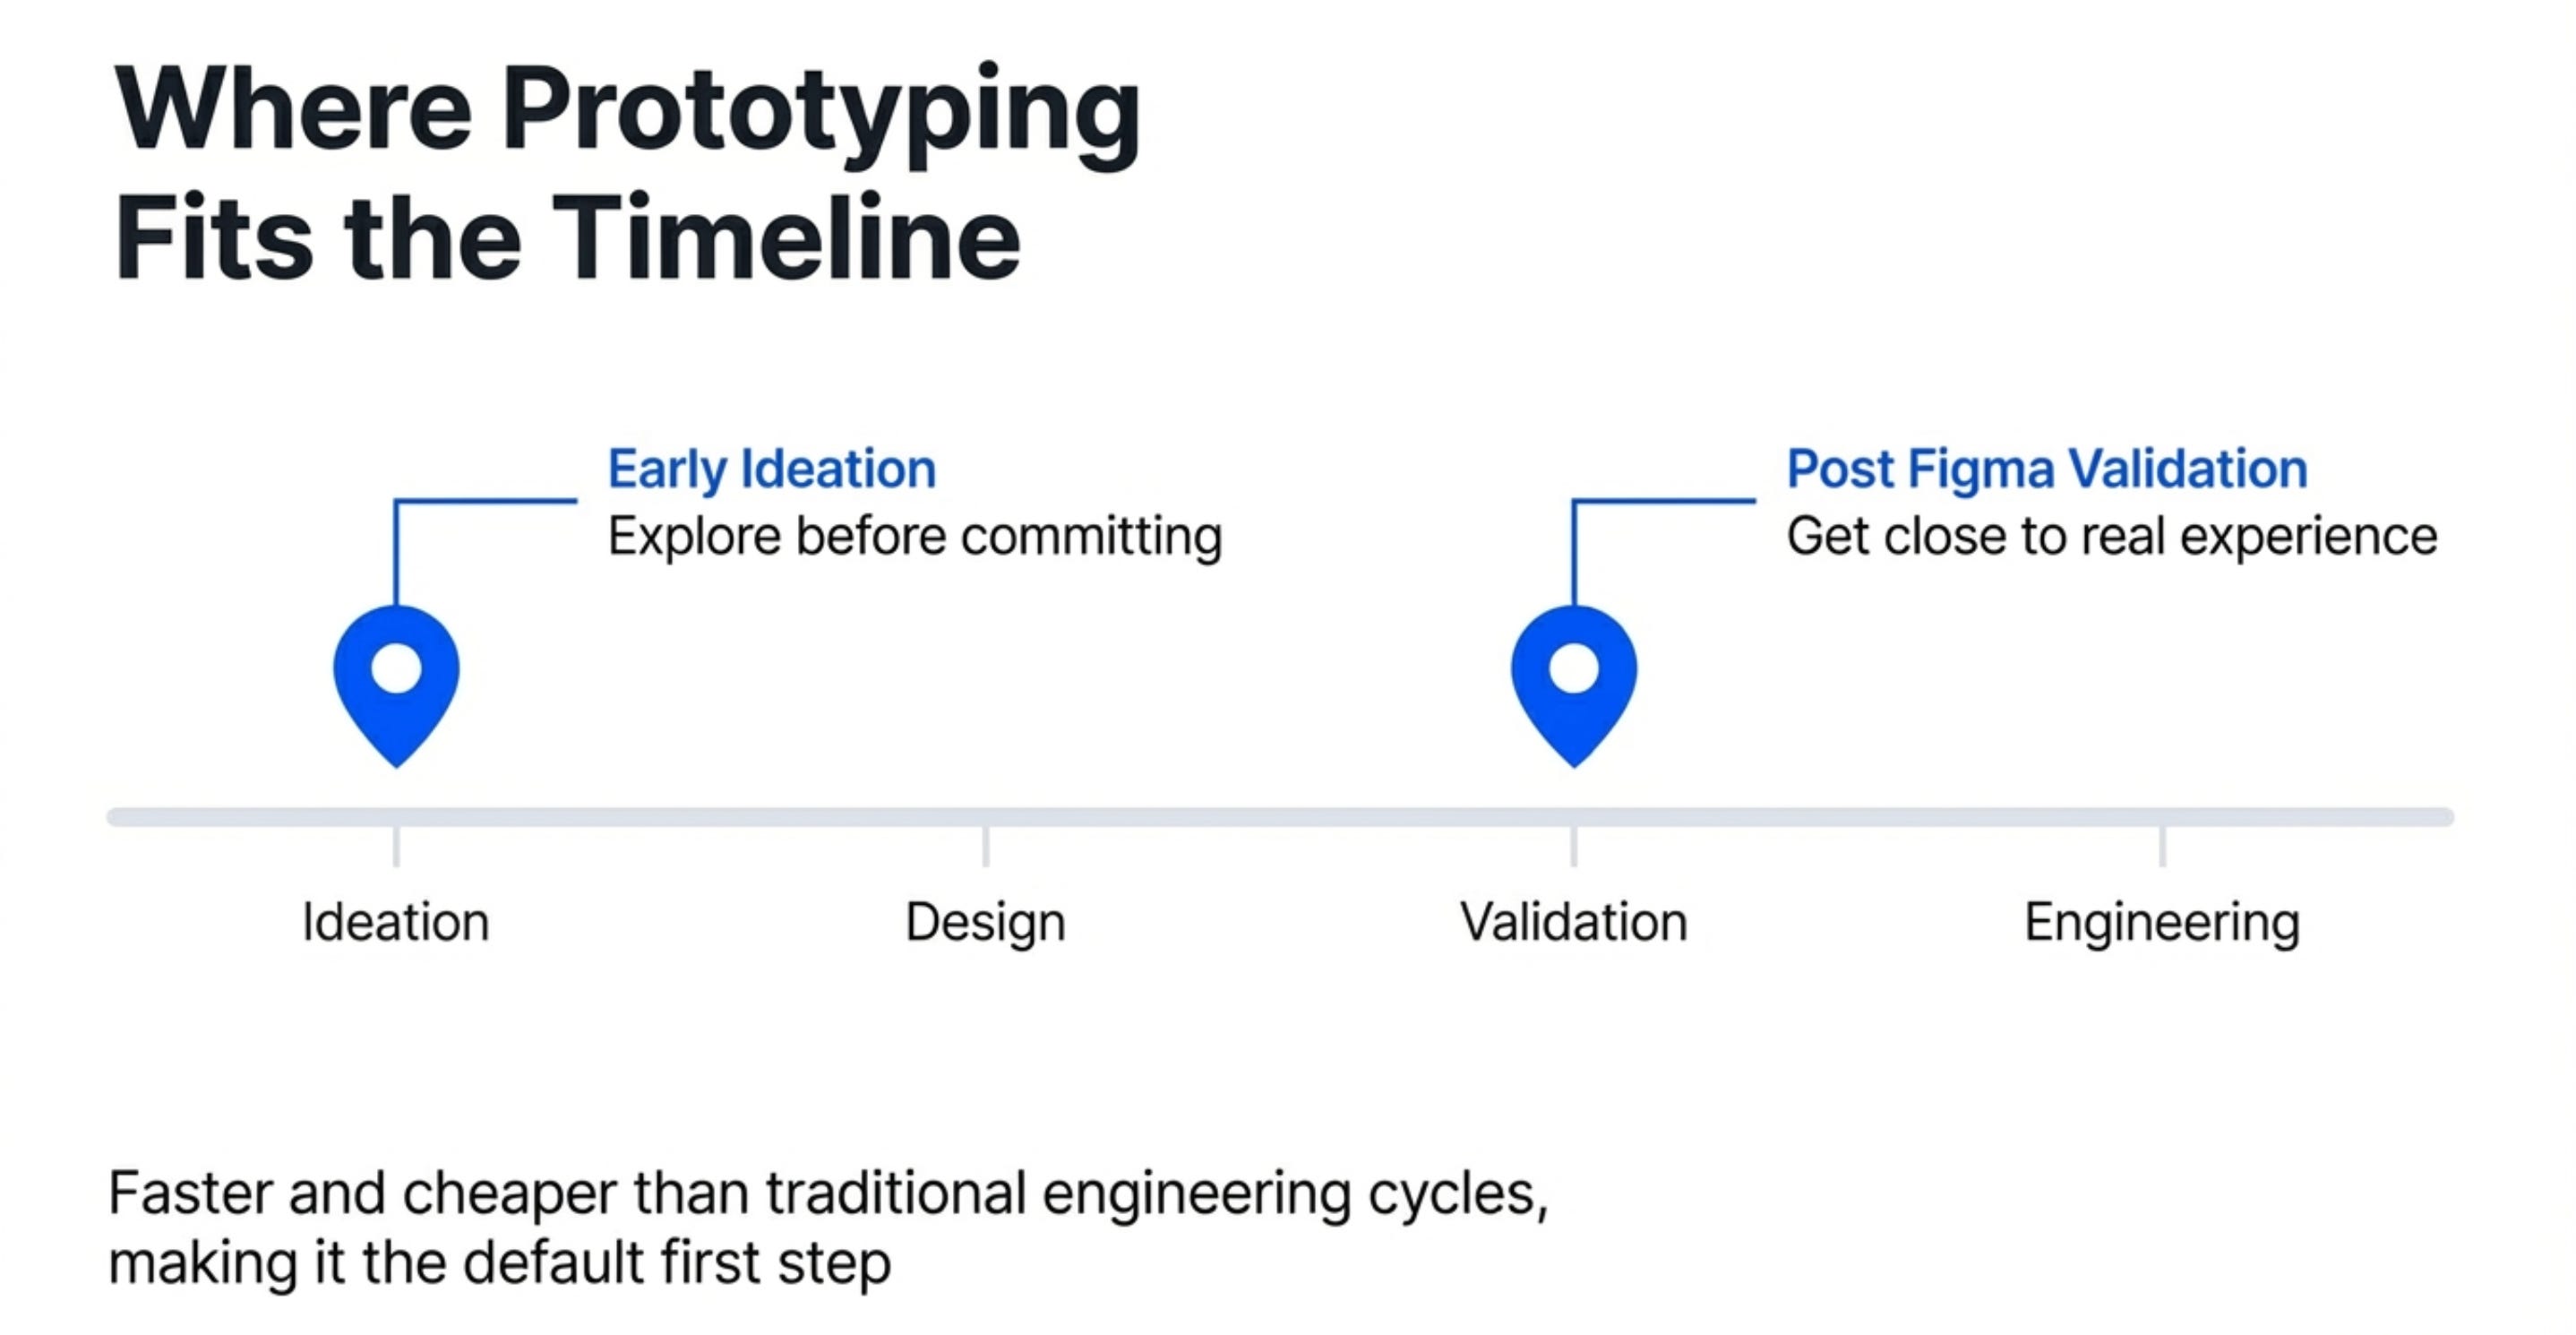
Moment 1 - Early ideation
This is where most teams barely prototype at all. A rare ~5% of exceptional PMs do it at the idea stage.
That’s a huge missed opportunity. Running 3-4 variations at ideation takes the same time it used to take to run one. You’ll learn more from 30 minutes of functional prototyping than from two hours of writing user stories.
Moment 2 - Post-Figma validation
After the design team has narrowed on a direction, you want to get as close to the real experience as possible before handing off to engineering.
Static Figma screens can’t tell you whether the interaction actually works. A functional prototype can. It’s also ~75% of forward-thinking teams’ most common use case for these tools right now.
Do the research first. Then prototype.
2. The workflow step by step
Here’s the exact flow we used to build a LinkedIn sentiment analysis feature from scratch. Use it as your blueprint:
Step 1 - Start from your design system
Don’t start from a blank page.
Drop a screenshot of your existing product into the tool. Ask it to recreate that page first.
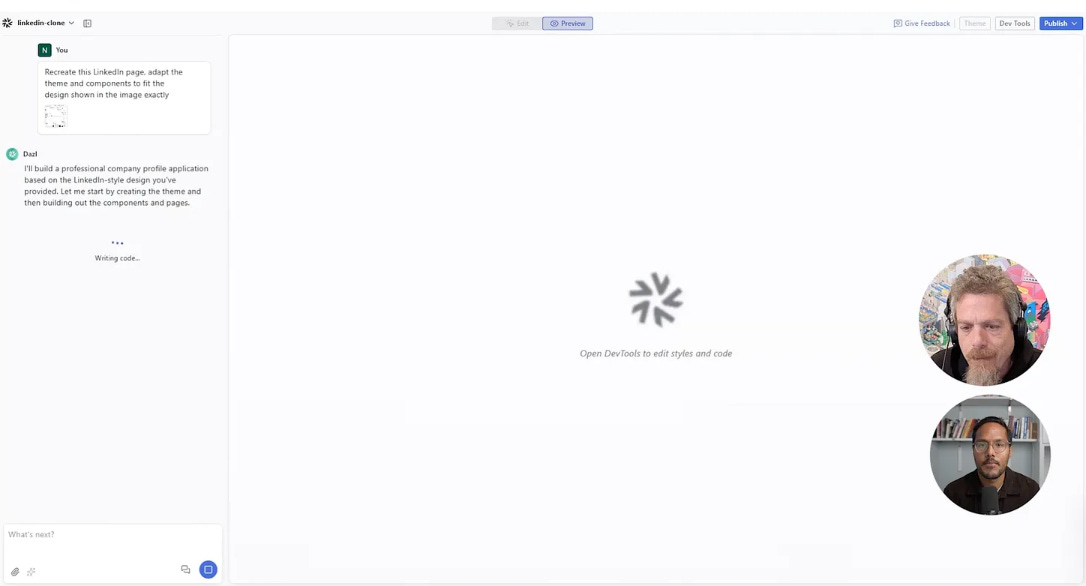
Now every prototype you build from this point will look like it belongs in your product - not like a generic template from the internet.
Save this as a team template. Everyone builds from the same base. Visual fidelity stays consistent. Time to first prototype drops dramatically.
Step 2 - Explore 3 to 4 divergent solutions
This is the step almost every PM skips.
They build one version, it looks decent, they move forward. But the entire point of AI prototyping is that building a second and third version costs almost nothing now. All three variations take the same time it used to take to build one.
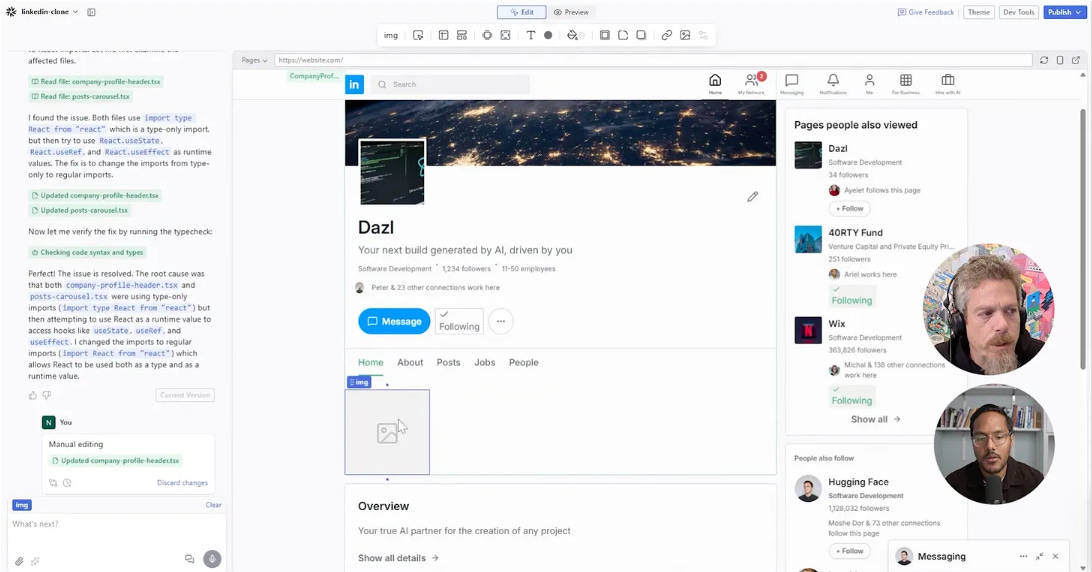
We built two versions of the sentiment analysis feature in the episode. One with sentiment inline on each post card. One as a separate summary section with a cohort graph below. Neither was perfect. Both were useful. That comparison is the point.
Don’t move forward until you have at least three versions to evaluate.
Step 3 - Visually edit the strongest direction
Once you’ve picked the best direction, stop prompting for every small change.
Switch to direct visual editing for fine-tuning. Move elements. Match colours with the eyedropper. Adjust spacing. This is faster than prompting because the result is immediate - you see it happen in real time, no waiting for the AI to reinterpret what you meant and get it 90% right.
Prompt for big structural changes. Visually edit for everything fine.
Step 4 - Build out the full end-to-end flow
Single-page prototypes miss too much.
The real value of prototyping is surfacing edge cases before they hit engineering. The moment you start connecting pages, edge cases appear automatically.
When we added a clickable drill-down page showing per-post sentiment detail in the episode, it immediately surfaced two edge cases - what happens with fewer than 4 posts, and what happens with too many. Both would have cost engineering time to discover in sprint. We found them in minutes.
Build the whole flow. Not just the happy path.
Step 5 - Test with your own users
Ideally not a user testing platform. Your actual users.
The ones who requested the feature. The ones who know your product well enough to have strong opinions. Get them on a video call and put the prototype in front of them.
Users who asked for a feature already know what they wanted. Watching them interact with your version tells you in 20 minutes whether you solved their actual problem - or just your interpretation of it.
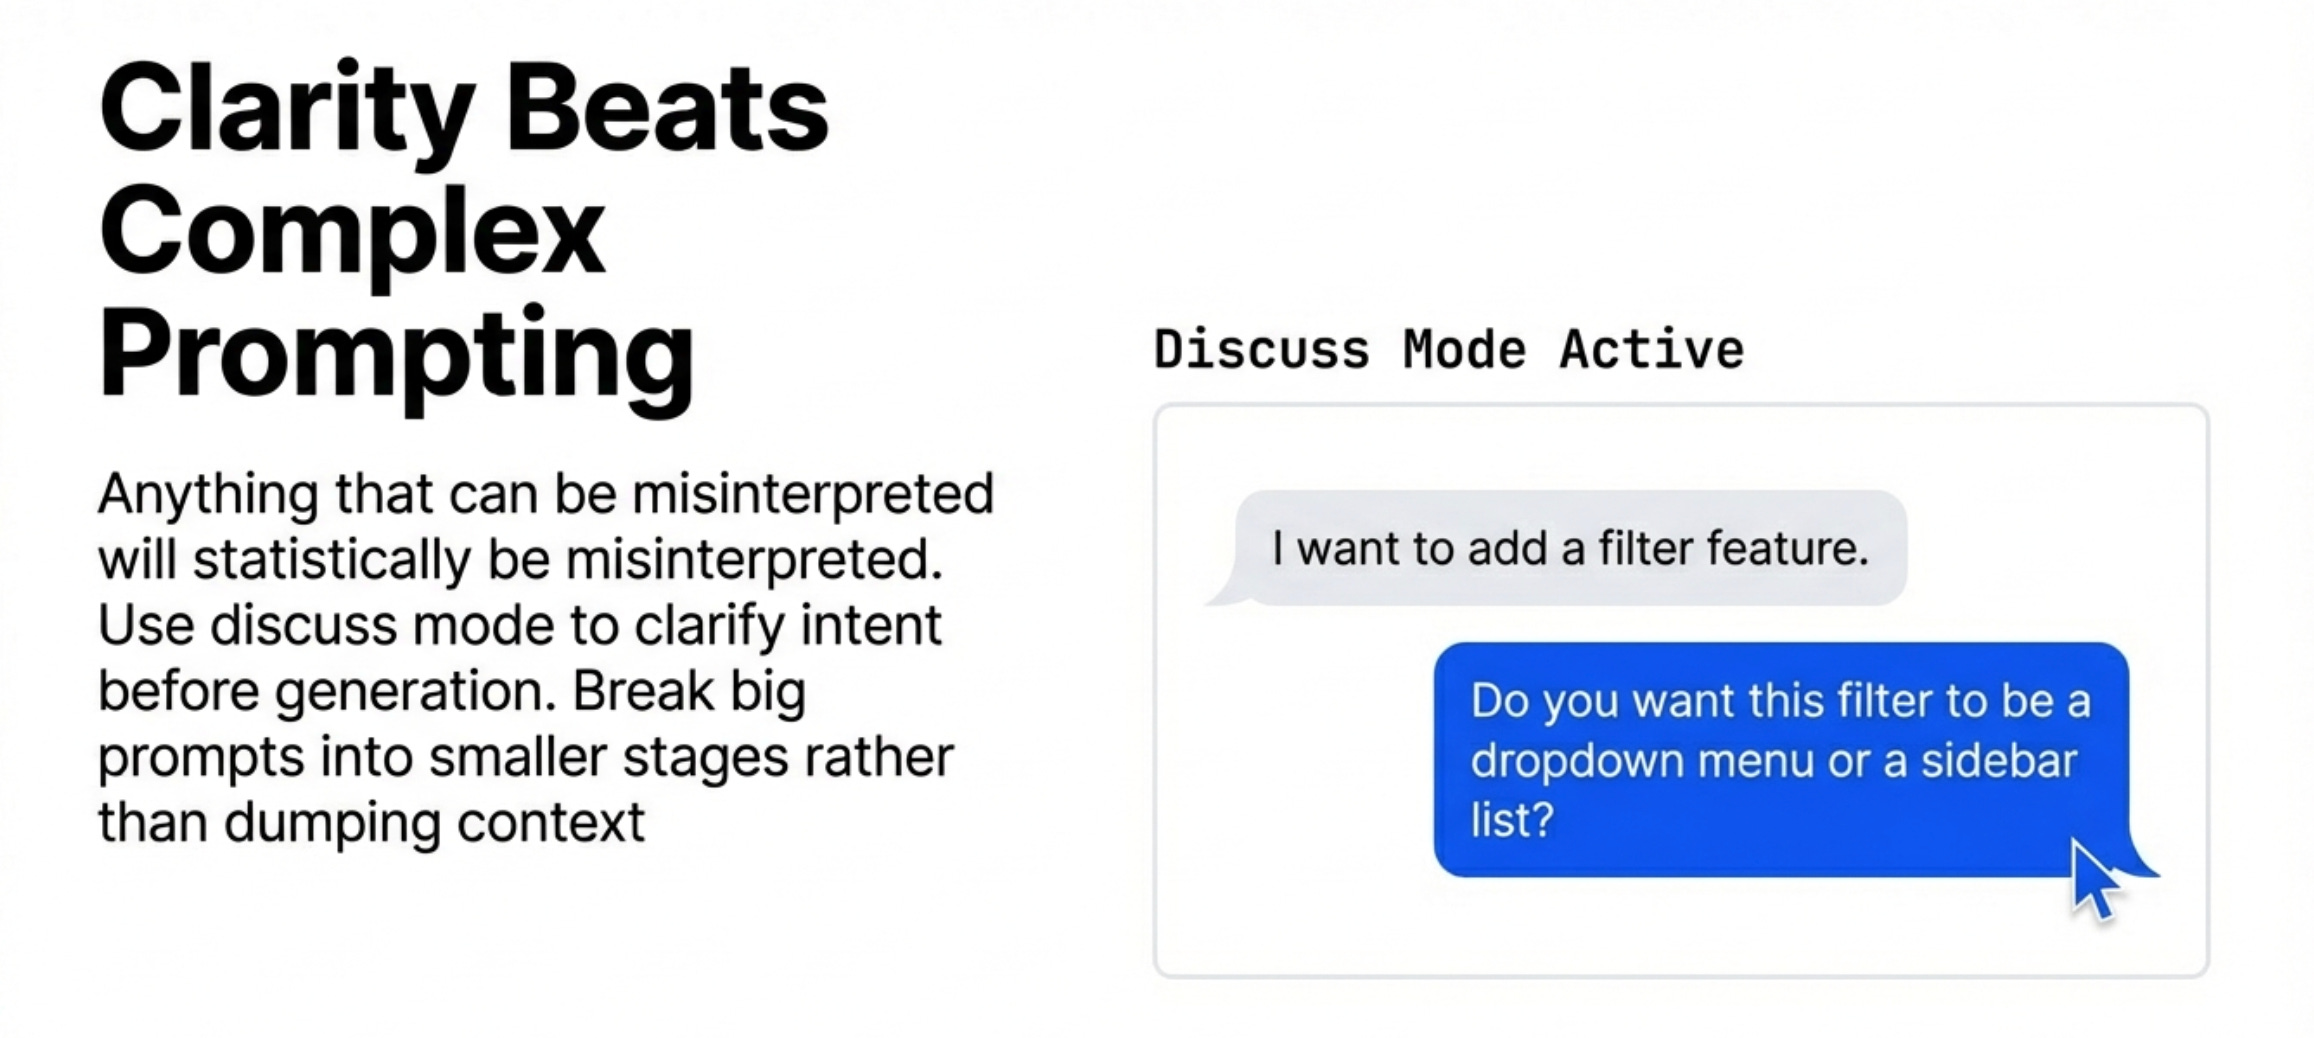
3. How to prompt without breaking things
Prompting for prototyping is different from prompting for writing or analysis. The rules are different.
You don’t need a system prompt. You don’t need few-shot examples or framework instructions. What you need is clarity.
Any ambiguity in your prompt will get exploited. Not every time - but statistically, any instruction that can be read two ways will eventually be read the wrong way. When that happens in a prototyping tool, the AI runs with its wrong interpretation at full speed, confidently, until it’s done. It doesn’t stop to ask.
The fix isn’t more prompt engineering. It’s clearer language before you send the prompt. Follow these three steps:
Step 1 - Use an LLM to audit your prompt first
Before running any complex prompt, paste it into a separate chat and ask it to find the contradictions. Ask what’s ambiguous. Ask what could be understood two different ways. Fix those. Then run the real prompt.
This sounds like extra work. It saves you 30-minute regeneration loops.
Step 2 - Use discuss/plan mode for anything major
Tell the AI what you’re planning and ask how it understands your intent. Don’t ask if it can do it - that always gets a yes. Ask what it thinks the right approach is.
The difference in response quality between “can you do this?” and “what do you think of this approach?” is significant.
Step 3 - Break big prompts into smaller steps
A huge prompt covering an entire feature produces average results across every part. A focused prompt on one piece at a time produces better results on each piece.
Build in stages. You’ll get there faster.
4. When to go high fidelity
Low fidelity is for exploration. High fidelity is for two specific situations.
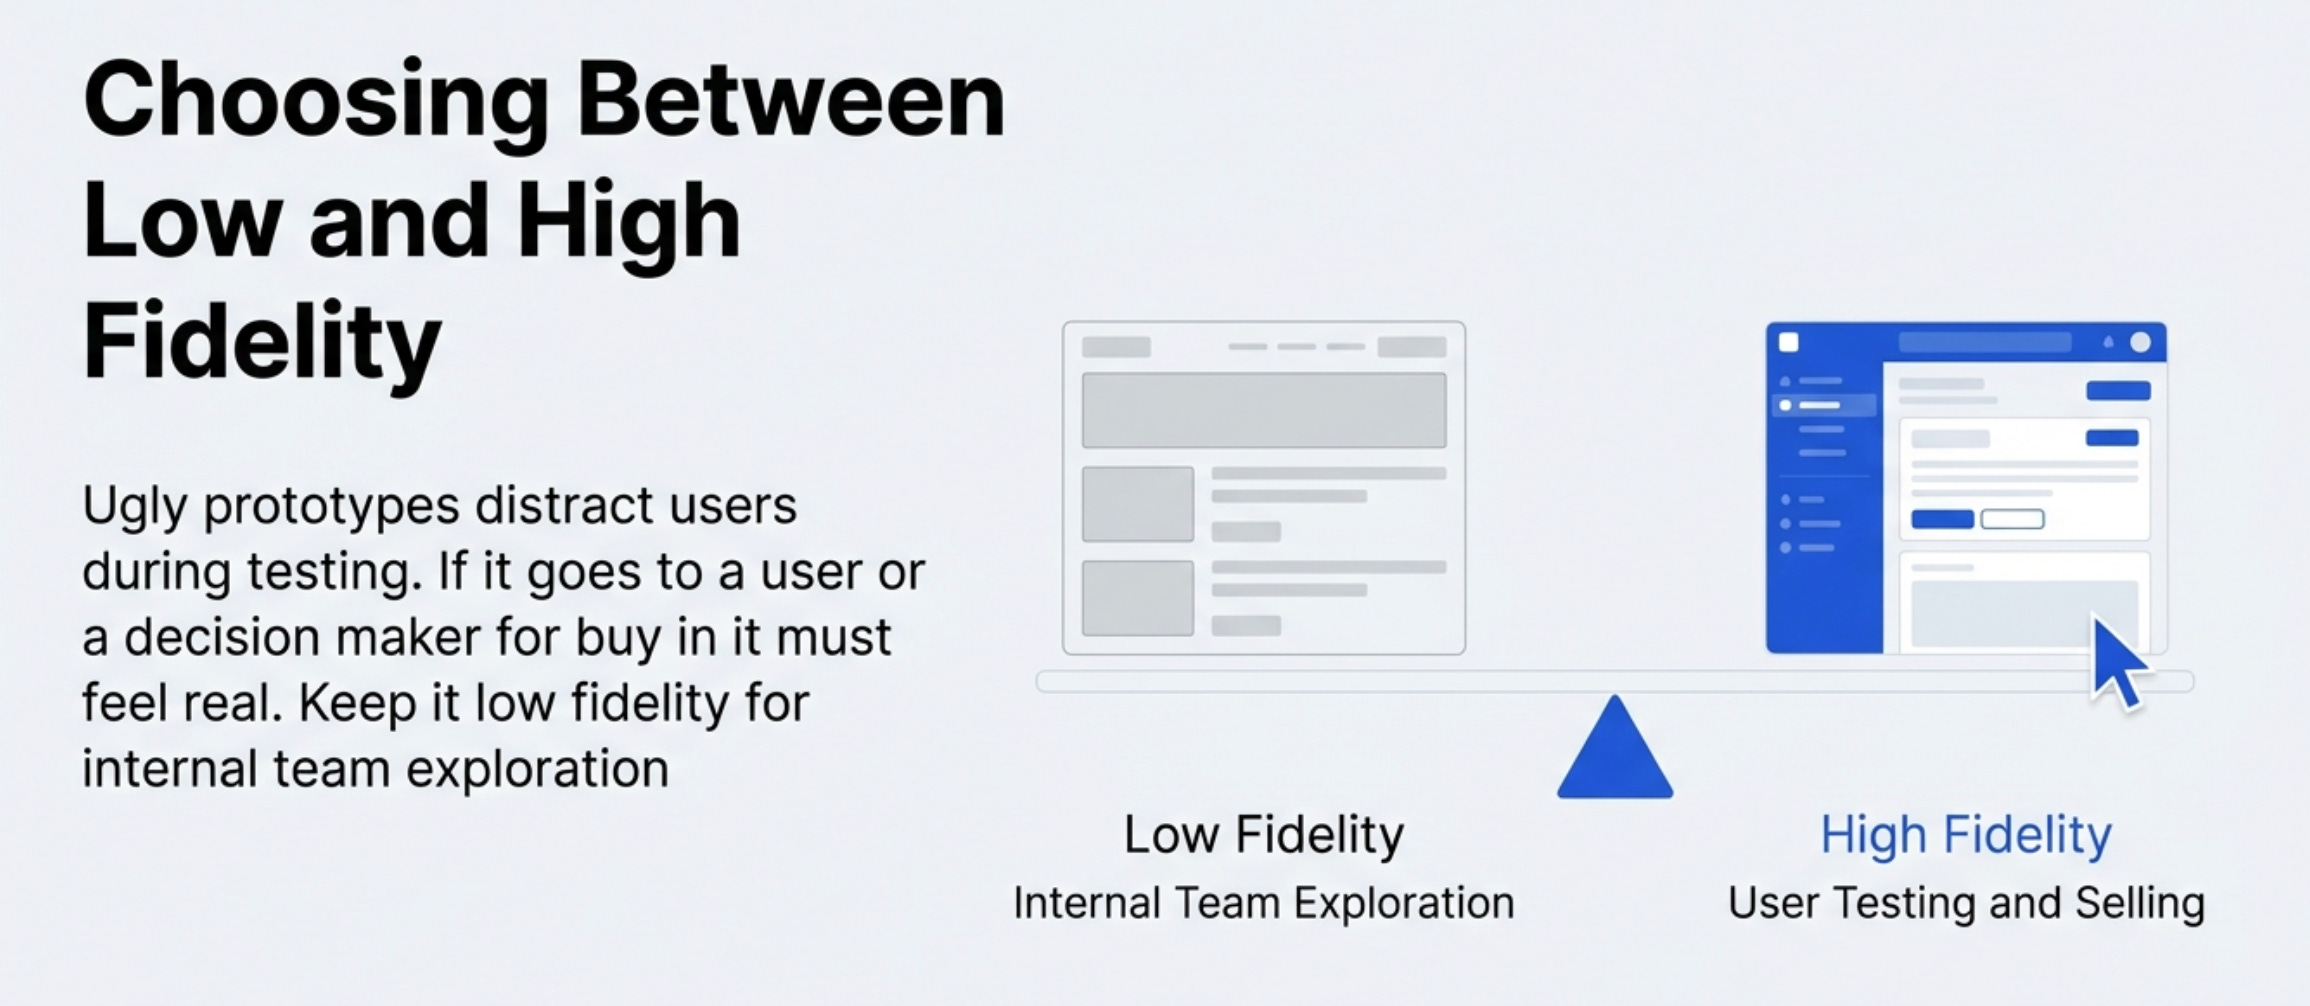
Situation 1 - Selling the feature internally
If your feature still needs buy-in from leadership or stakeholders, a polished prototype does more work than any deck or written spec.
People engage differently with something they can touch. If it looks rough, they focus on the roughness instead of the idea. A lot of features die in alignment meetings not because the idea was bad - but because it looked unfinished.
Make it look real when the goal is alignment.
Situation 2 - Usability testing with real users
Low fidelity and real usability testing don’t work together.
Put something rough in front of a user and ask them to evaluate the experience - you’ll get feedback about the roughness, not the experience. You need it to feel real.
The right workflow is low fidelity for internal team exploration, then one high-fidelity version for users. Not every prototype needs to reach high fidelity. But any prototype going to users does.
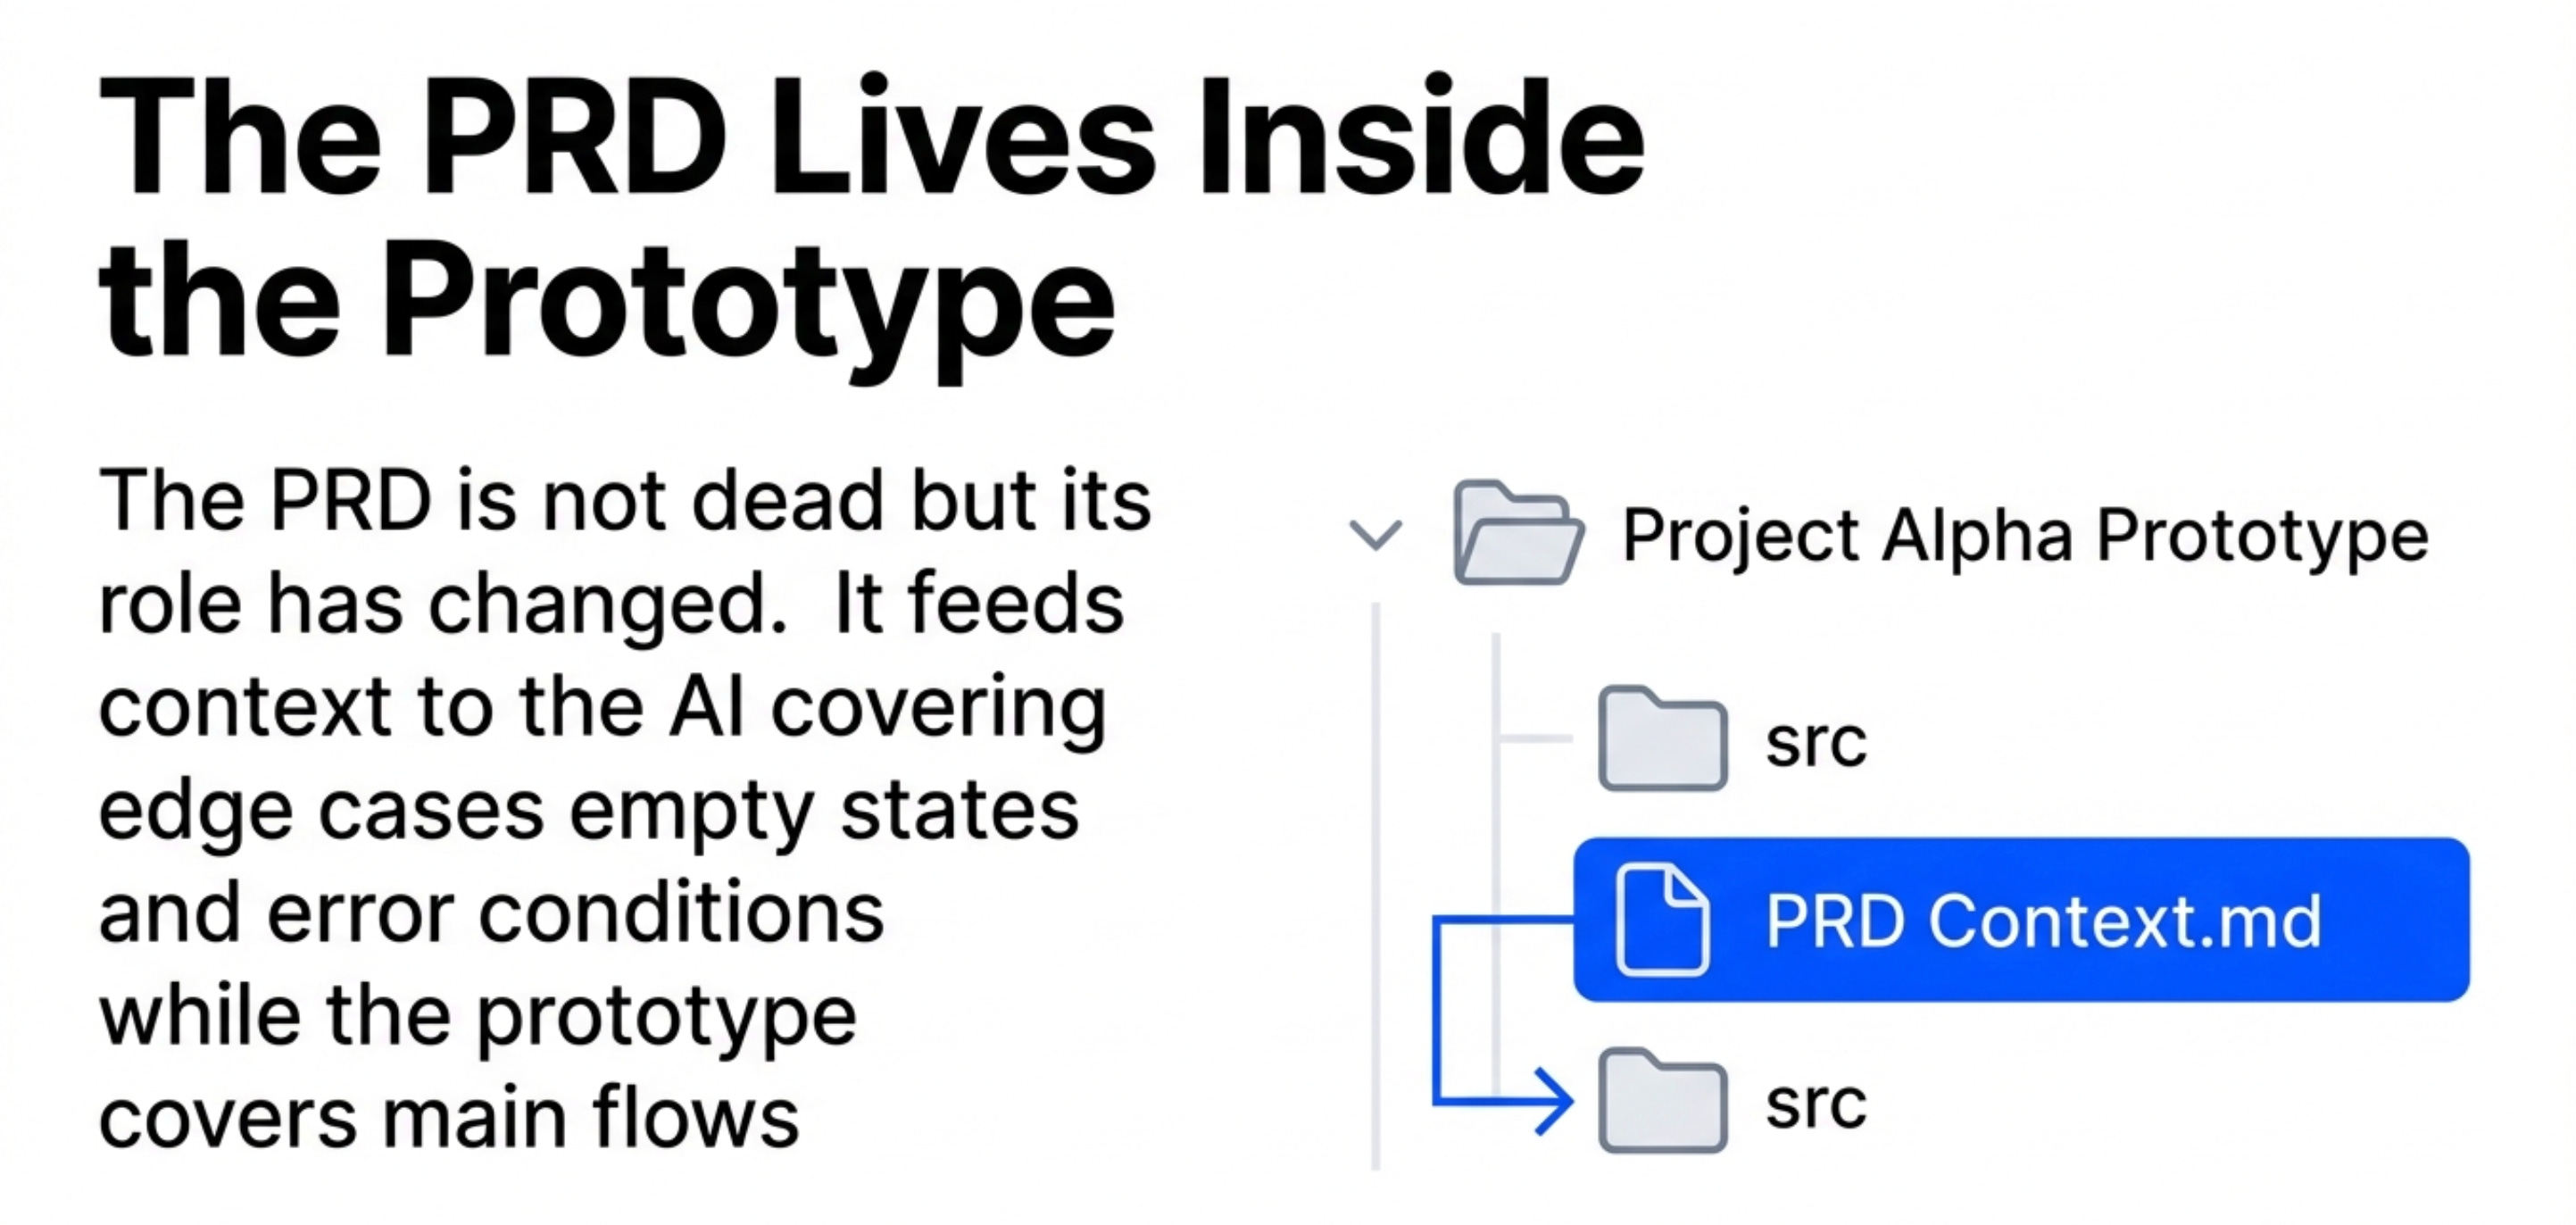
5. PRD plus prototype - the new standard
The PRD isn’t dead. But what it’s for has changed.
The old way
It used to be that the PRD was everything. It had to describe the feature completely, in text, for every reader - engineers, designers, stakeholders - to understand the vision.
That worked when prototypes were expensive and rare. But the flip side is that a lot of the content ended up vacuous. You’d get a PRD with every section filled in, but the actual quality of the content was weak. People skim text. Nobody skims an interactive prototype.
The new way
Most of the feature - the core flows, the interaction patterns, the visual logic - should now live in the prototype. That’s what people actually engage with.
The PRD fills in what the prototype can’t show: edge cases, empty states, error conditions, tracking requirements, rollout plan. Things that are hard to prototype exhaustively. Write those down.
Here’s a good test. If someone reads the PRD, plays with the prototype, and still has questions - something’s missing. No open questions is the goal.
The PRD should live inside the prototype project as a file in the same folder. When you do that, the AI reads it when you prompt new features. It doesn’t skim. It applies the context. Your PRD stops being documentation and starts being active instruction.
Cover your 90% flows in the prototype. Cover all edge cases in the PRD.
6. How to hand off to engineers
A functional prototype built in a tool like Dazl isn’t a throwaway demo. It’s a full server-side and client-side application. React components, standard file structure, nothing proprietary. A developer on your team picks it up and it looks like any other web project they’ve worked on.
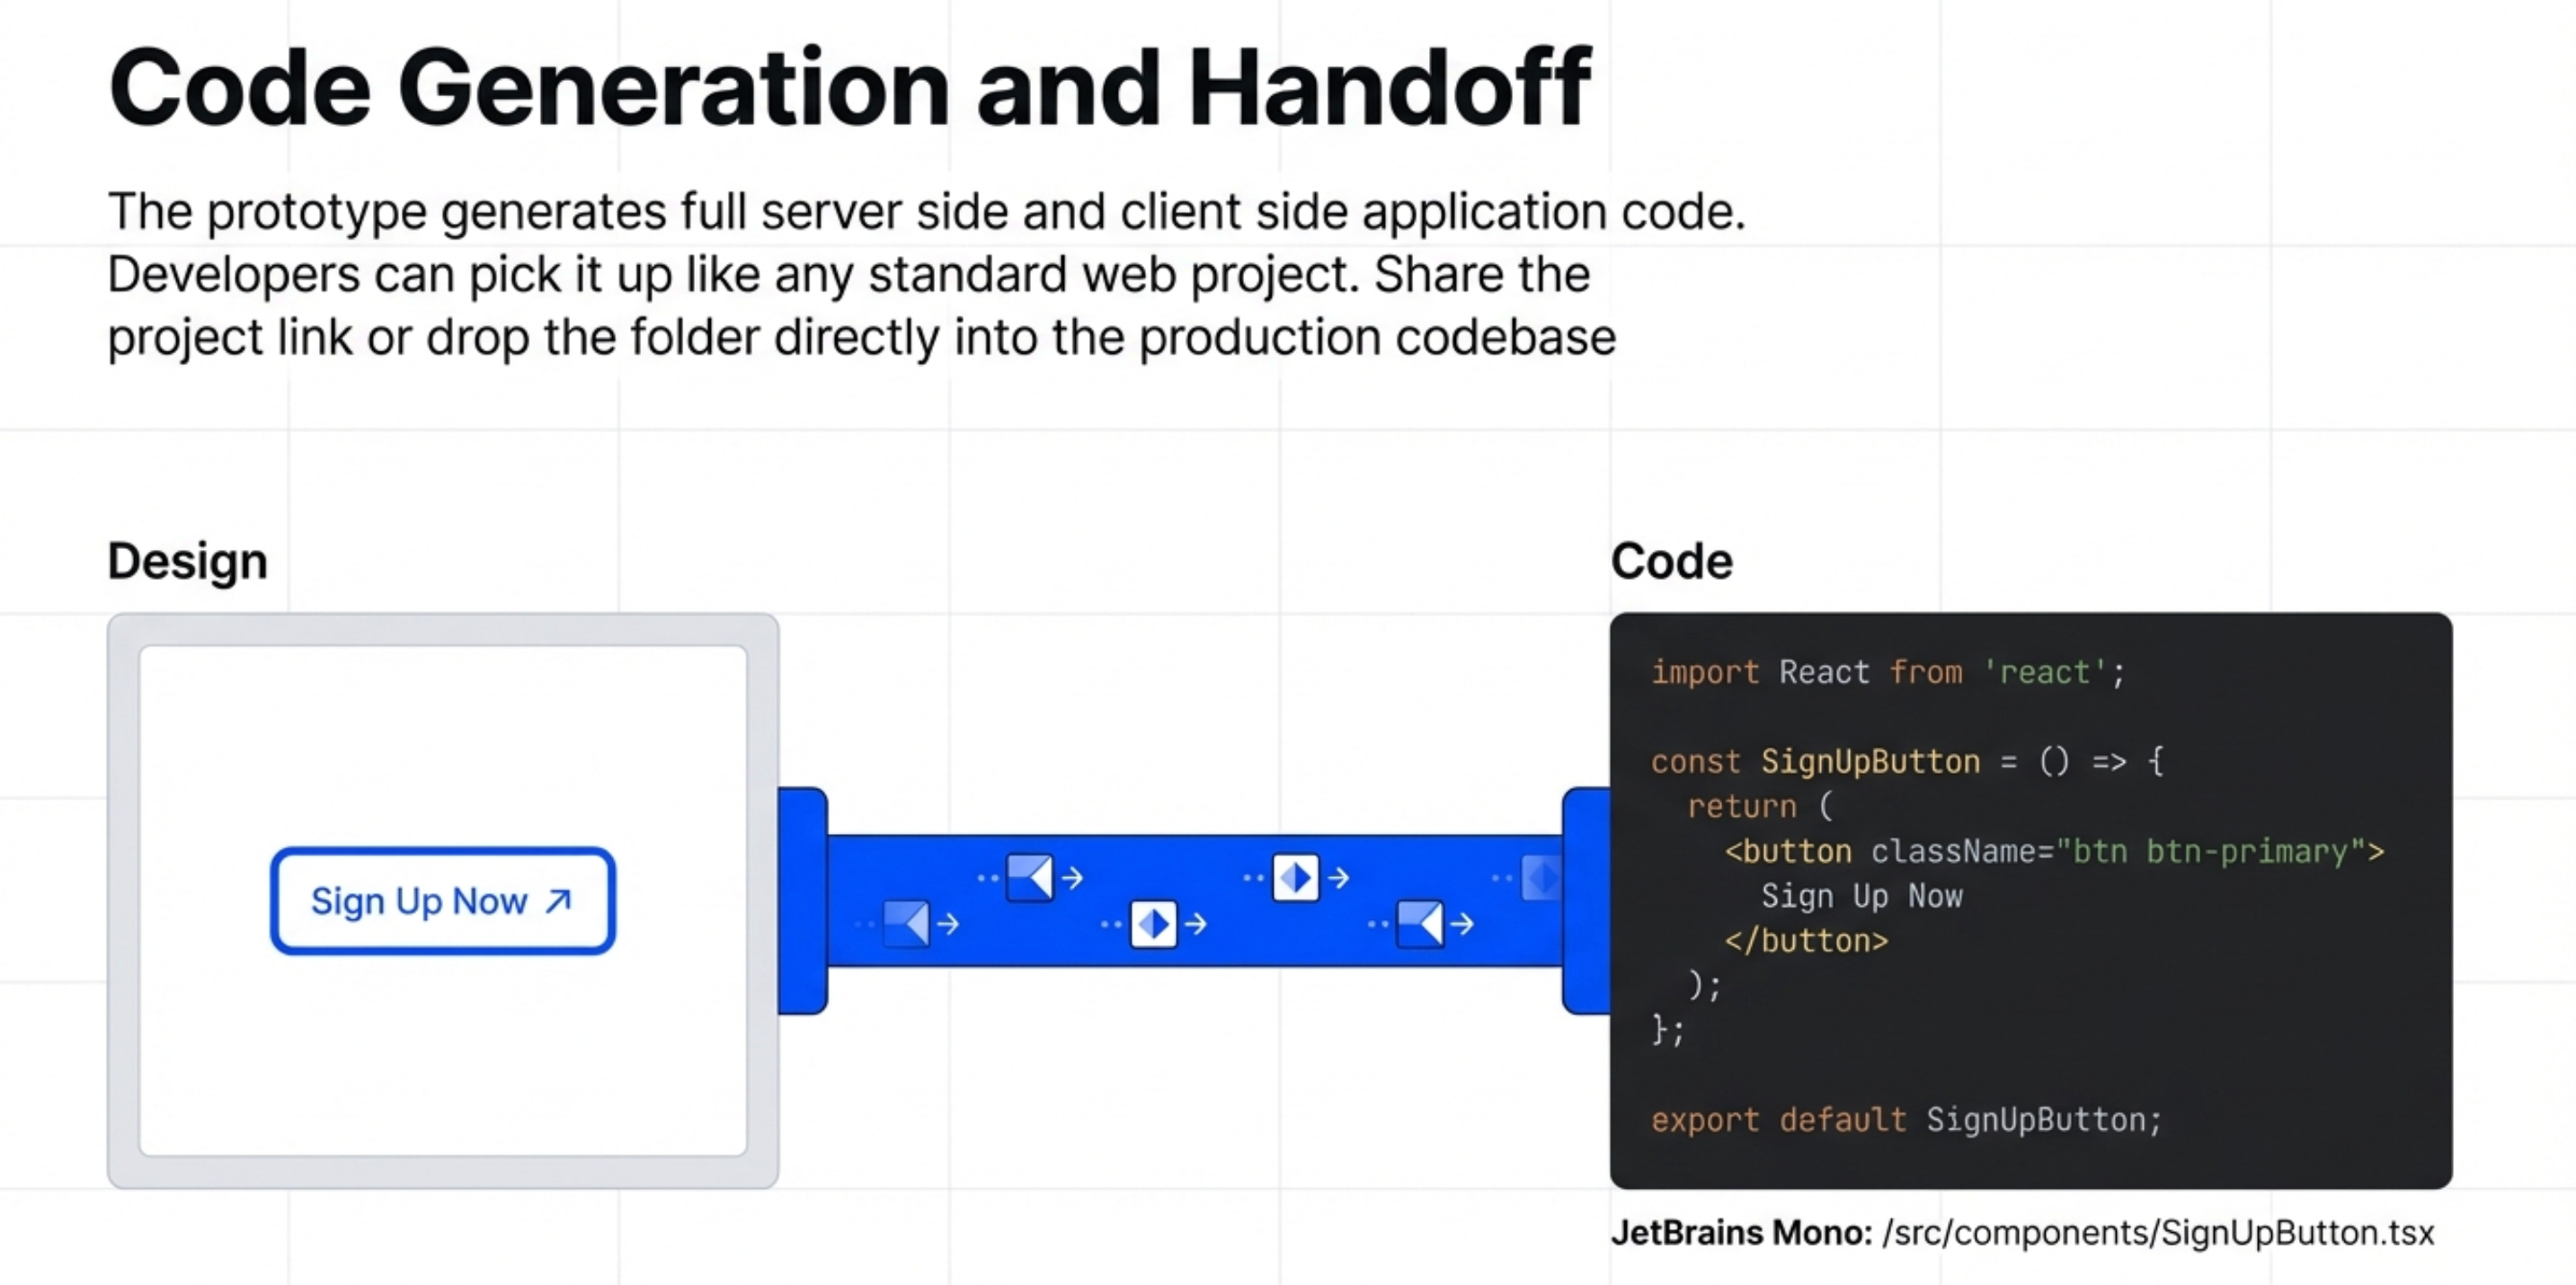
So share the published prototype link. That alone answers ~90% of the questions that would normally fill up a handoff call.
But for anything more specific, download the project folder, drop it next to the production codebase, and tell Cursor or Claude Code to copy the interaction. Most of the implementation work gets handled automatically.
The skill to build now
It’s how to read enough of the codebase to have an informed conversation.
Open the actual project your company is building. Ask an AI to explain the architecture. Ask for a diagram. Ask what a specific component does.
Do that for a few weeks and you’ll close the communication gap with your engineering team faster than almost anything else you could do.
Related content
Newsletters
Podcasts
PS. Please subscribe on YouTube and follow on Apple & Spotify. It helps!