Check out the conversation on Apple, Spotify and YouTube.
Brought to you by:
NayaOne: Airgapped cloud-agnostic sandbox
Pendo: The #1 software experience management platform
Maven: Get 15% off Xinran’s course with my link
Bolt: Ship AI-powered products 10x faster
Gamma: Turn customer feedback into product decisions with AI
Today’s Episode
The role of PM is taking on more and more of design and engineering. But there are literally no good guides on designing with AI for PMs.
So I brought in an expert.
Xinran Ma runs Design with AI, one of the top newsletters on AI design. He’s been studying AI design tools for three years. And he hasn’t shared most of this information publicly before.
In today’s episode, we going live. We building real prototypes. We showing you the exact workflows that top 1% designers use.
If you watch, you’ll learn the entire workflow from PRD to prototype to product:
If you want access to my AI tool stack - Dovetail, Arize, Linear, Descript, Reforge Build, DeepSky, Relay.app, Magic Patterns, Speechify, and Mobbin - grab Aakash’s bundle.
Newsletter Deep Dive
As a thank you for having me in your inbox, I’ve written up the complete guide to designing with AI for PMs:
What designing with AI means
The mind map of AI design workflows
The exact workflow in Google AI Studio
How to go from idea to prototype in Lovable
The 5 best tools for different design use cases
How to know when an AI-generated design is actually good
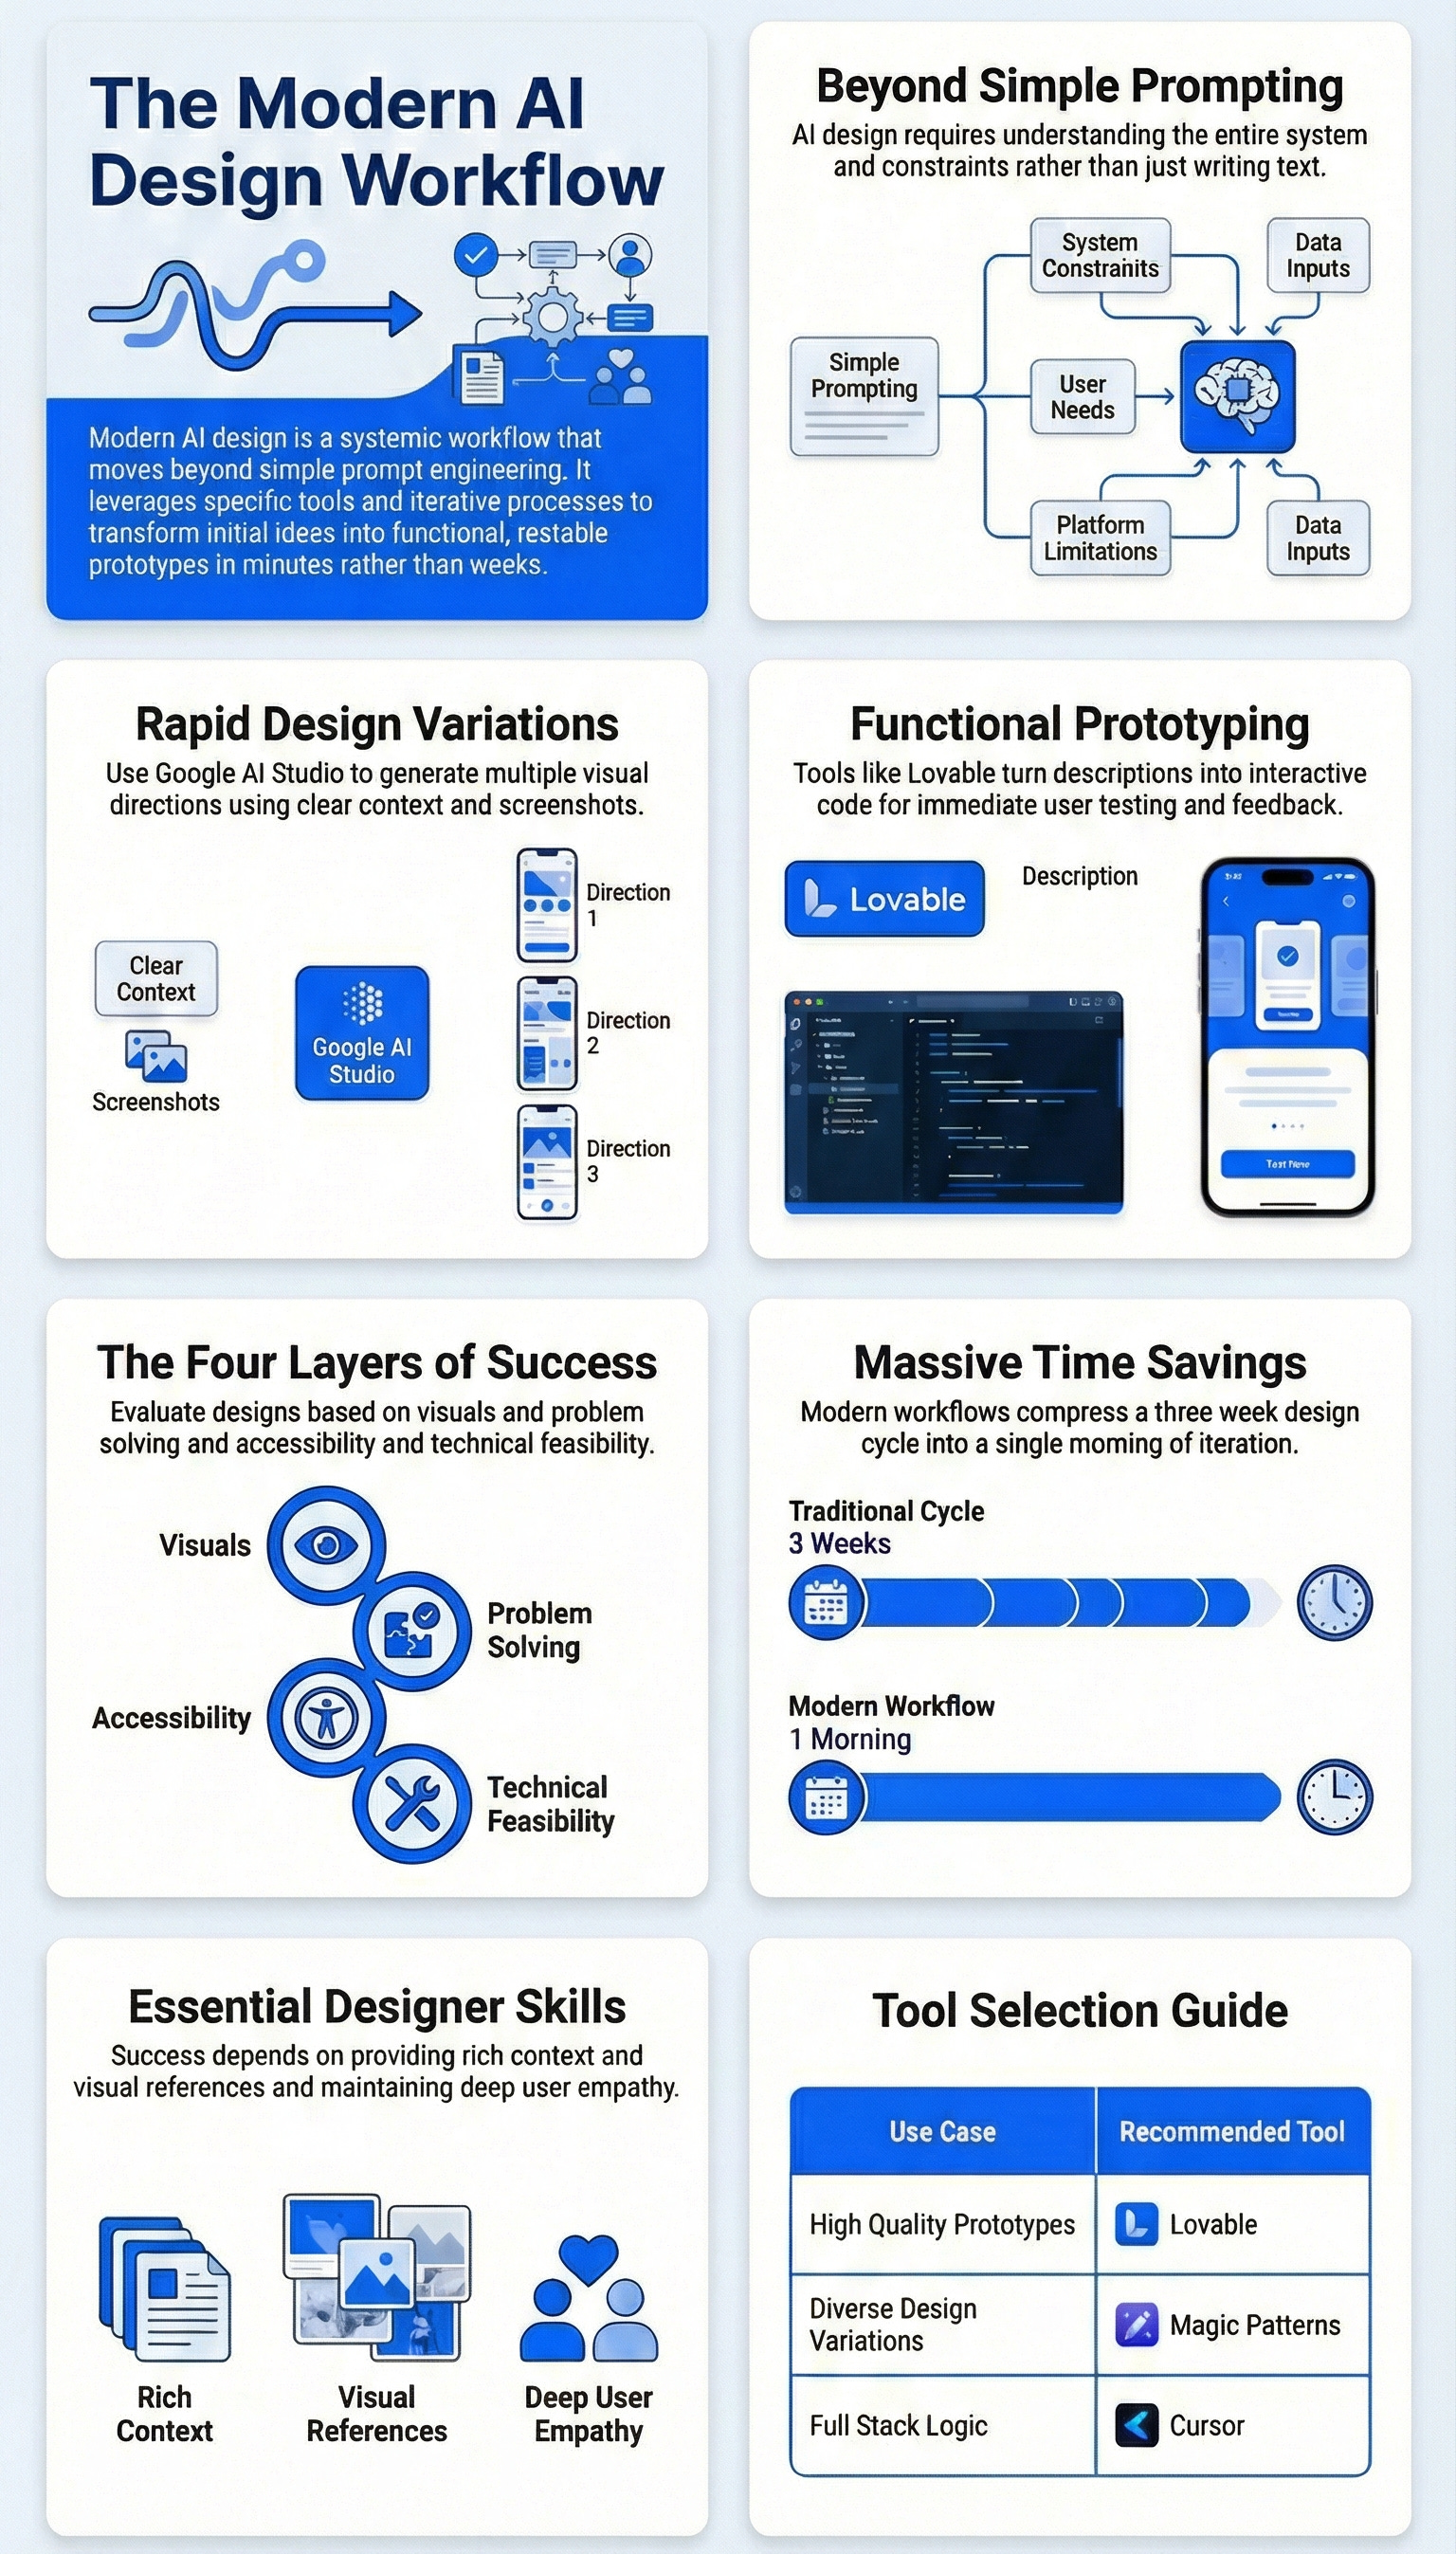
1. What Designing with AI Means
Designing with AI sounds broad because it is. But there’s structure to it.
Xinran breaks down the entire universe into a mind map with clear categories.
The Five Core Categories
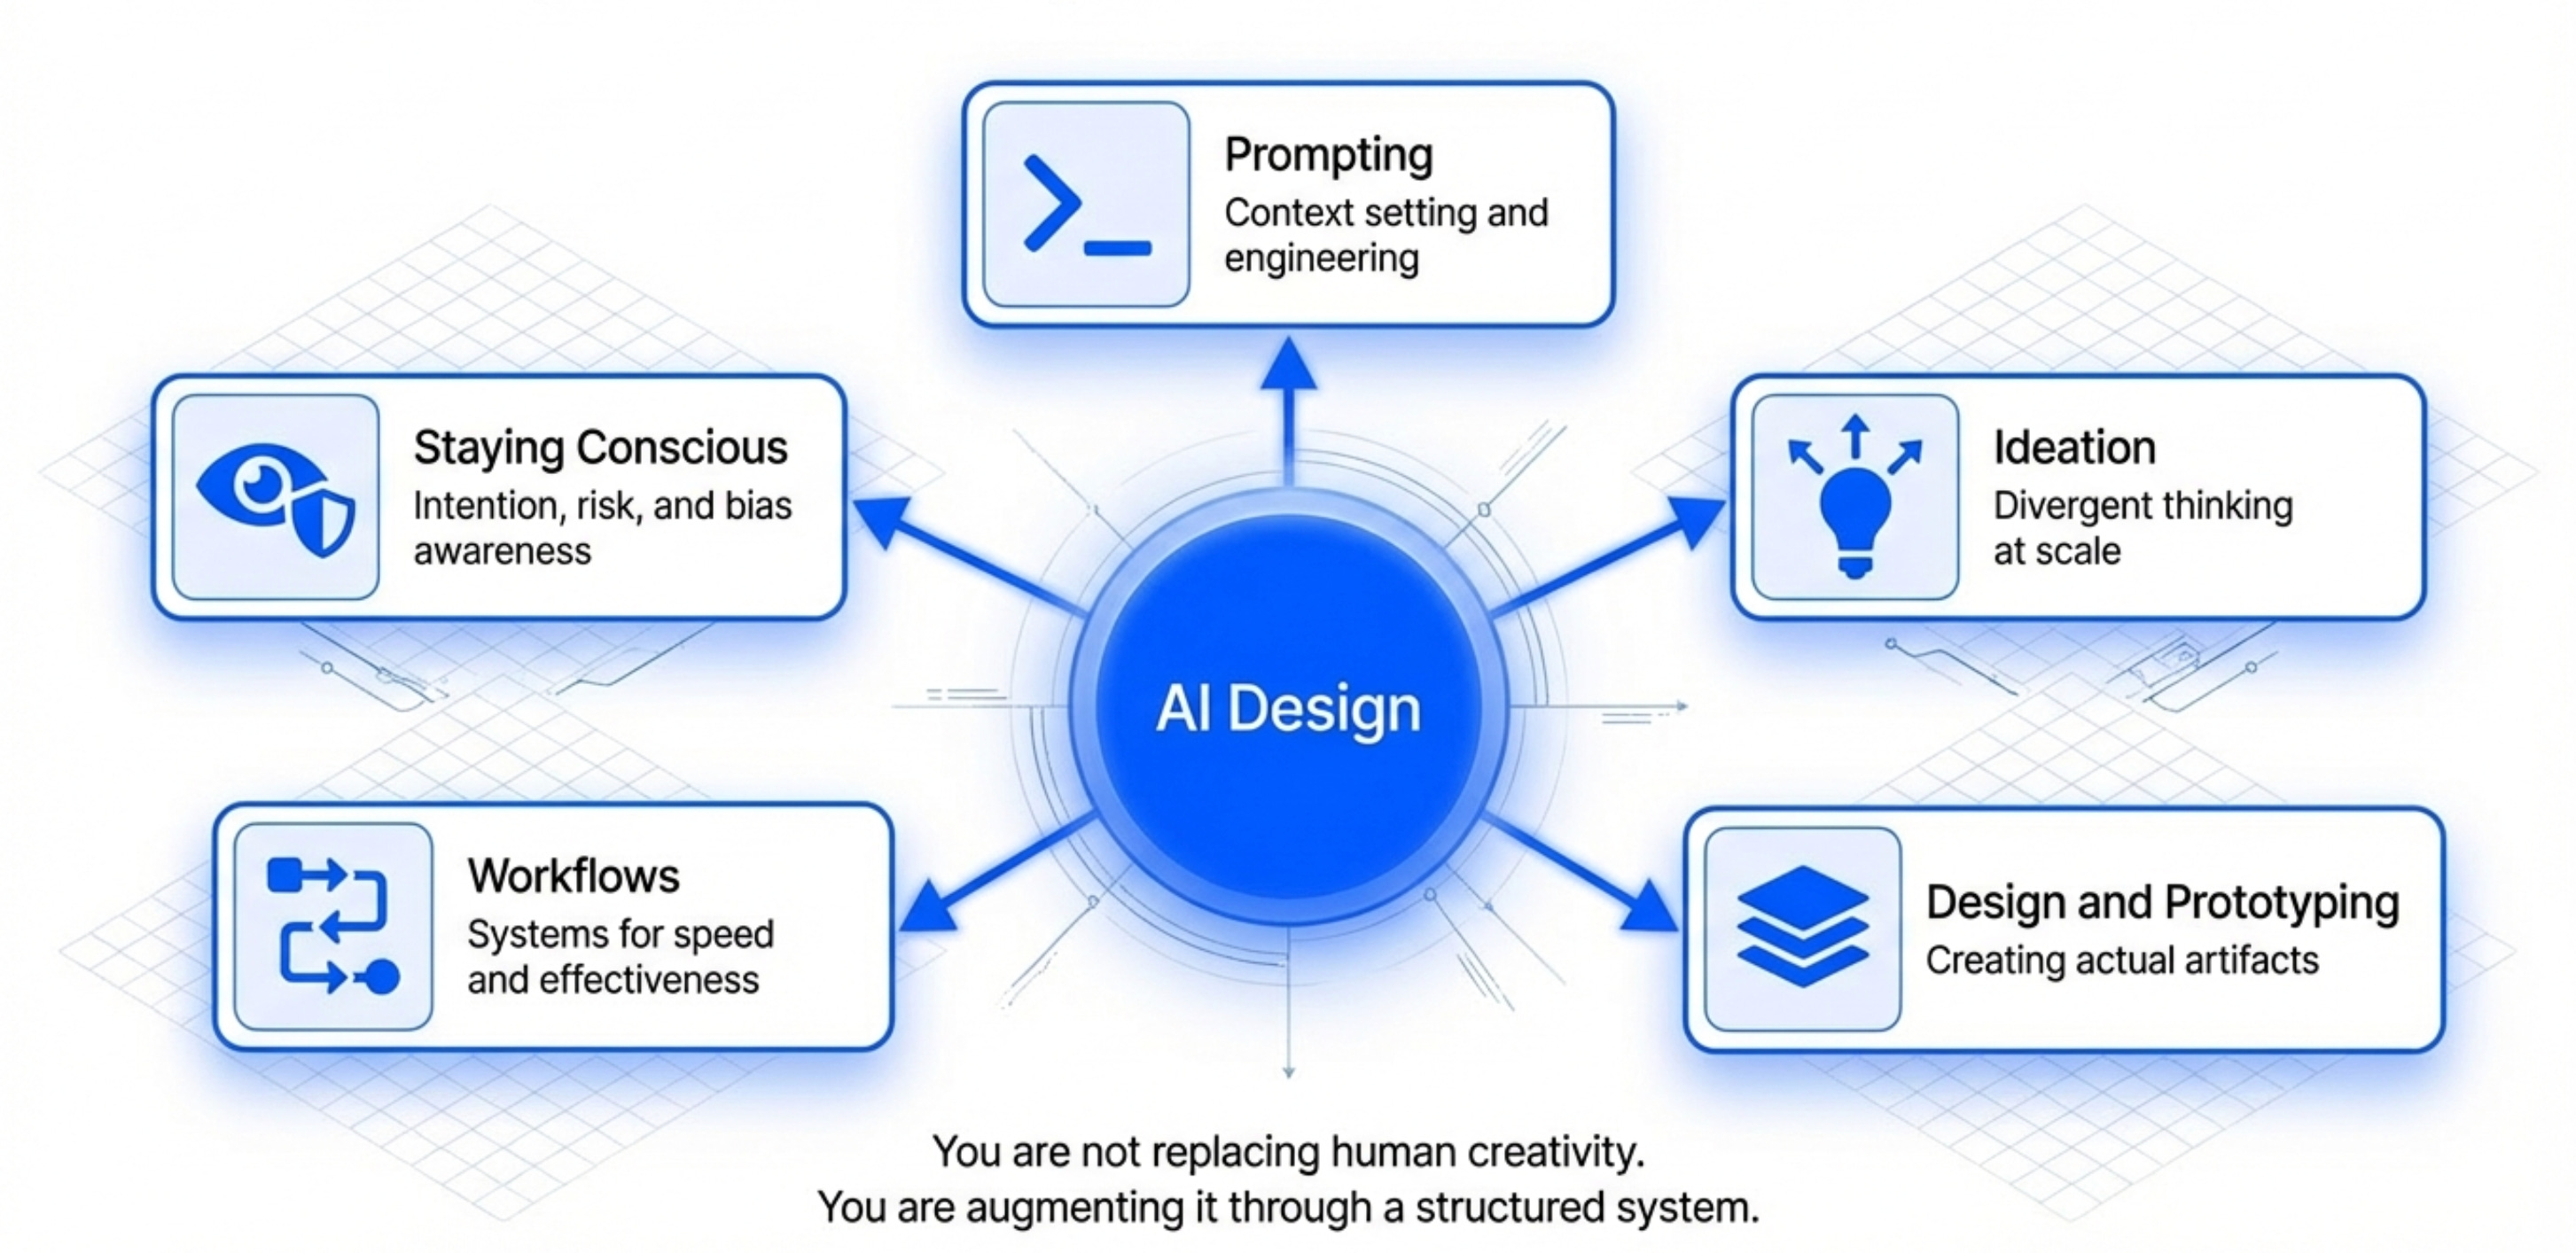
Xinran’s mind map breaks AI design into five main areas.
Category 1 - Prompting
How to prompt better to get better results. This includes prompt engineering, context setting, and iteration techniques.
Most people stop here. Prompting is just the starting point.
Category 2 - Ideation
Using AI as an assistant to generate ideas that humans find hard to think about. This is about divergent thinking at scale.
Category 3 - Design and Prototyping
Using AI tools to actually create designs and prototypes.
We’ll go deep on this with live demos in sections 2 and 3.
Category 4 - Workflows
The systems and processes for how you actually work with AI design tools day-to-day. This is about becoming fast and effective.
Xinran has workflows for different scenarios - quick prototypes, high-fidelity designs, full-stack experiences.
Category 5 - Staying Conscious
The part fewer people talk about. How to bring intention and thoughtfulness to AI design. This includes awareness of risks, biases, and unintended consequences.
You can’t just prompt and ship. You need to think about what you’re building and who it impacts.
Why Designing with AI Matters for PMs
The role of PM, designer, and engineer are merging.
You don’t need to become a professional designer. But you do need to understand design workflows.
With AI tools, the barrier to creating good designs dropped dramatically. A PM can now prototype experiences that used to require a designer and weeks of time.
Only if you understand the full system, not just prompting.
2. Generating Divergent Design Ideas with Google Stitch
The first workflow uses Google Stitch for rapid design exploration.
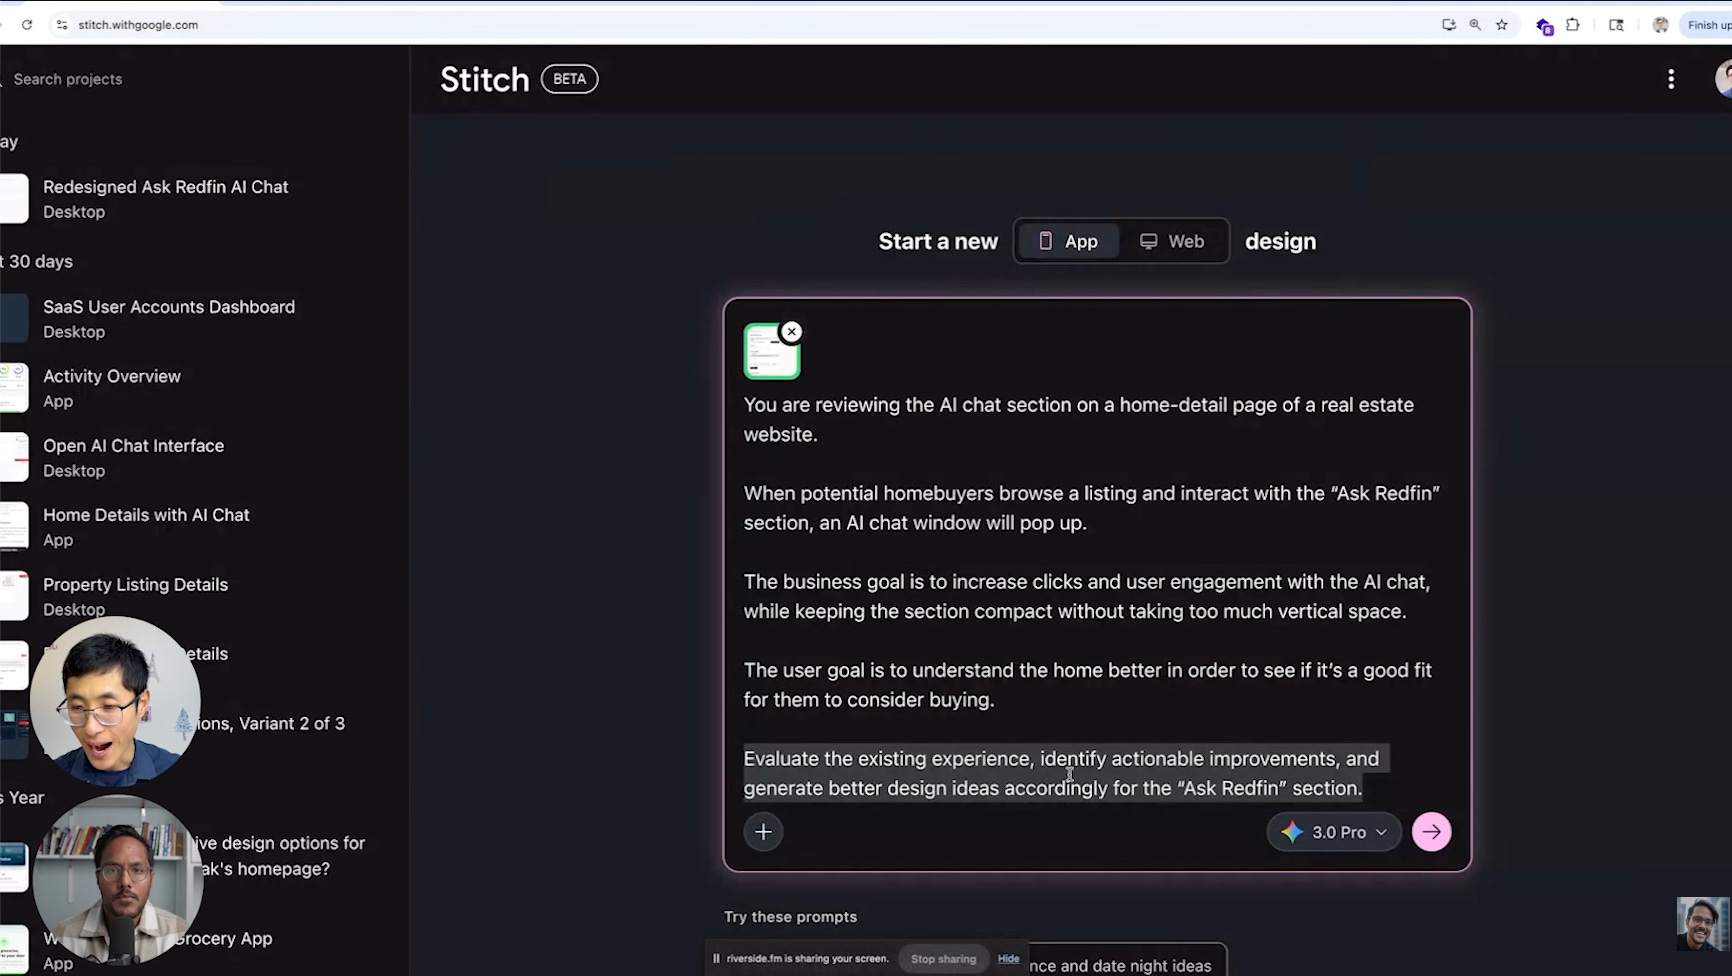
In the demo, Xinran took a screenshot of Redfin’s “Ask Redfin” AI chat section on a home detail page.
The challenge: given this existing experience, what are the other design variants we could explore?
This is different from starting with a blank canvas. You have an existing design. You want to see what else is possible.
Step 1 - Provide Context and a Visual Reference
In Stitch, paste a screenshot of the existing design.
Then add a prompt with three parts: the context (what the section does and who uses it), the business goal, and your ask.
Xinran’s prompt:
Step 2 - Generate Initial Variations
Stitch generates two or three design variants by default.
Each one takes a different approach to layout, spacing, and information hierarchy while keeping the core functionality.
Review them. See which direction has potential.
Step 3 - Go YOLO for Divergent Exploration
This is where Stitch gets interesting. There’s a creative range slider that goes from refined to YOLO. Set it to YOLO.
Specify what you want to vary: layout, color schemes, text content. Set the output to three or four variants. Hit generate.
The results go wide.
Some will look nothing like the original. Some will break conventions you assumed were fixed. That’s the point. You’re using AI to explore directions you wouldn’t have reached on your own in a 30-minute brainstorm.
Step 4 - Export to Google AI Studio
Pick the variant with the most potential. Export it directly to Google AI Studio.
AI Studio receives the design as an HTML reference file with a prompt. From here, you can turn the static design into an interactive prototype.
You can add system instructions for style consistency.
You can use the annotate feature to add comments and request specific changes, similar to how you’d collaborate in Figma.
One tip: if you selected multiple screens in Stitch before exporting, you get a multi-screen prototype in AI Studio rather than a single page.
3. From Idea to Prototype
The second workflow is more ambitious. We’re going from a blank idea to a fully functional prototype you can click through and test with users.
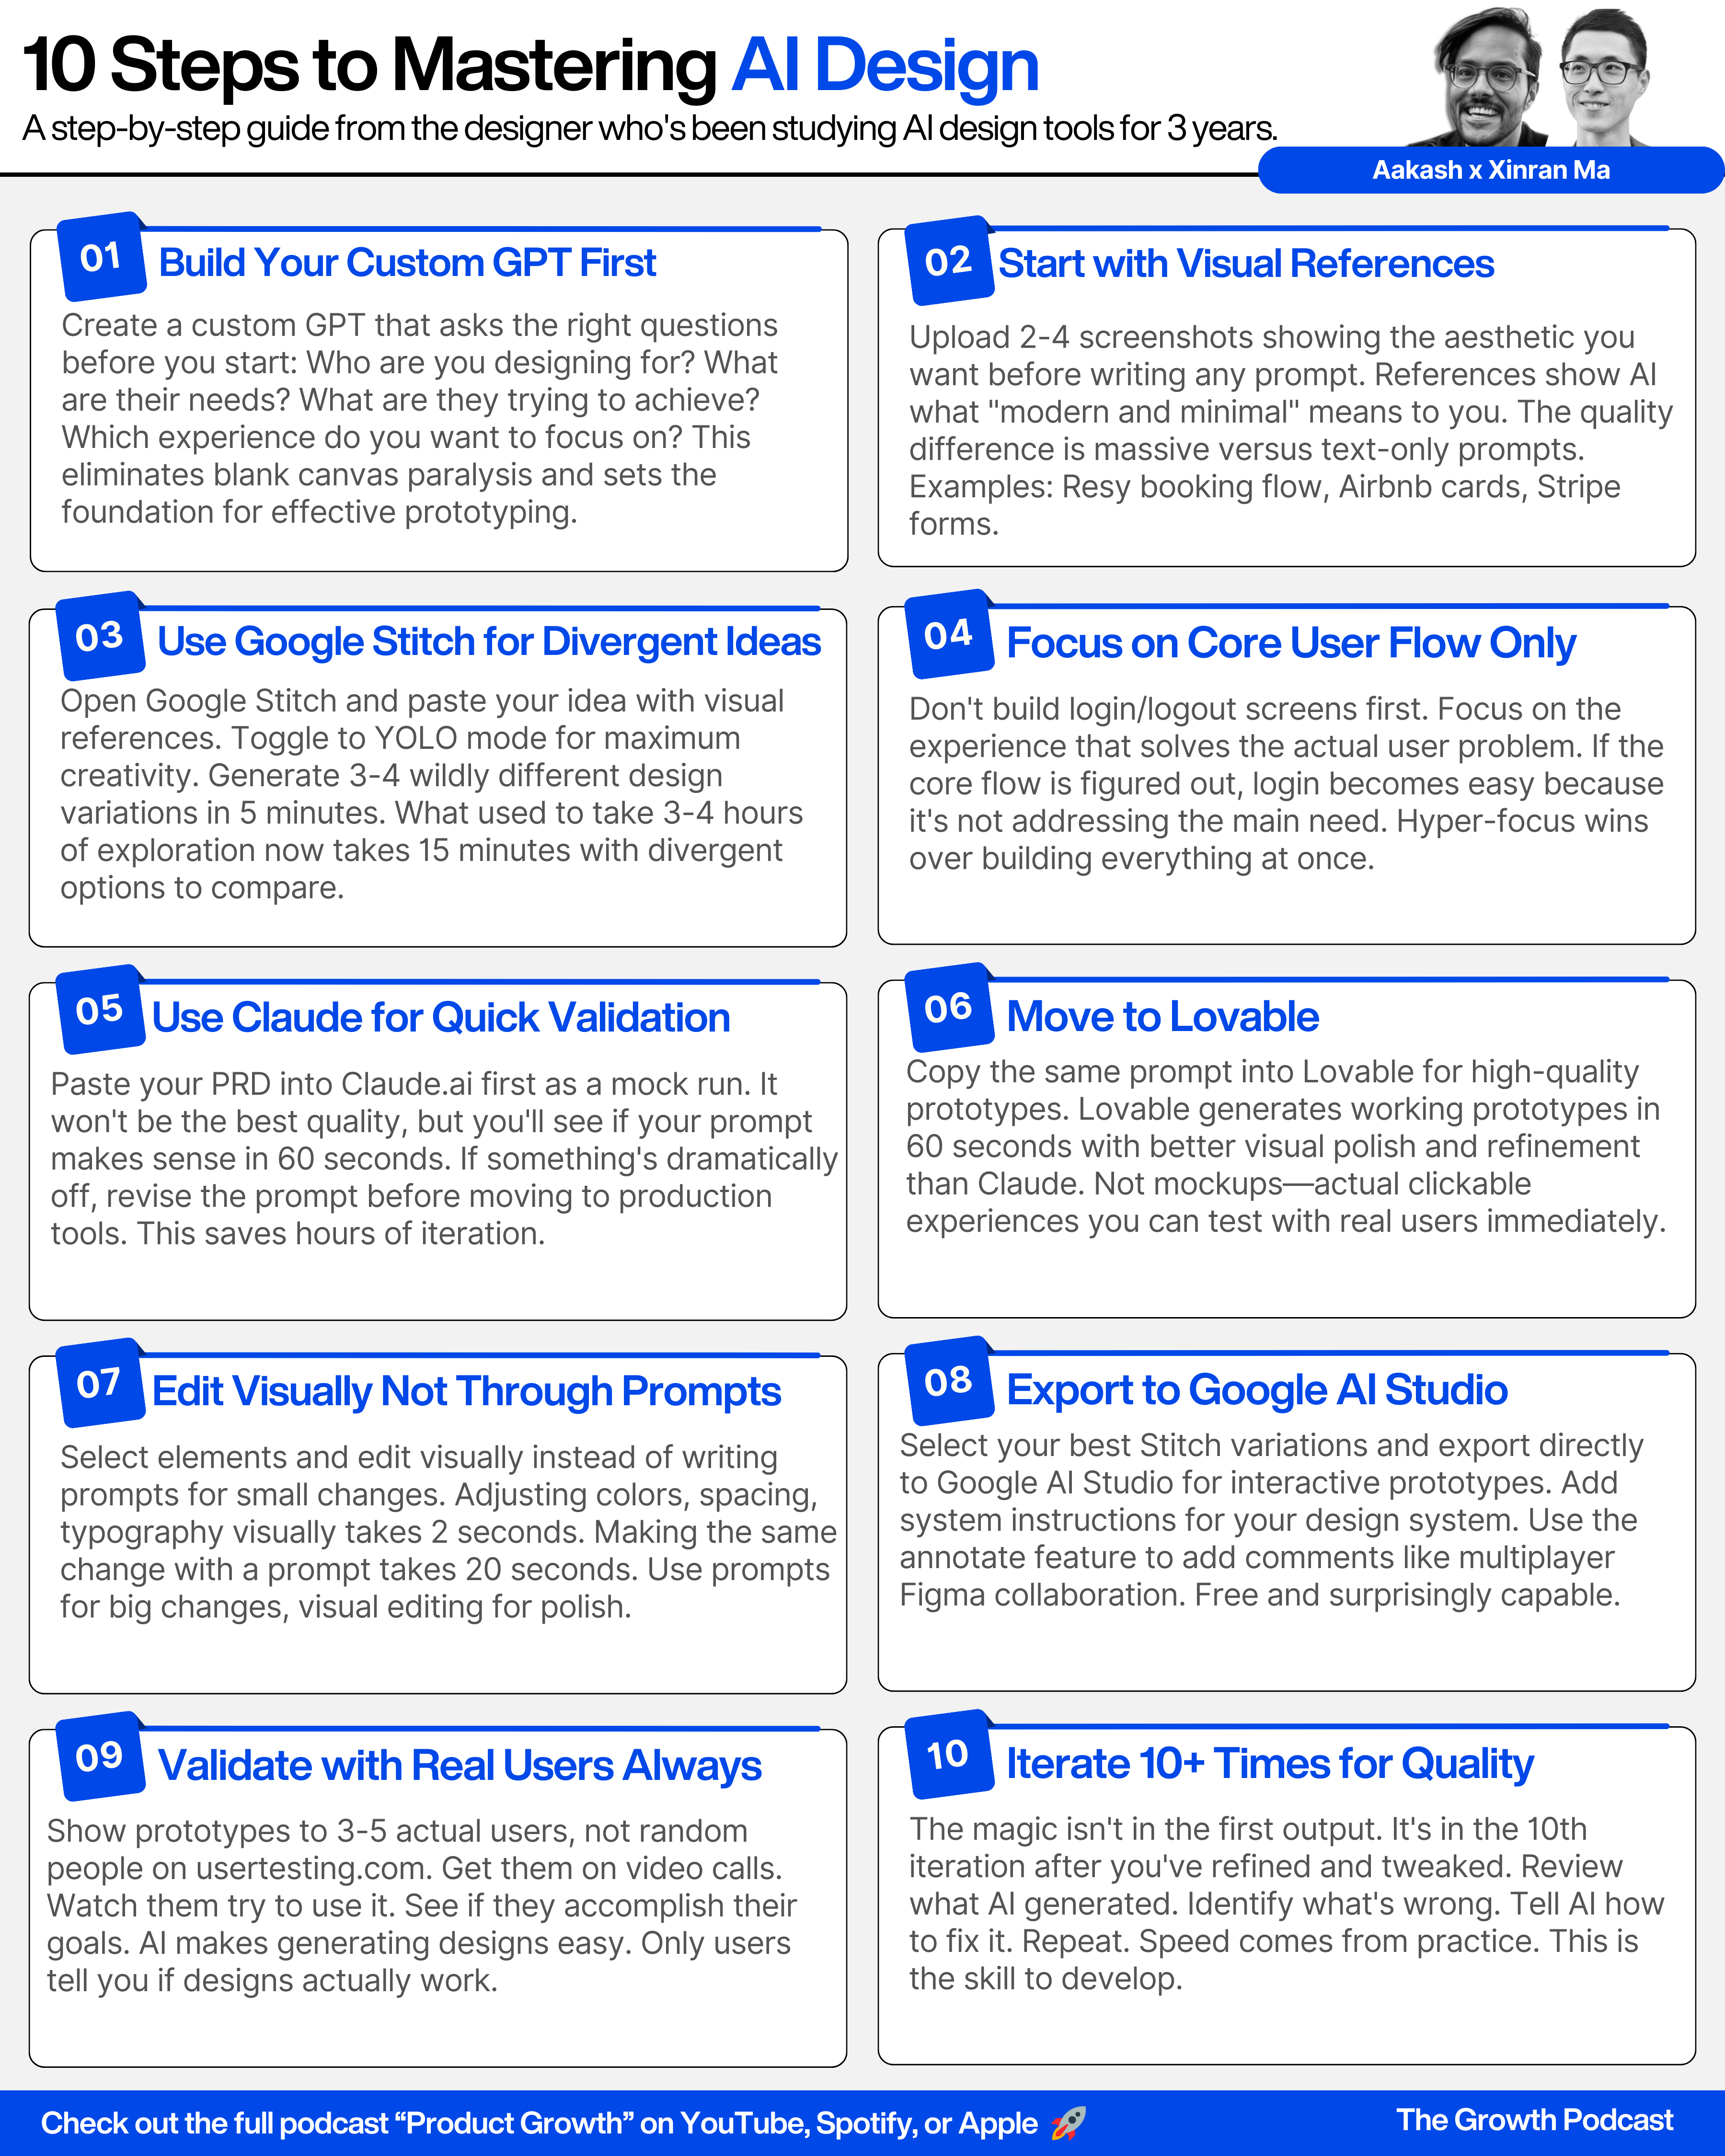
The trick is you don’t start in Lovable. You start in a custom GPT.
Step 1 - Use a Custom GPT to Get Clarity
Xinran built a custom GPT that asks you a sequence of focused questions before generating any design spec.
The questions force you to define three things: who you’re designing for, what their core need is, and which specific experience to build first.
In the demo, it looked like this.
The GPT asked: What is the main goal of your product? He typed “help users track expenses.”
It asked: Who are the intended users? He typed “freelancers.”
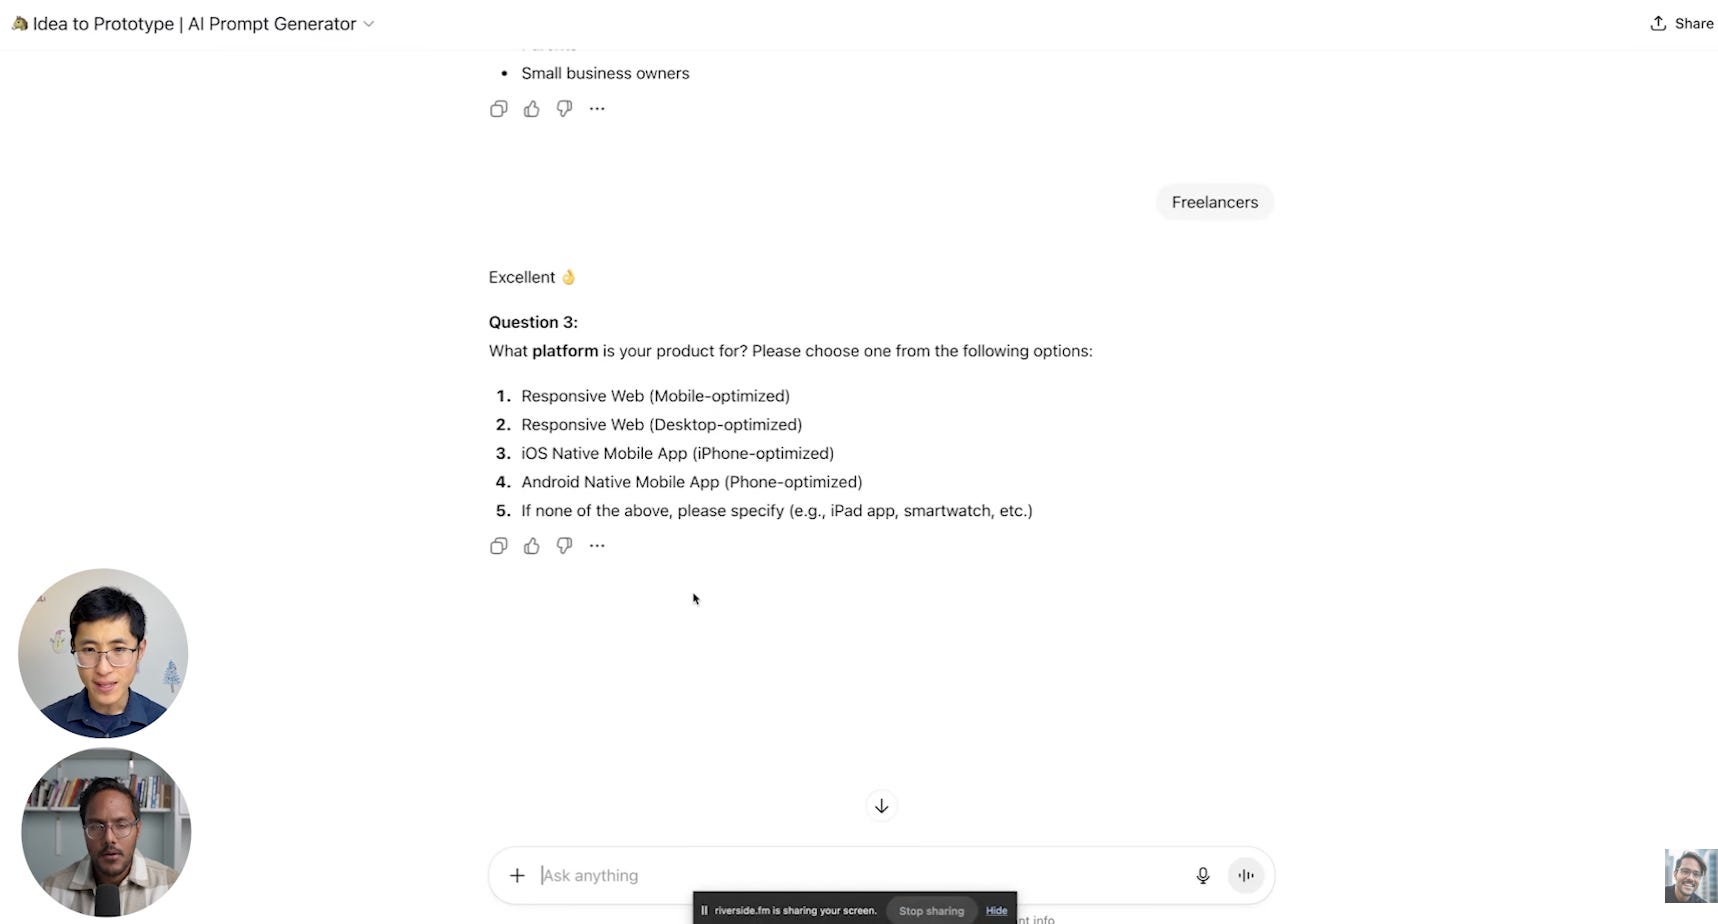
It asked: What platform? He selected “responsive web.”
Then it generated the key user flows to choose from.
One detail worth stealing: his custom GPT is programmed to never suggest login or signup as a key user flow.
His reasoning is that login doesn’t solve the core user problem. It’s standard everywhere. If you figure out the core flow first, auth becomes trivial to add later.
Most generic ChatGPT prompts will recommend sign-up as step one. His GPT skips it entirely.
The GPT then generates a lightweight spec in markdown format.
Not a full PRD. Just enough to define the front-end screens, components, and interactions.
No backend logic. No success metrics. No user personas. Just what the prototype needs to render.
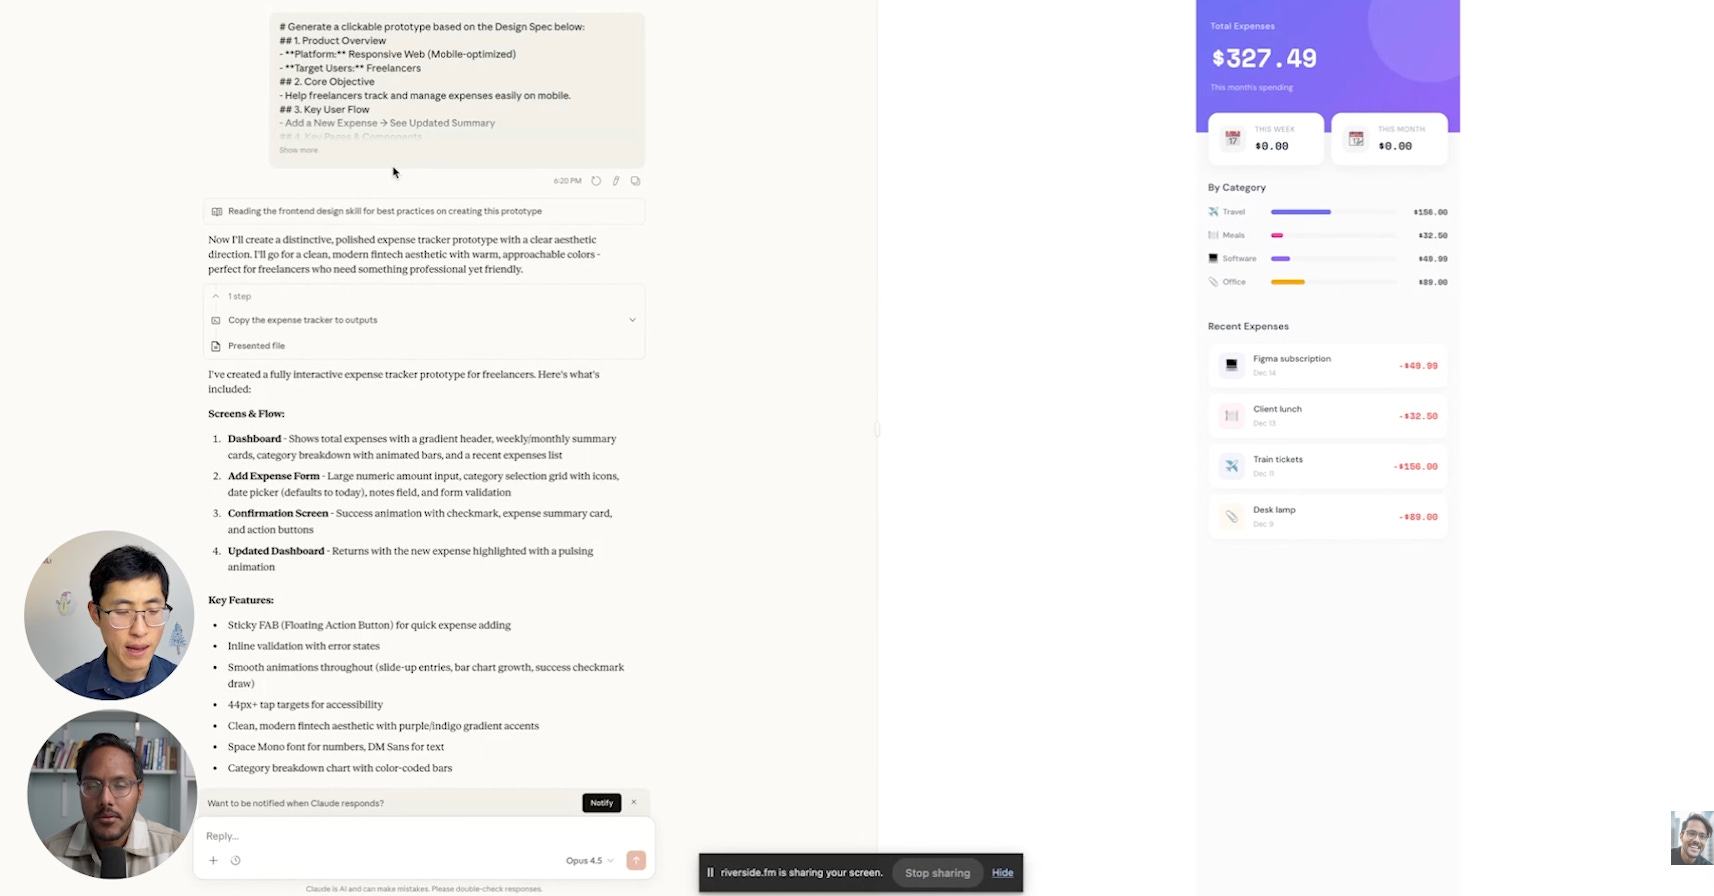
Step 2 - Run a Mock Check in Claude
Before pasting into Lovable, Xinran pastes the spec into Claude as a sanity check. He doesn’t expect great design from Claude.
He uses it as a quick visual preview to see if the prompt produces roughly the right screens and flows.
If something looks dramatically off in Claude’s output, the problem is the spec, not the tool. He goes back and revises before spending Lovable credits.
And yes, he uses ChatGPT for the prompt and Claude for the mock run specifically to save Claude tokens.
His words:
I like to shift it to ChatGPT in order to save tokens for Claude.
Step 3 - Paste Into Lovable for the Real Prototype
Copy the same markdown spec into Lovable. Lovable reads it and generates a working prototype in about 60 seconds.
For the expense tracker demo, it created the add expense screen, the summary view, confirmation states, and navigation between them.
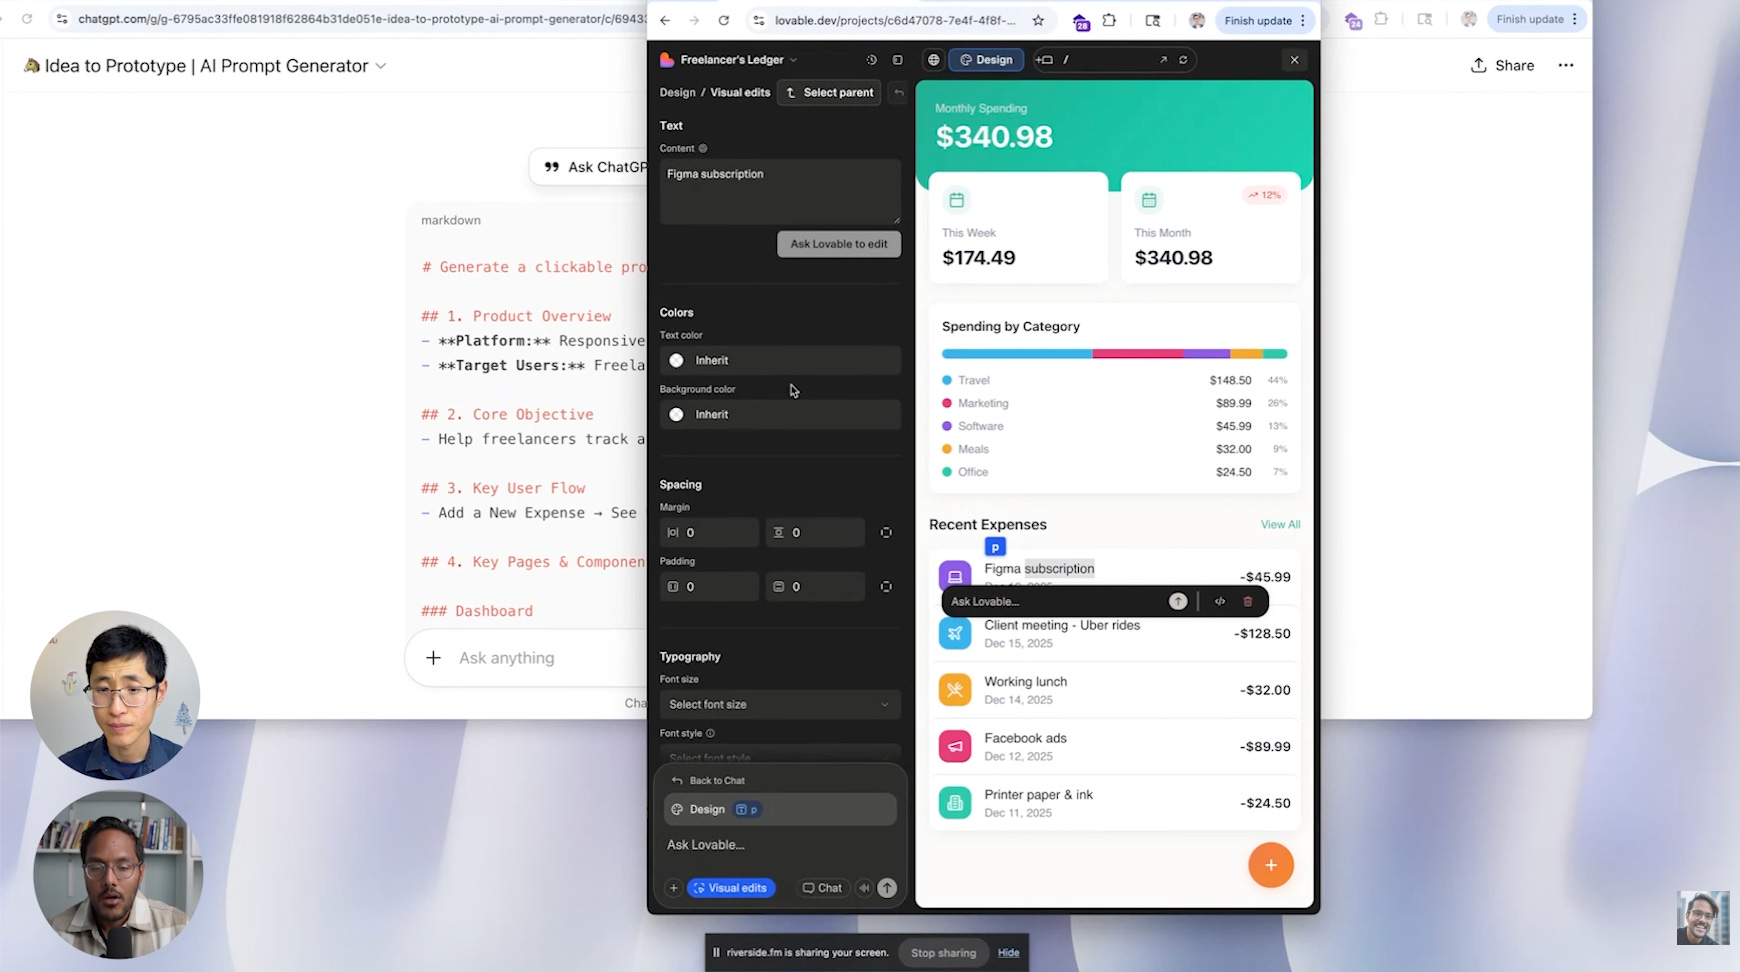
Compared to Claude’s output, the Lovable version had refined spacing, proper dropdown components, arrow states, and a confirmation page that actually looked finished.
You now have a clickable prototype. You can tap through the flow. You can see how it feels.
Step 4 - Iterate on What You See
The first version won’t be perfect. That’s expected.
Now you refine. You iterate.
Look at what Lovable generated. What’s wrong? What’s missing?
In the demo, the expense tracker had the right screens but needed refinement.
You tell Lovable what to change in plain language. Each iteration takes 20-30 seconds.
Five to ten iterations gets you to something polished enough to share with stakeholders or test with users
Step 5 - Add Interactivity and Logic
Here’s where it gets powerful. You can add real logic to your prototype.
Want the expense categories to auto-suggest based on past entries? Tell Lovable.
Want the summary view to update totals in real time as you add expenses? Tell Lovable.
Want to connect a bank API for transaction imports? Tell Lovable.
The tool generates working code. Each iteration makes the prototype more functional.
Step 6 - Export and Share
When you’re happy with the prototype, export it.
Lovable gives you clean React code. You can hand this to engineers. You can deploy it as a test version. You can share it with stakeholders.
Engineers don't need to start from scratch. They have working code to build on.
4. The Best Tools for Different Use Cases
Not every tool is best for every job. You need the right tool for what you’re trying to do.
Xinran uses different tools for different scenarios. Here’s his stack.
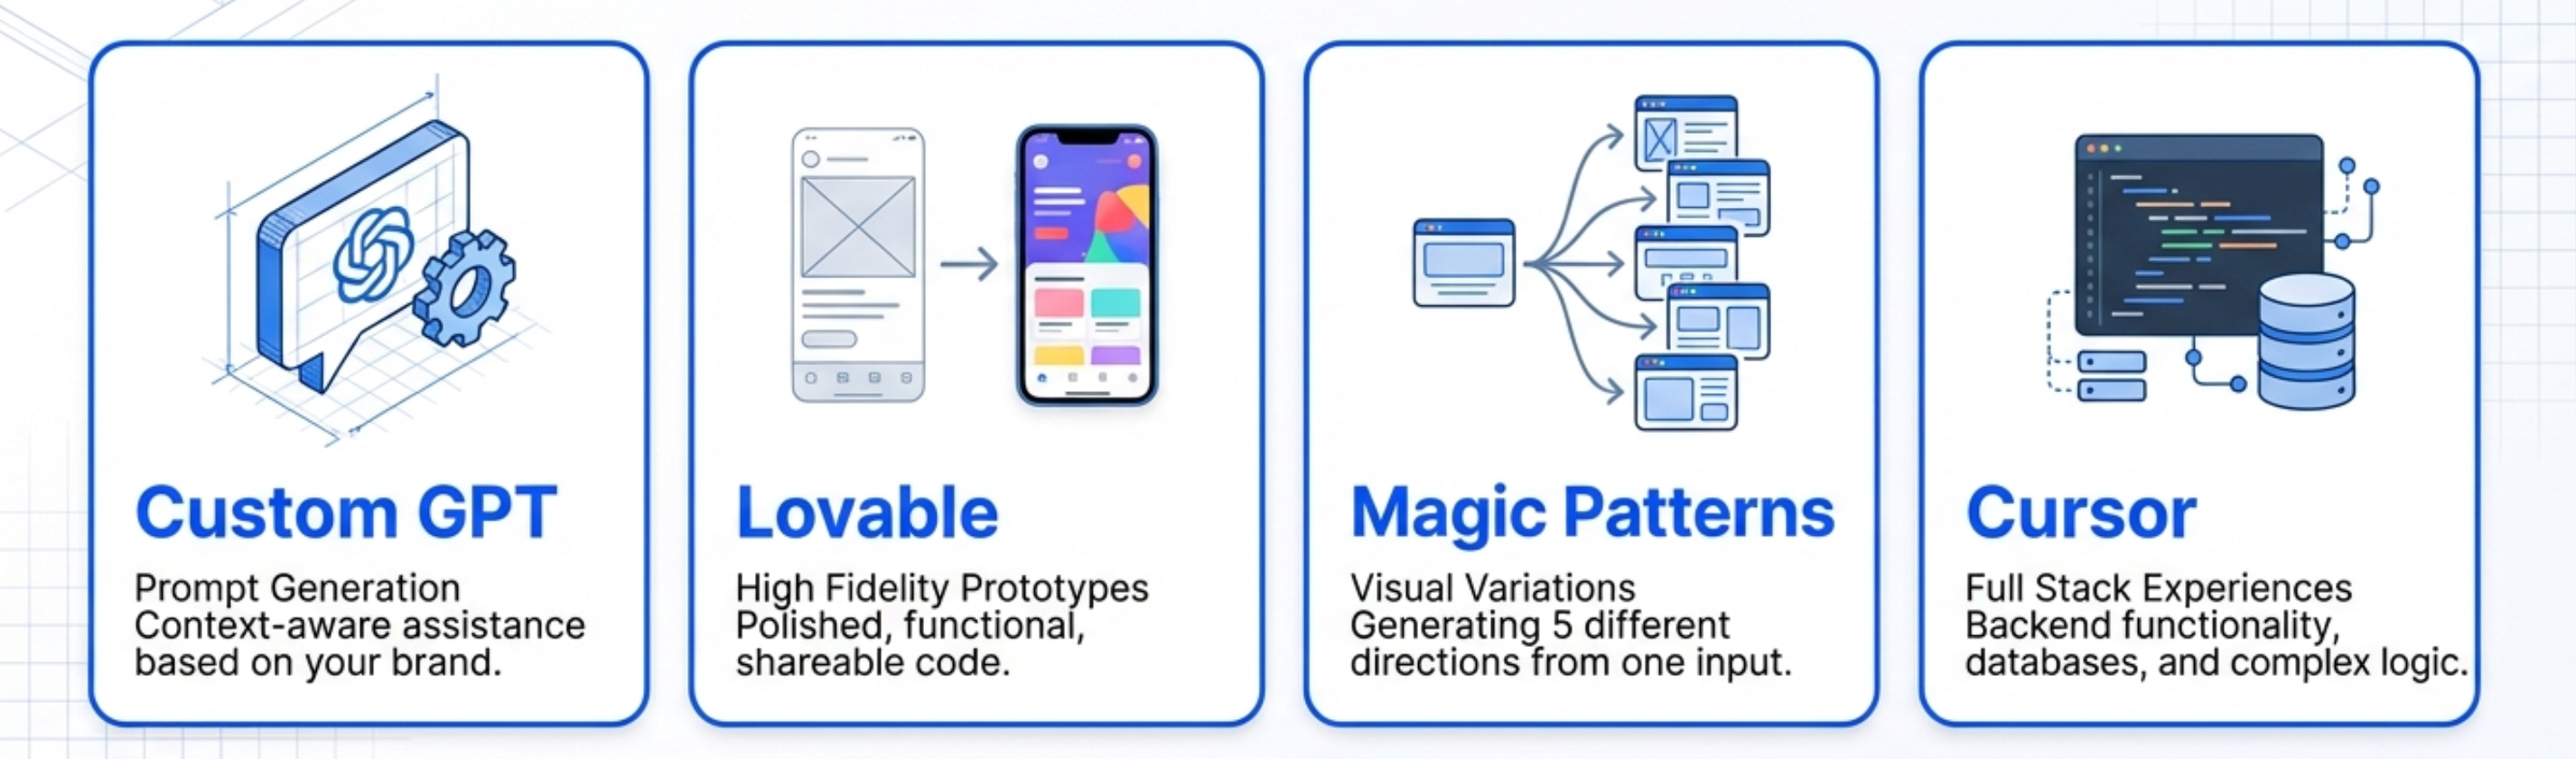
For Generating Effective Prompts - Custom GPT
The best tool for creating good prompts is a custom version of ChatGPT.
Build a custom GPT that understands your design system, your product, and your user base.
Feed it your brand guidelines, your existing designs, and examples of good outputs.
Now when you ask for design ideas, it generates suggestions that fit your context.
This is better than generic ChatGPT because it knows your specific situation.
For High-Quality Prototypes - Lovable
Lovable ranks first in Xinran’s stack for design quality.
The output is polished, the code is clean, and it ships with features like visual editing (still catching up to V0 and Figma Make, but improving fast). If price isn’t a factor, this is his pick.
For a Close Second - v0
v0 produces similar quality to Lovable with a different design aesthetic. Lovable leans glamorous and vibrant. v0 is more restrained. v0 also lets you edit code without upgrading to a paid plan, which makes it more accessible.
Personal preference decides this one.
For Design Variations - Magic Patterns
Magic Patterns (free in my bundle) excels at generating multiple design variations quickly.
Give it a single design. Ask for 5 variations. It generates 5 completely different visual directions.
This is perfect for early exploration. You want to see options. You want diversity.
Magic Patterns gives you that faster than any other tool.
For more on AI prototyping tools, check out the AI prototyping guide.
For Free Prototyping - Google AI Studio
Google AI Studio is the best free option.
You don’t need to pay extra. You get solid quality output. You can generate designs, variations, and basic prototypes.
Use this if you’re just getting started or if budget is a constraint.
The quality isn’t quite as good as Lovable. But it’s free and it’s surprisingly capable.
For Full-Stack Experiences - Cursor
Cursor is the best tool if you need backend functionality or complex interactions.
It’s more technical than the other tools. You need some development knowledge.
But if you can write basic code, Cursor is incredibly powerful. You can build complete applications with real databases, APIs, and complex logic.
Use this for serious prototypes that need to feel production-grade.
Where Claude Fits In
Xinran doesn't rank Claude against Lovable or v0.
He puts it in a different category. Claude is his mock-run tool: paste a spec in, get a fast visual check, verify the prompt makes sense before moving to a dedicated prototyping tool.
The design quality isn't as refined as Lovable or V0, but that's not the point. It's a sanity check, not the final output
5. How to Know When an AI Design is Actually Good
Generating designs is easy. Knowing if they’re good is hard.
Here’s how to evaluate AI-generated designs.
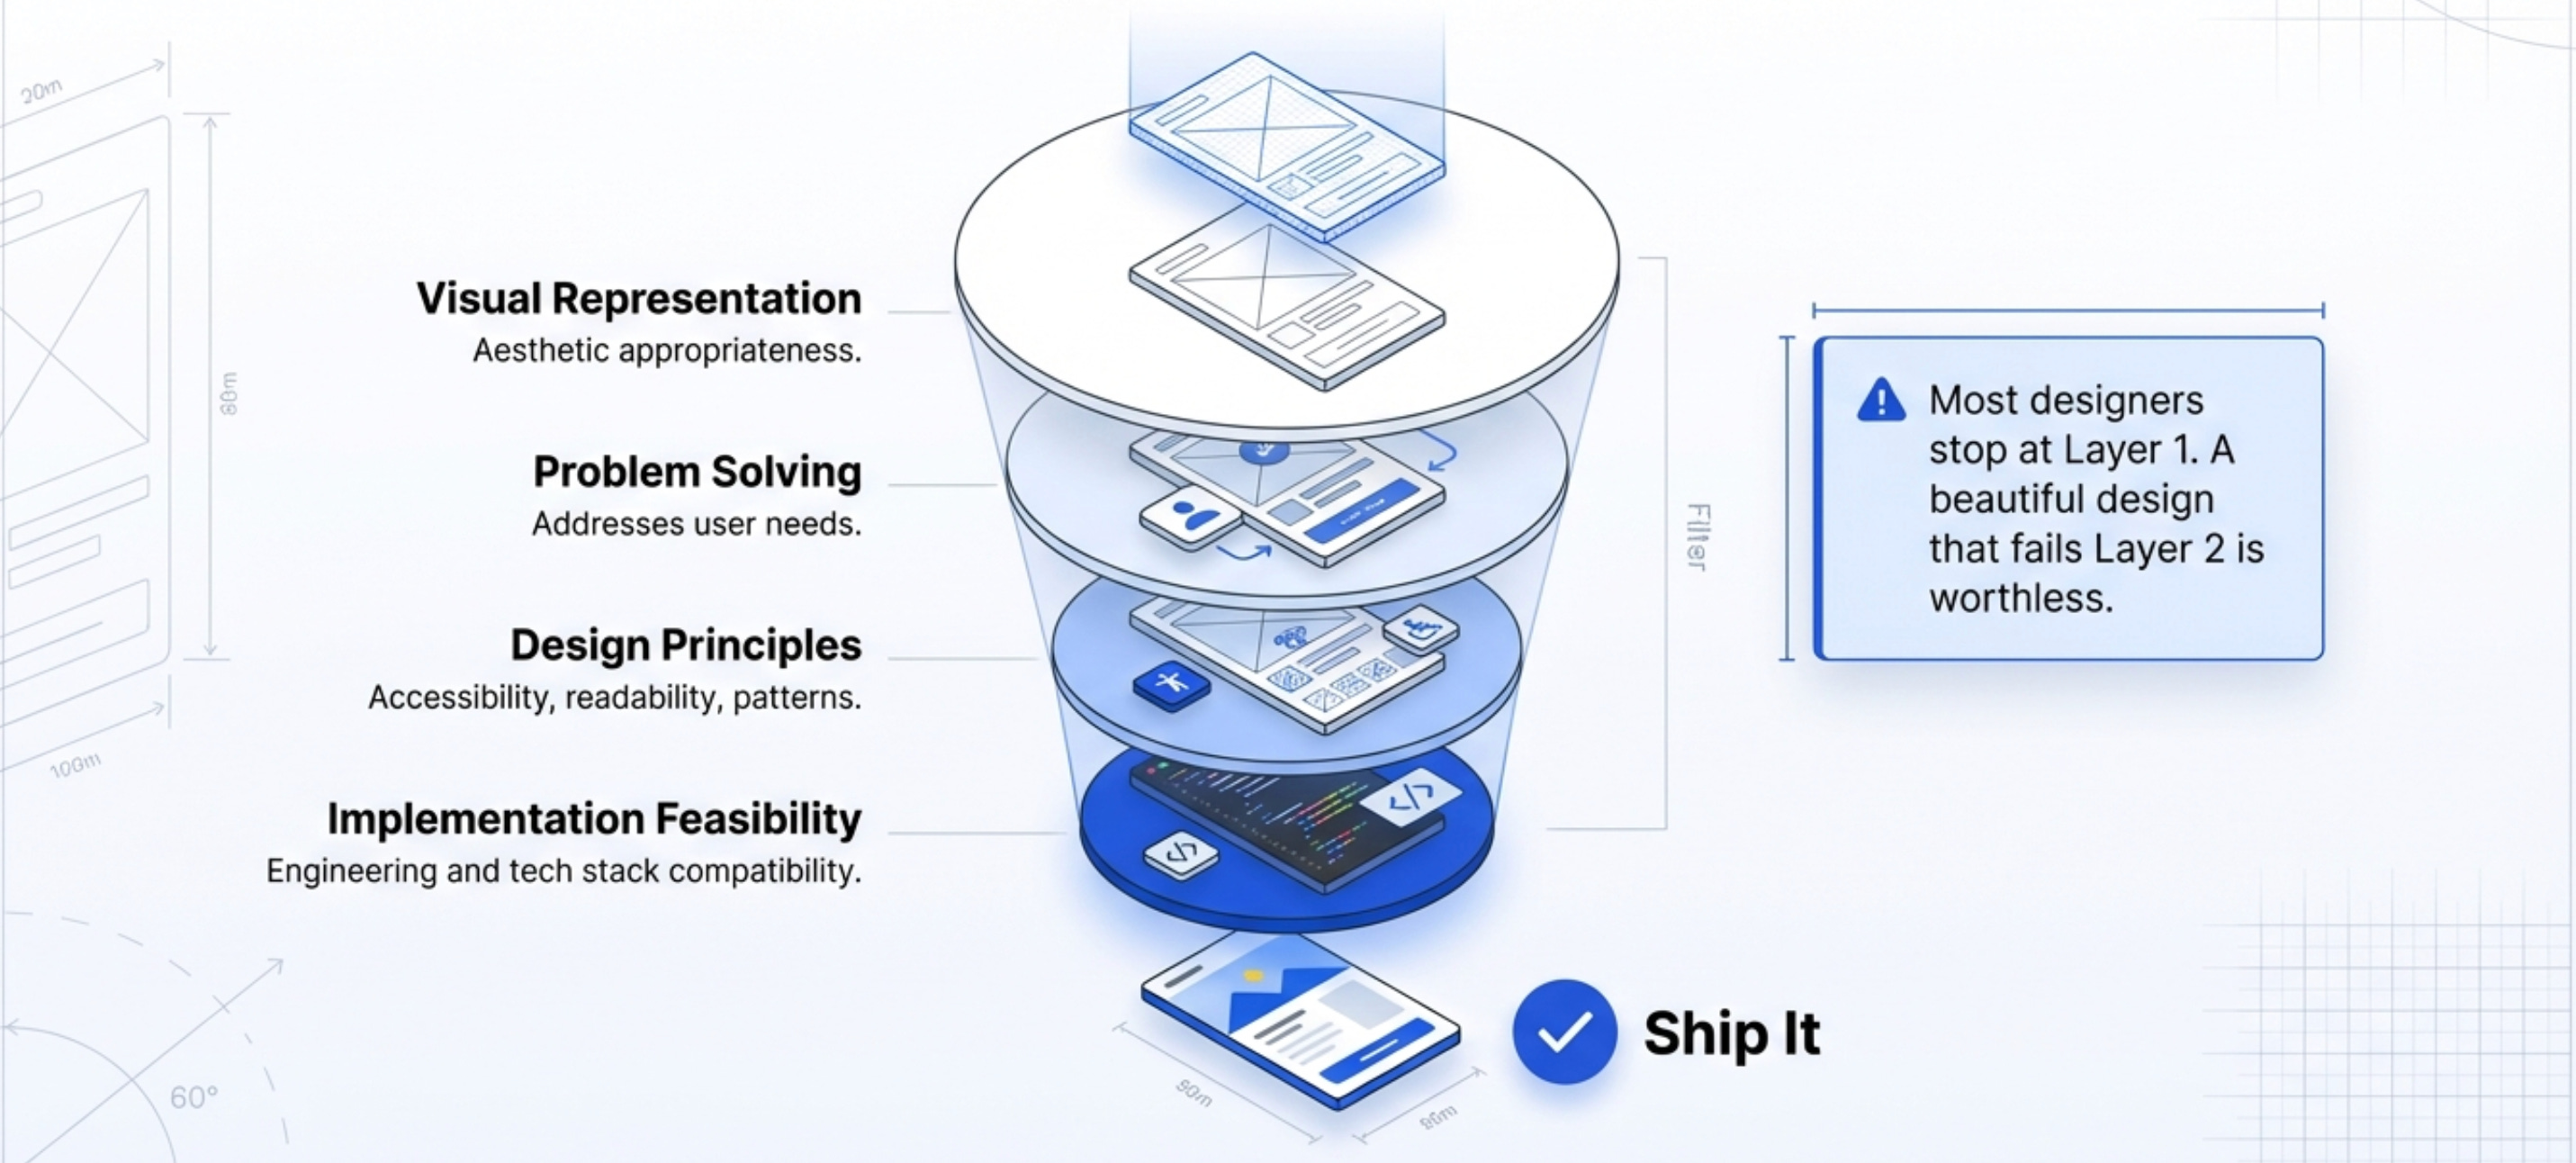
Layer 1 - Visual Representation
The first layer is what people see immediately. Does the design look good?
Is it visually pleasant? Does it resonate with users? Is the aesthetic appropriate for your brand and audience?
This is important. But it’s only part of the equation.
Many AI designs look great visually but fail at deeper levels.
Layer 2 - Problem Solving
Does the design actually solve the user problem?
Forget about AI tools for a second. Does this experience address what users need?
You need to validate with real users. Show them the design. Watch them try to use it. See if they can accomplish their goals.
AI can generate pretty designs all day. Only users can tell you if they work.
For more on AI product validation, check out how to do AI evals.
Layer 3 - Design Principles
Is the design accessible? Is it readable for different groups of people? Does it follow established interaction patterns?
These fundamentals still matter.
AI tools don’t automatically produce accessible designs. You need to check:
Color contrast ratios
Text readability
Screen reader compatibility
Keyboard navigation
Touch target sizes
Run the design through accessibility checkers. Test it with assistive technologies.

Don’t skip this. Accessibility isn’t optional.
Layer 4 - Implementation Feasibility
Can engineers actually build this? Is the design technically feasible within your constraints?
Even though AI prototyping tools generate code, that code might not match your tech stack or architecture.
Review the design with your engineering team. Make sure it’s buildable.
There’s no point creating elaborate designs that can’t ship.
Most people stop after layer 1. They see something pretty and call it done. Run all four checks before you ship anything.
6. The Skills You Need to Master AI Design
If you want to get better at designing with AI, focus on these five skills.
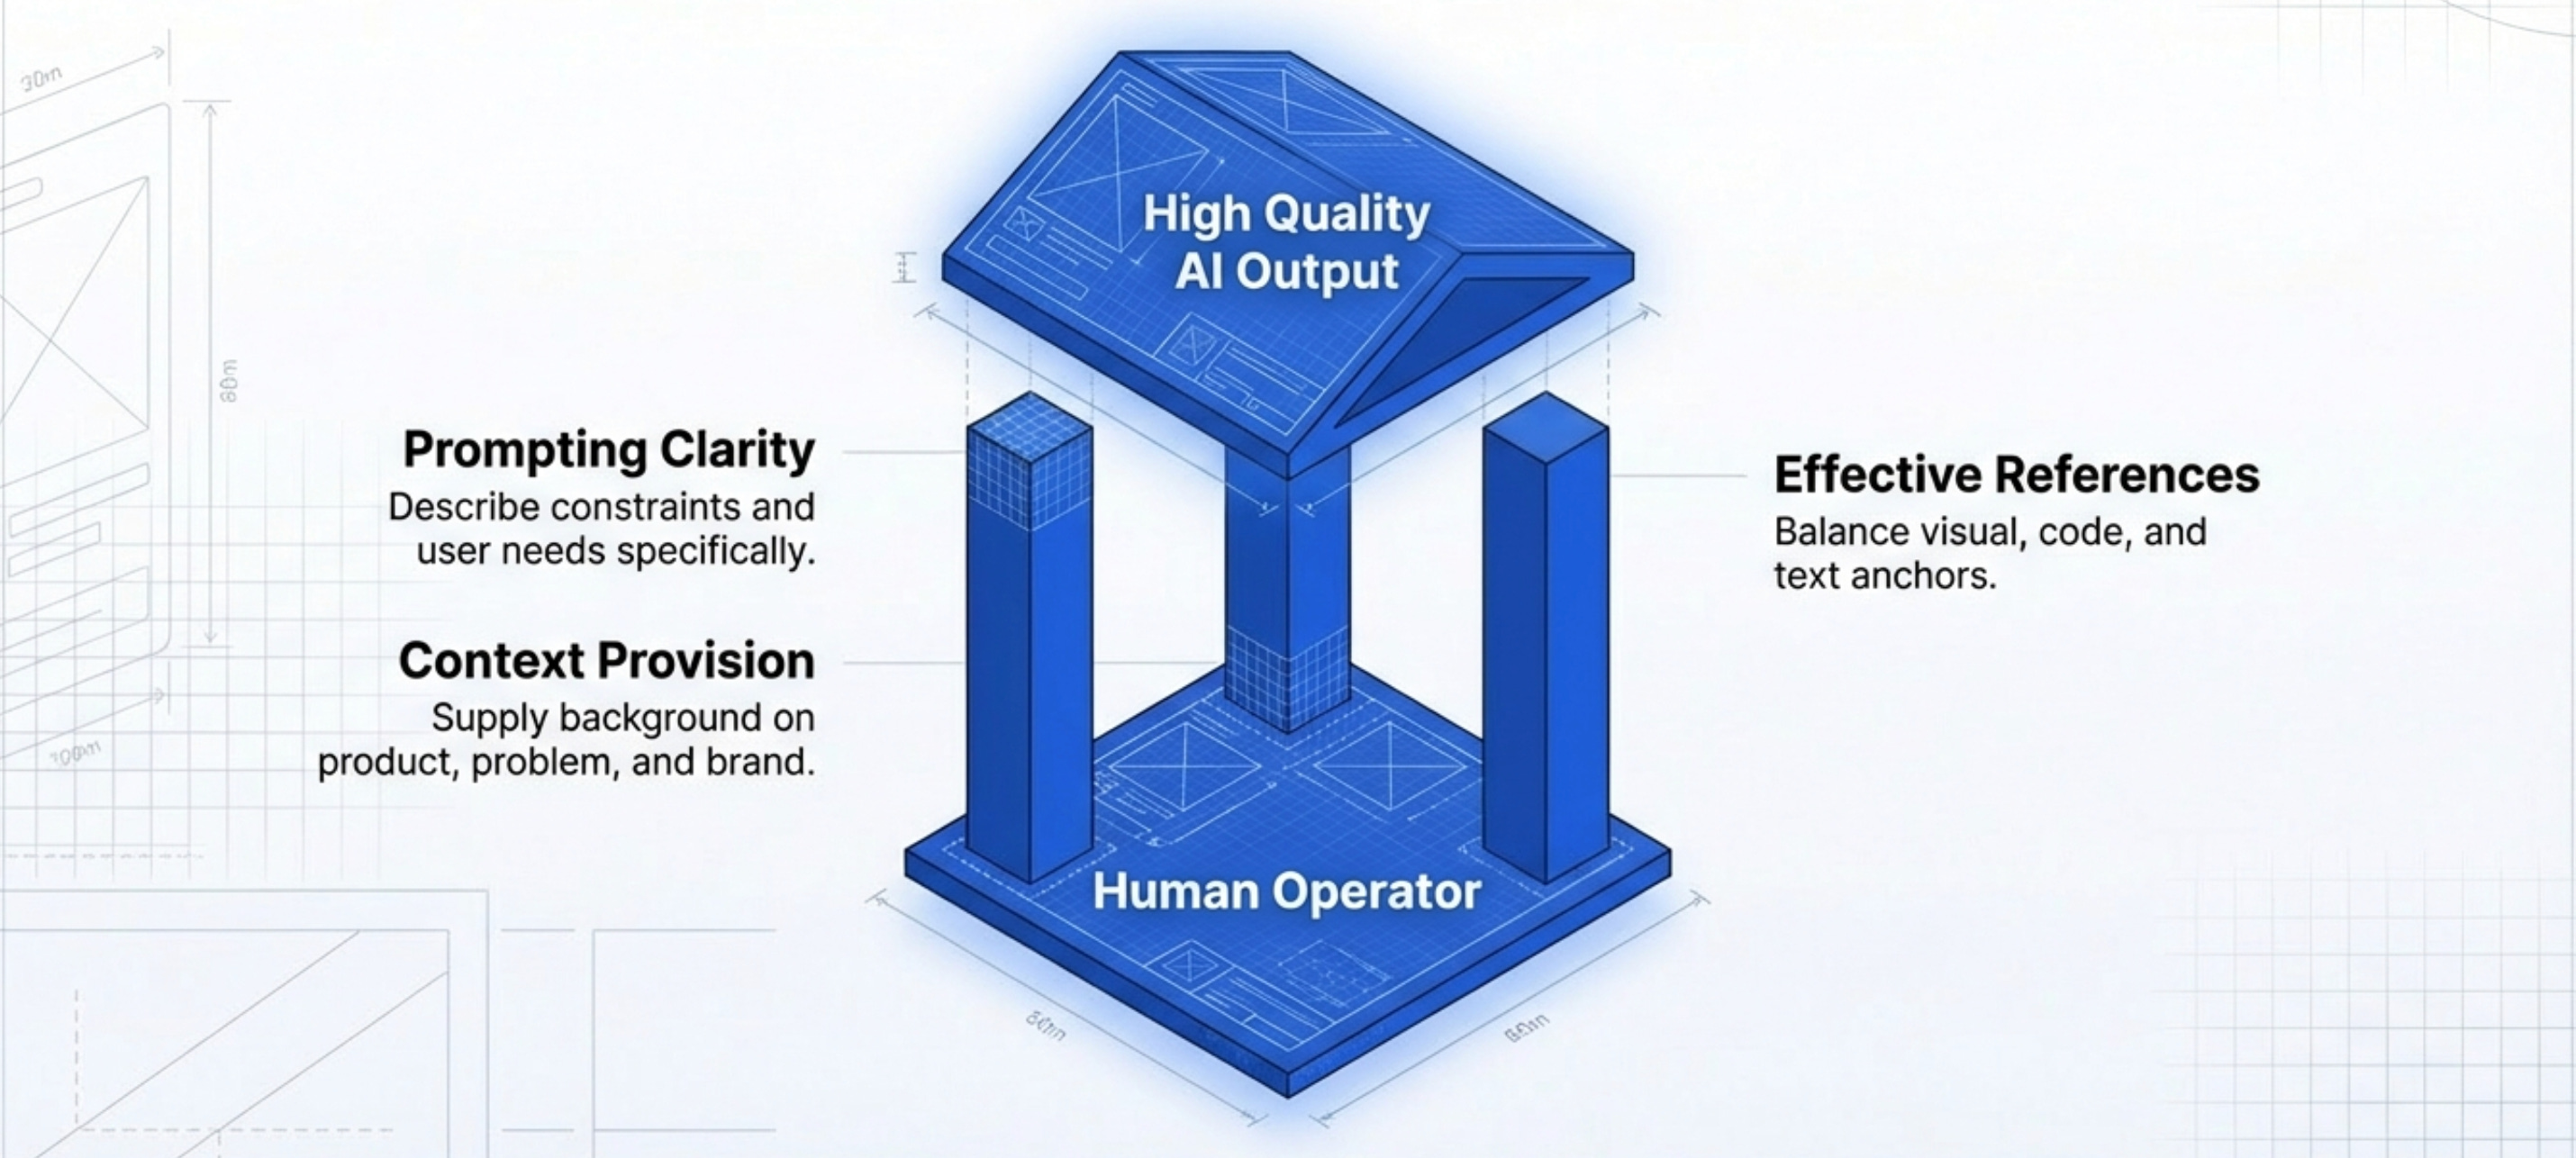
Skill 1 - Prompting with Clarity
The first skill is writing clear, specific prompts.
Good prompts are rooted in clarity about what you want to build. If you can’t clearly describe what you want, AI can’t build it.
Practice being specific. Include context. Define constraints. Describe the user and their needs.
Vague prompts get vague results. Clear prompts get clear results.
For more on prompt engineering, check out the complete guide to prompt engineering.
Skill 2 - Providing Context
Context is what separates good AI outputs from great ones.
The necessary context includes:
Who are the users?
What problem are you solving?
What constraints matter (technical, brand, accessibility)?
What’s the broader product or feature this fits into?
More context = better outputs.
Don’t just say “design a button.” Say “design a primary CTA button for a B2B SaaS onboarding flow where users need to connect their calendar. The brand is professional and trustworthy.”
That’s specific. That’s context-rich. That’s what gets you quality.
Skill 3 - Effective References
Visual references, code references, and text references all help AI understand what you want.
The key is balance. Too few references and AI has nothing to work with. Too many references and you overwhelm it.
Use 2-4 references per prompt. Make them spot-on for what you’re trying to achieve.
A screenshot of a similar UI. A link to a design system component. A snippet of code showing interaction logic.
These references anchor AI’s output to something concrete.
Skill 4 - Iteration Speed
Getting good at AI design means getting fast at iteration.
The magic isn’t in the first output. It’s in the 10th iteration after you’ve refined and tweaked.
Practice iterating quickly. Review, identify what’s wrong, tell AI how to fix it, repeat.
The faster you can iterate, the better your final output.
Speed comes from experience. The more you use these tools, the faster you get.
Skill 5 - User Empathy
This is the most important skill. If you’re empathetic toward users, you’ll go the extra mile to validate what they need.
AI tools make it easy to generate designs. But only human empathy tells you if those designs actually help users.
Talk to users. Watch them use your prototypes. Listen to their frustrations. Understand their context.
All the AI design tools in the world won’t help if you’re building the wrong thing.
This is still product work at its core. AI just makes the execution faster.
7. The Biggest Workflow Changes
Xinran’s workflow has completely transformed since AI design tools became good.
Here’s what changed and why it matters.
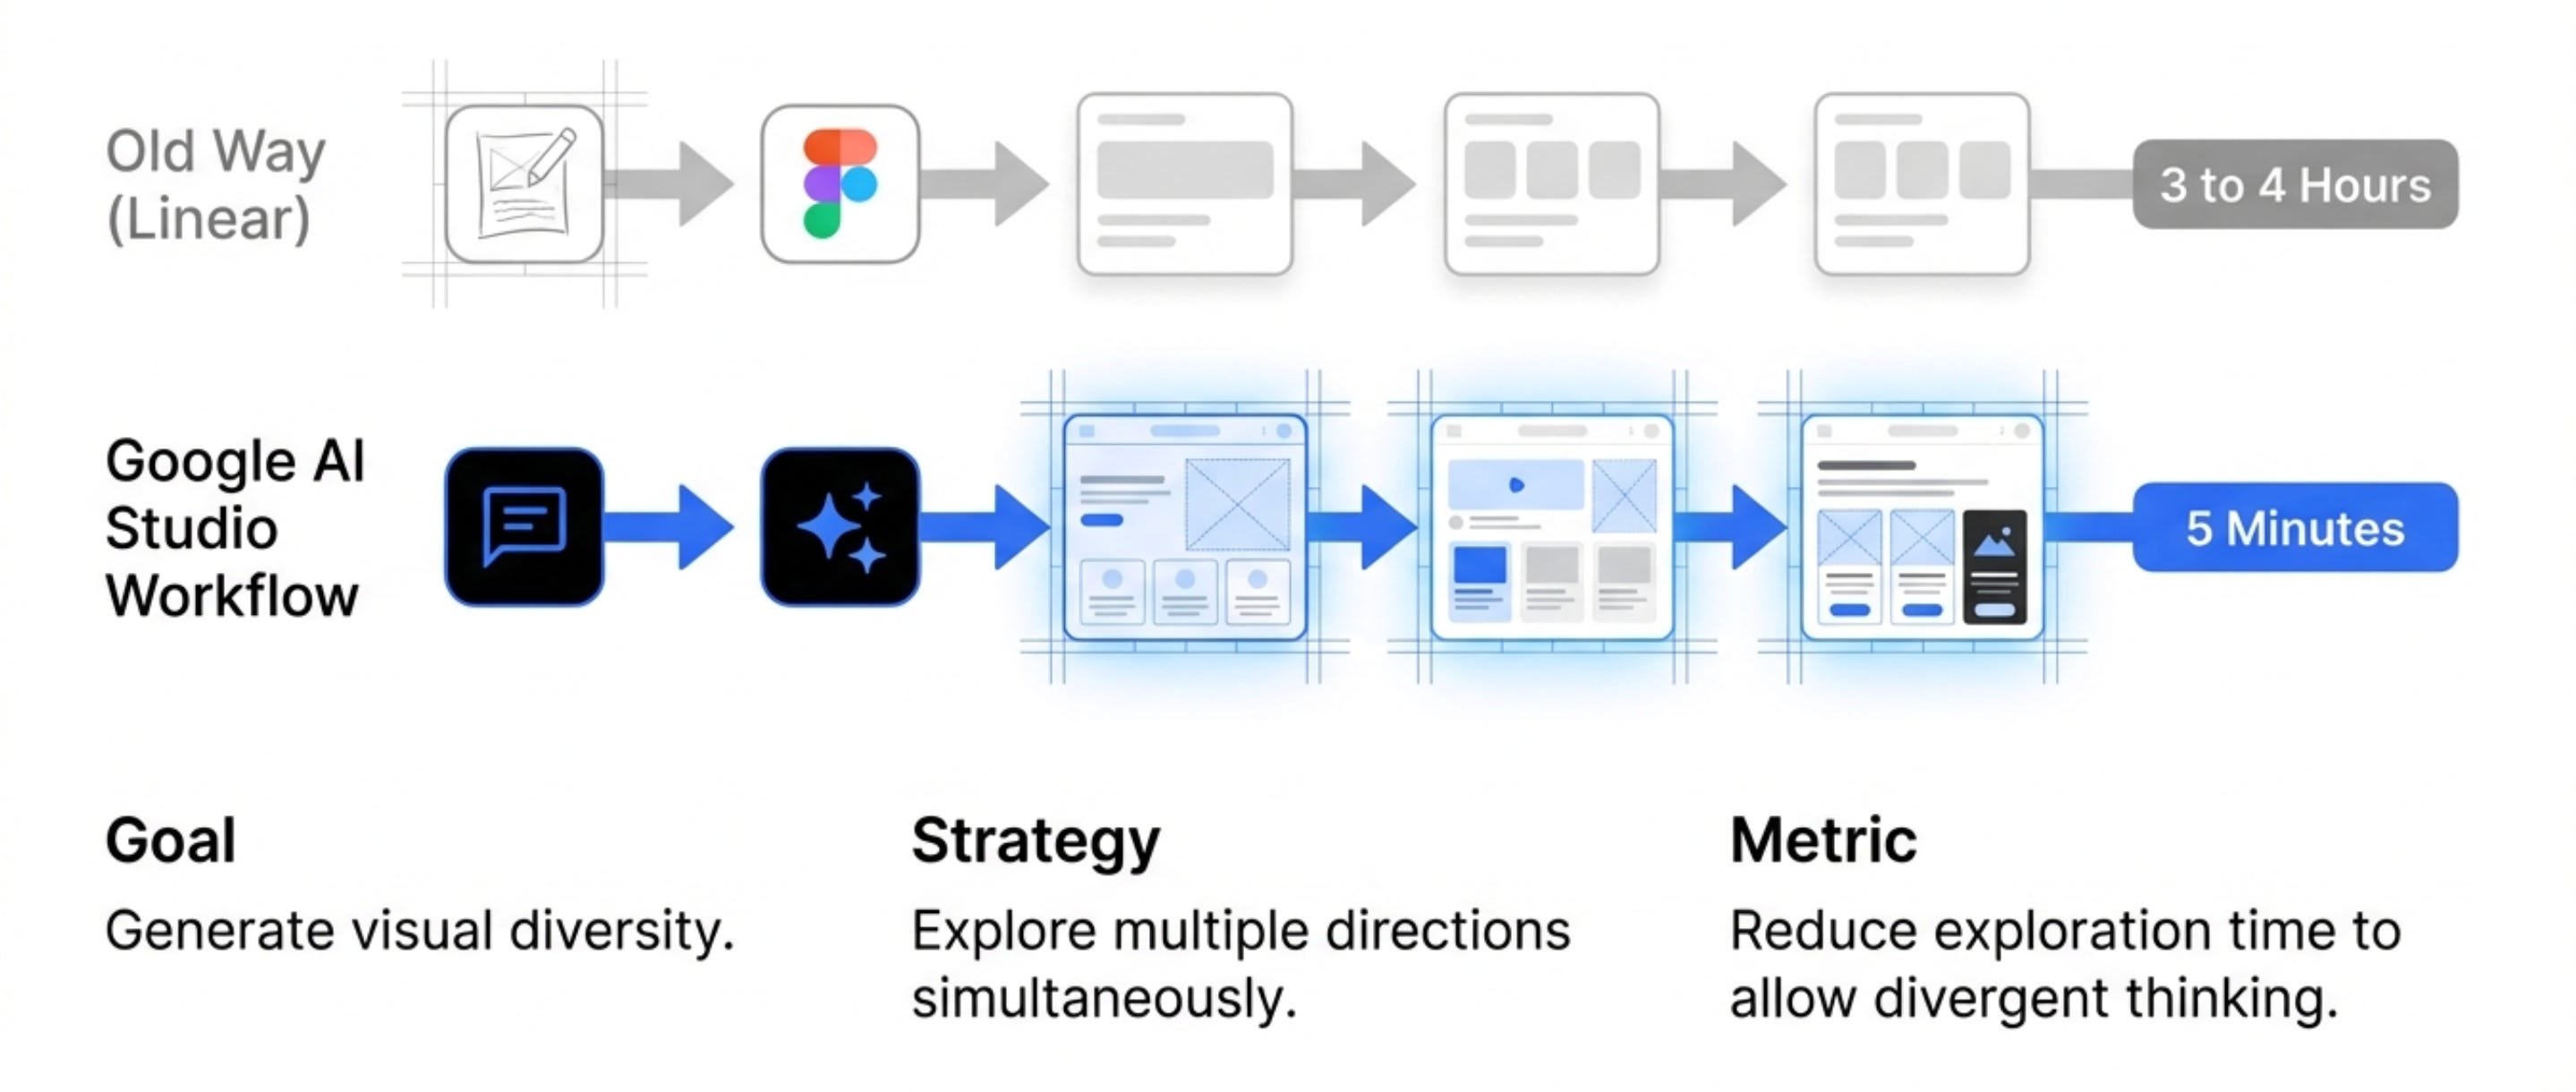
Before AI - Linear and Slow
The old workflow was linear.
You’d start with user research. Then create rough sketches. Then build wireframes. Then design high-fidelity mockups in Figma. Then connect screens together. Then create a clickable prototype.
Each step depended on the previous step. You couldn’t skip ahead. You couldn’t explore alternatives without going back to earlier stages.
This took weeks.
After AI - Parallel and Fast
The new workflow is parallel.
You can describe what you want in text. Add a visual or code reference. Generate a proof of concept in minutes.
You can explore multiple directions simultaneously. You can iterate on any part of the experience without redoing everything.
The workflow became non-linear. You can jump between ideation and prototyping freely.
This is powerful, especially in early stages.
The Alignment Advantage
Early alignment matters more than perfect details.
With AI tools, you don’t need every screen designed in Figma to convey your idea.
You can generate a rough prototype. Show it to stakeholders. Get aligned on direction.
Then go back and refine the details.
This is faster and more effective than spending days on pixel-perfect mockups only to learn stakeholders wanted something different.
The ability to get aligned quickly transforms product development.
What This Means for You
If you’re still designing the old way - linear, Figma-first, perfect pixels before validation - you’re too slow.
Adopt the new workflow:
Describe what you want to build
Generate a quick prototype with AI
Share with stakeholders and users
Iterate based on feedback
Refine the details once direction is validated
This is how top designers work now. It’s how you should work too.
Where to Find Xinran
Related Content
Newsletters:
Podcasts:
PS. Please subscribe on YouTube and follow on Apple & Spotify. It helps!