Check out the conversation on Apple, Spotify and YouTube.
 Free Download")
Brought to you by Linear: Plan and build products like the best.
Today’s Episode
My personal mission with this newsletter and podcast is to help you do less of the work you hate and more of the work you love.
That’s why I’m excited to present today’s episode.
I have on Mike Bal, Head of Product and AI at David’s Bridal, who shows you his complete AI PM operating system.
He doesn’t switch between tools all day. He’s connected them all together.
And it results in some magical workflows (with Cursor and Claude) at the center:
If you want access to my AI tool stack - Dovetail, Arize, Linear, Descript, Reforge Build, DeepSky, Relay.app, Magic Patterns, Speechify, and Mobbin - grab Aakash’s bundle.
Newsletter Deep Dive
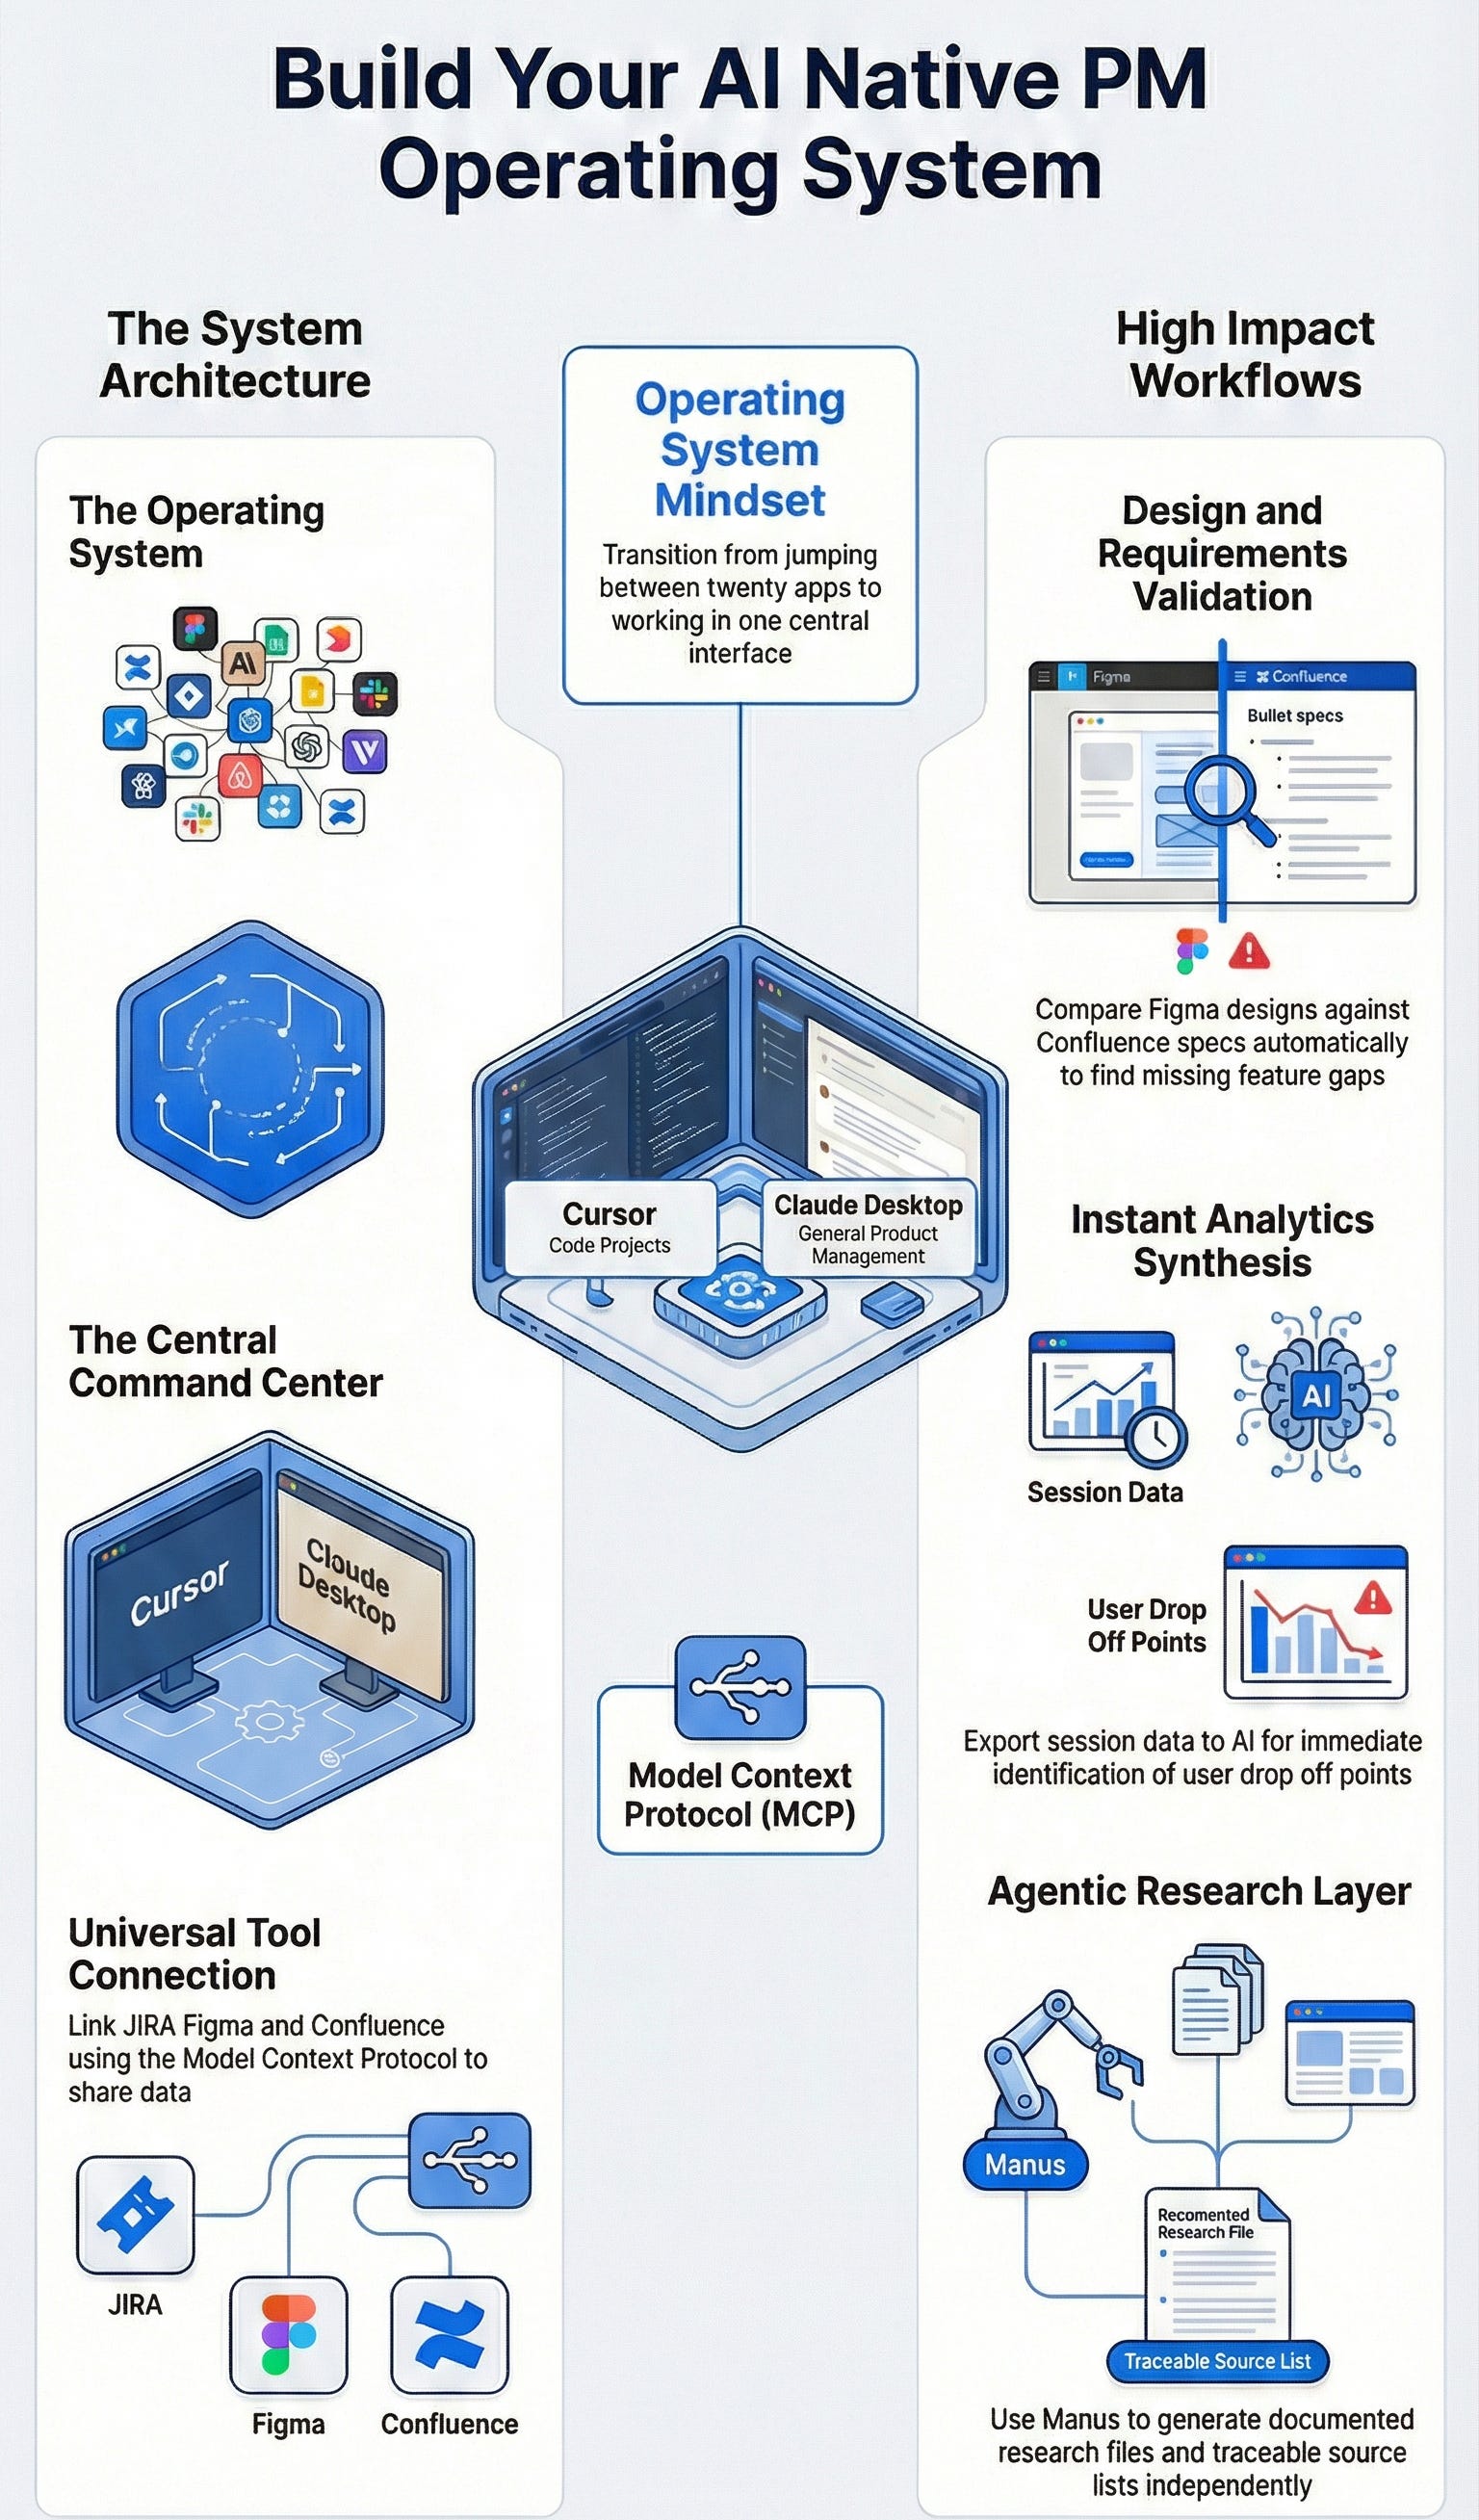
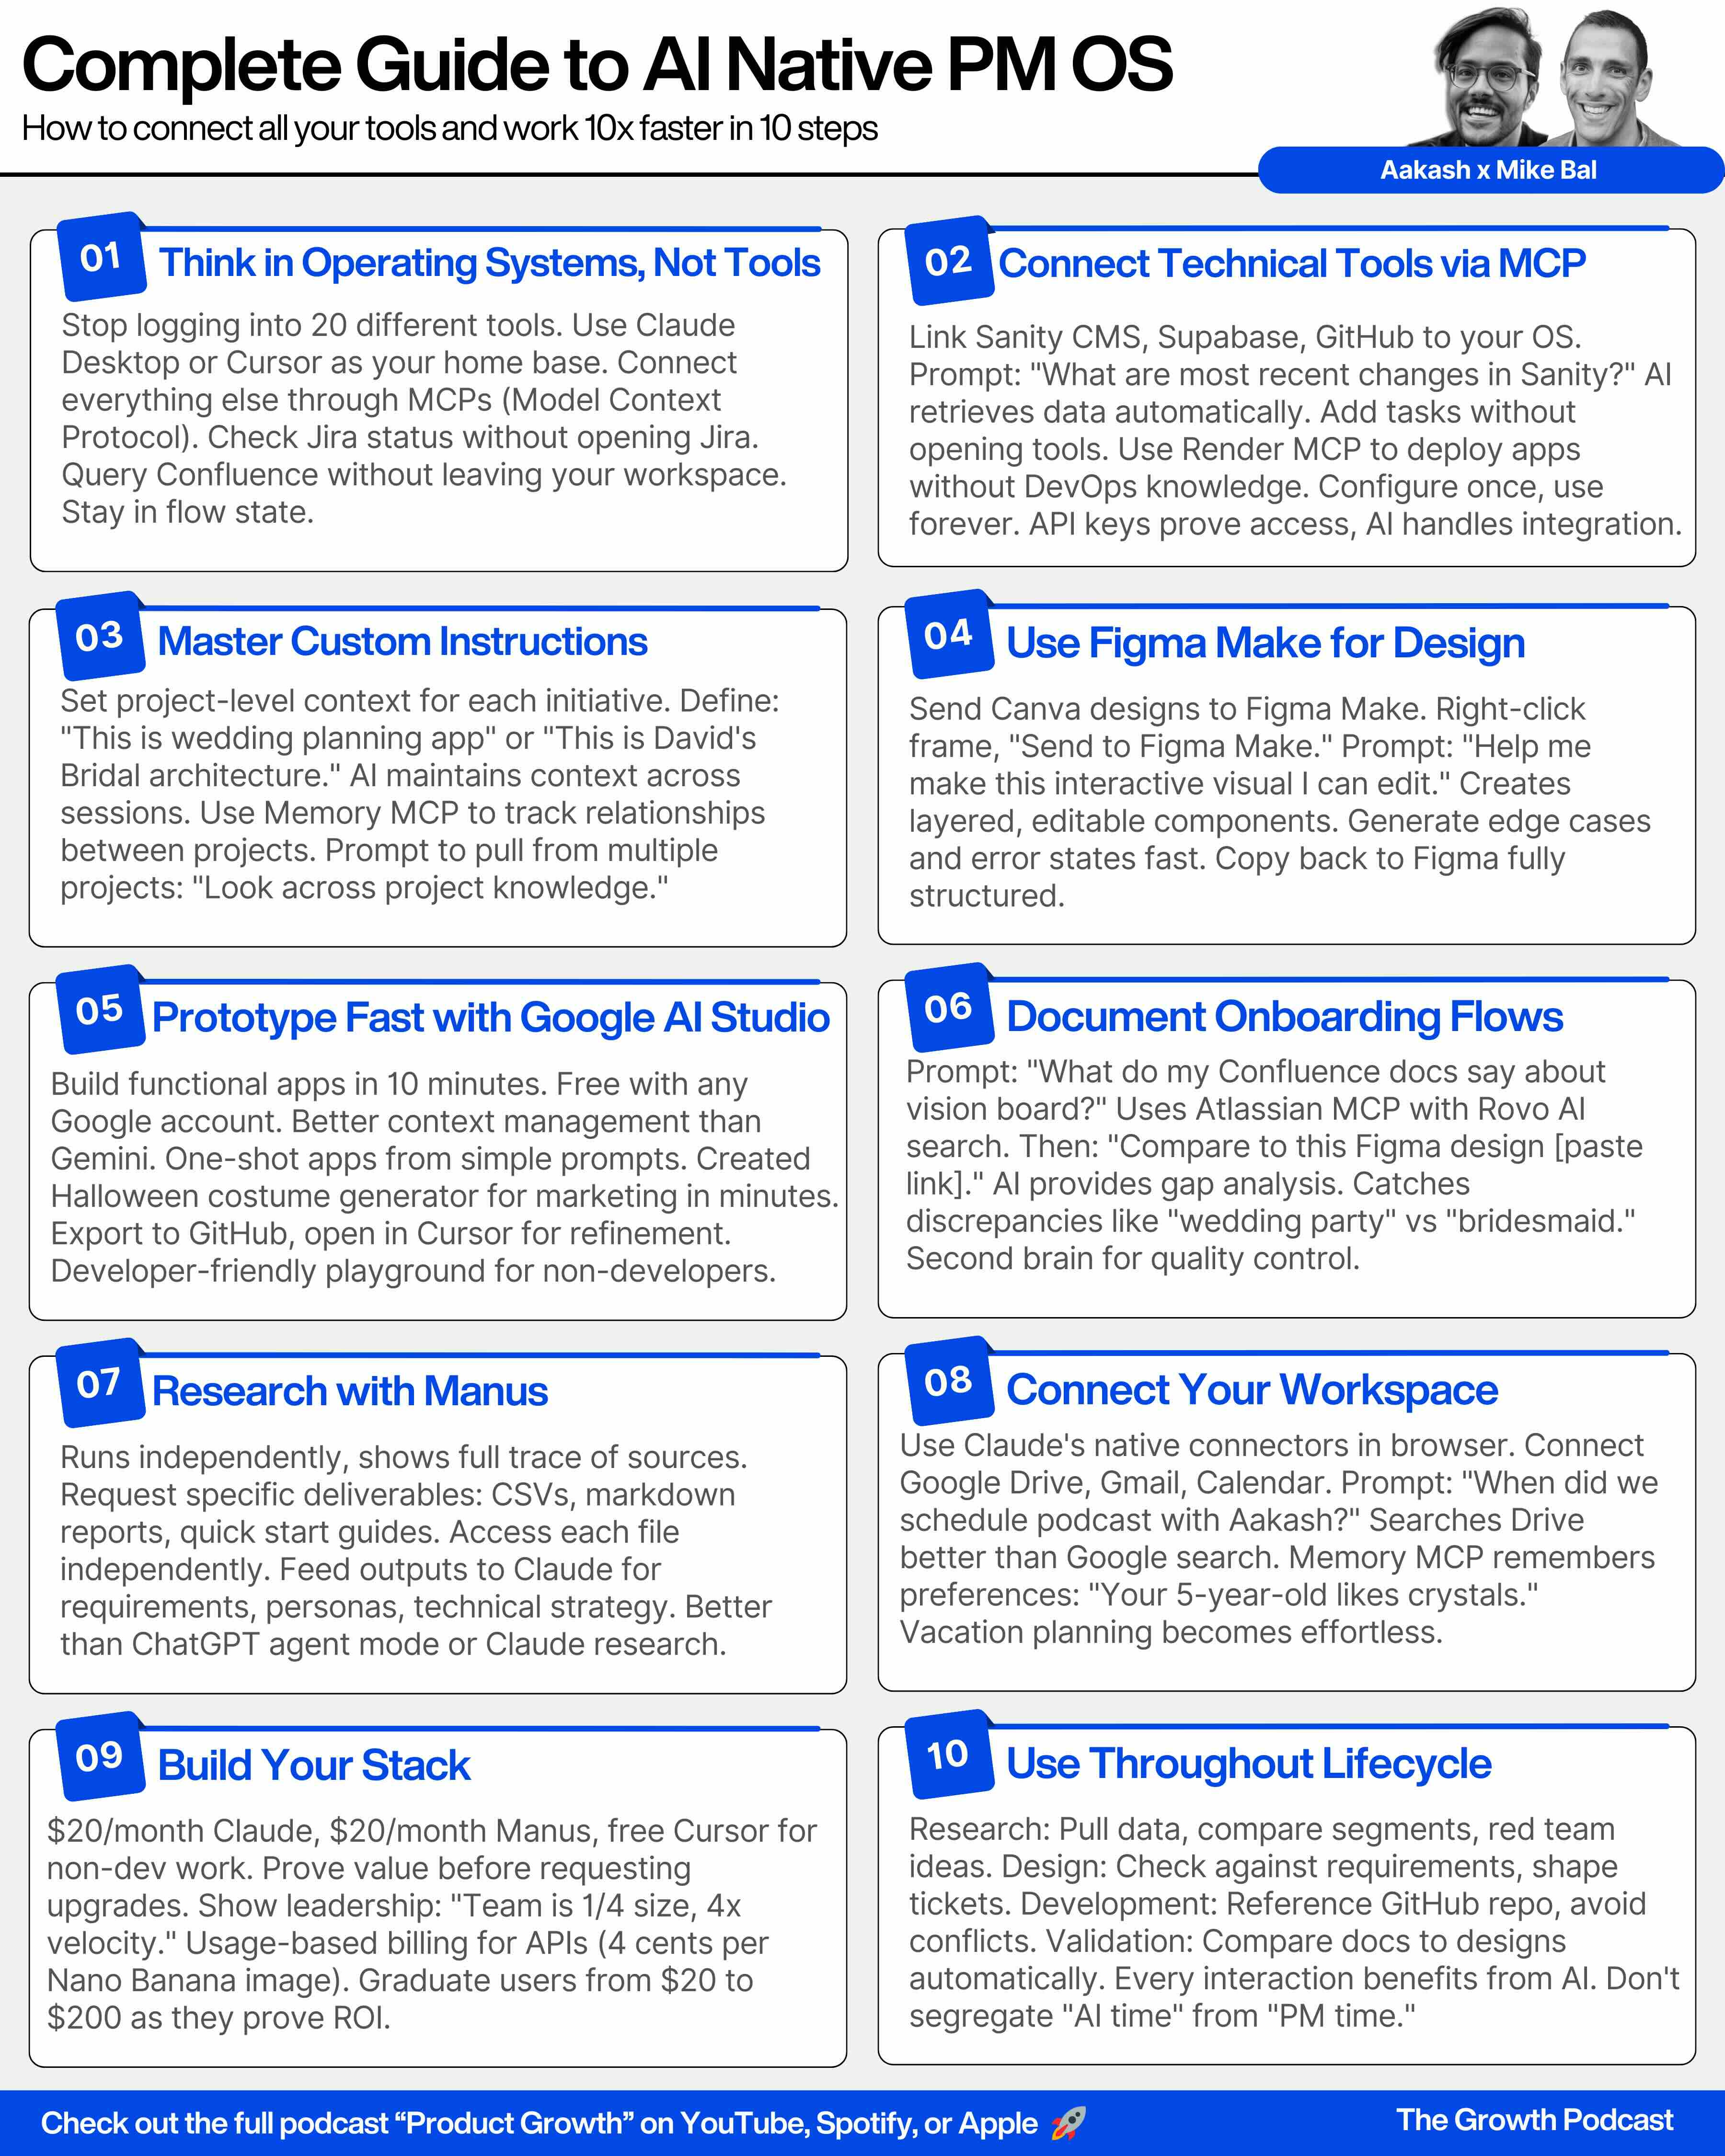
As a thank you for having me in your inbox, I’ve written up a complete guide to building your AI native PM operating system. It’s the ultimate composable stack playbook:
The Operating System Mindset
Build the Core with Cursor + Claude Desktop
Connecting Everything Through MCP to Make it Useful
The Research Layer That Changes Everything
4 Key Workflows
1. The Operating System Mindset

The average PM is using AI, thank god. But, most think in terms of tools:
I have my research tool (maybe Perplexity)
I have my LLM of choice (maybe Claude)
I have my coding buddy (maybe Claude Code)
But they don’t have a unified interface and operating system for all those tools. As a result, they’re context switching all day.
That would be okay… if context switching wasn’t a huge drain! Each time you have to switch to a new task, your brain experiences friction. You lose that flow state.
That’s why you need an OS.
What Makes an Operating System Different
Cursor and Claude Desktop become your command center. Let me give you a few examples?
Need to check if a JIRA ticket is closed?
Ask from Cursor. Don’t open JIRA.Need to compare a Figma design to your PRD?
Ask from Claude. Don’t manually cross-reference.Need analytics on user behavior?
Pull Clarity data into Cursor. Don’t export CSVs.
What we’re doing here is borrowing the composable mindset that teams like MarTech have always had.
We’re picking and choosing how tools are configured to meet our needs.
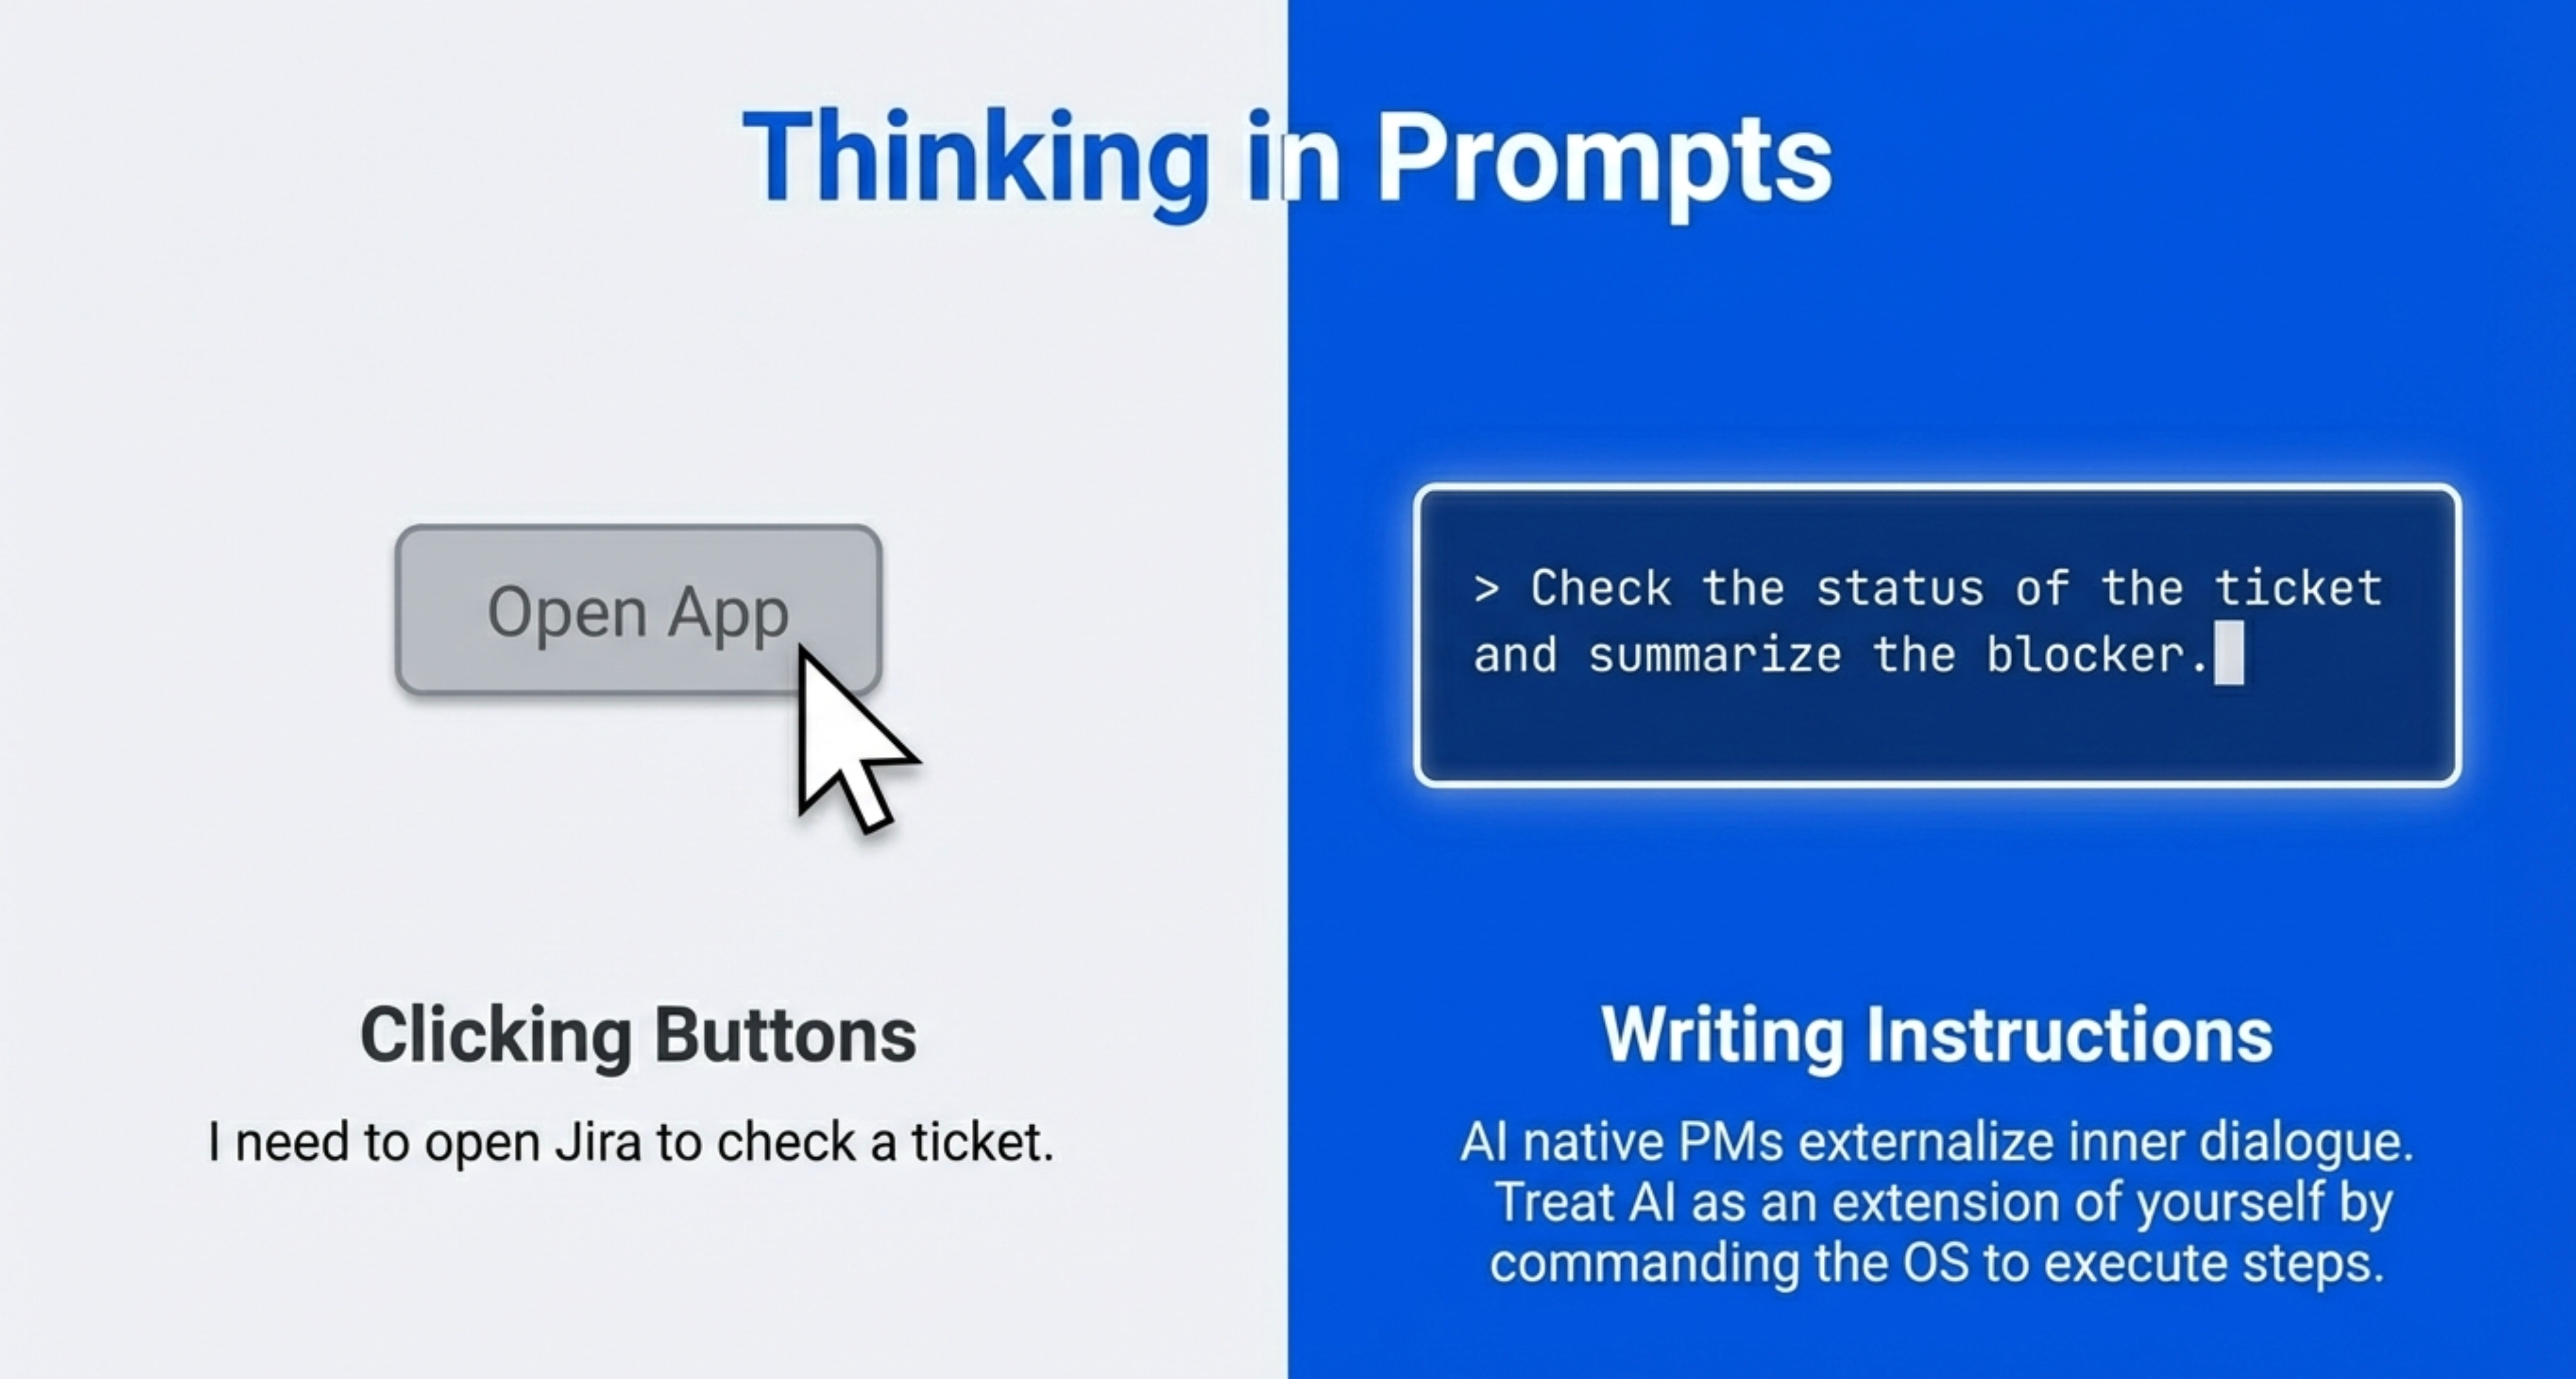
AI Native PMs Think in Prompts
“AI native PMs think in prompts.”
What does that mean?
Most people think “I need to do X, so I’ll open Y tool.”
AI native PMs think “I need to do X. What are the instructions? What are the steps? What’s the best way to get this done?”
If you’re reflective, you probably already do this internally. You have an inner dialogue where you break down tasks into steps.
AI native PMs externalize that dialogue into prompts.
They’re constantly thinking about what they need to get done, what the steps are, and what tools will help them execute those steps most efficiently.
This mindset shift unlocks everything else.
The Two Modes
Not everything happens inside the operating system.
Mike intentionally keeps some work external.
Research happens outside. He uses Manus to do heavy lifting research independently, generates deliverables, vets the information, then brings validated context into his core projects.
Why?
Because LLMs anchor to whatever you feed them. If you pull in bad information automatically, the AI starts using it as common assumptions.
Mike calls this the “conspiracy theorist LLM problem.”
You feed it random ideas. The LLM picks and chooses what to anchor to. Now every response is based on common beliefs that might not be important.
So research stays separate until it’s vetted and ready to be canonical information.
Same with QA. Build separately, test separately, validate separately, then integrate.
This separation prevents contamination of your core operating system.
Why This Matters Now
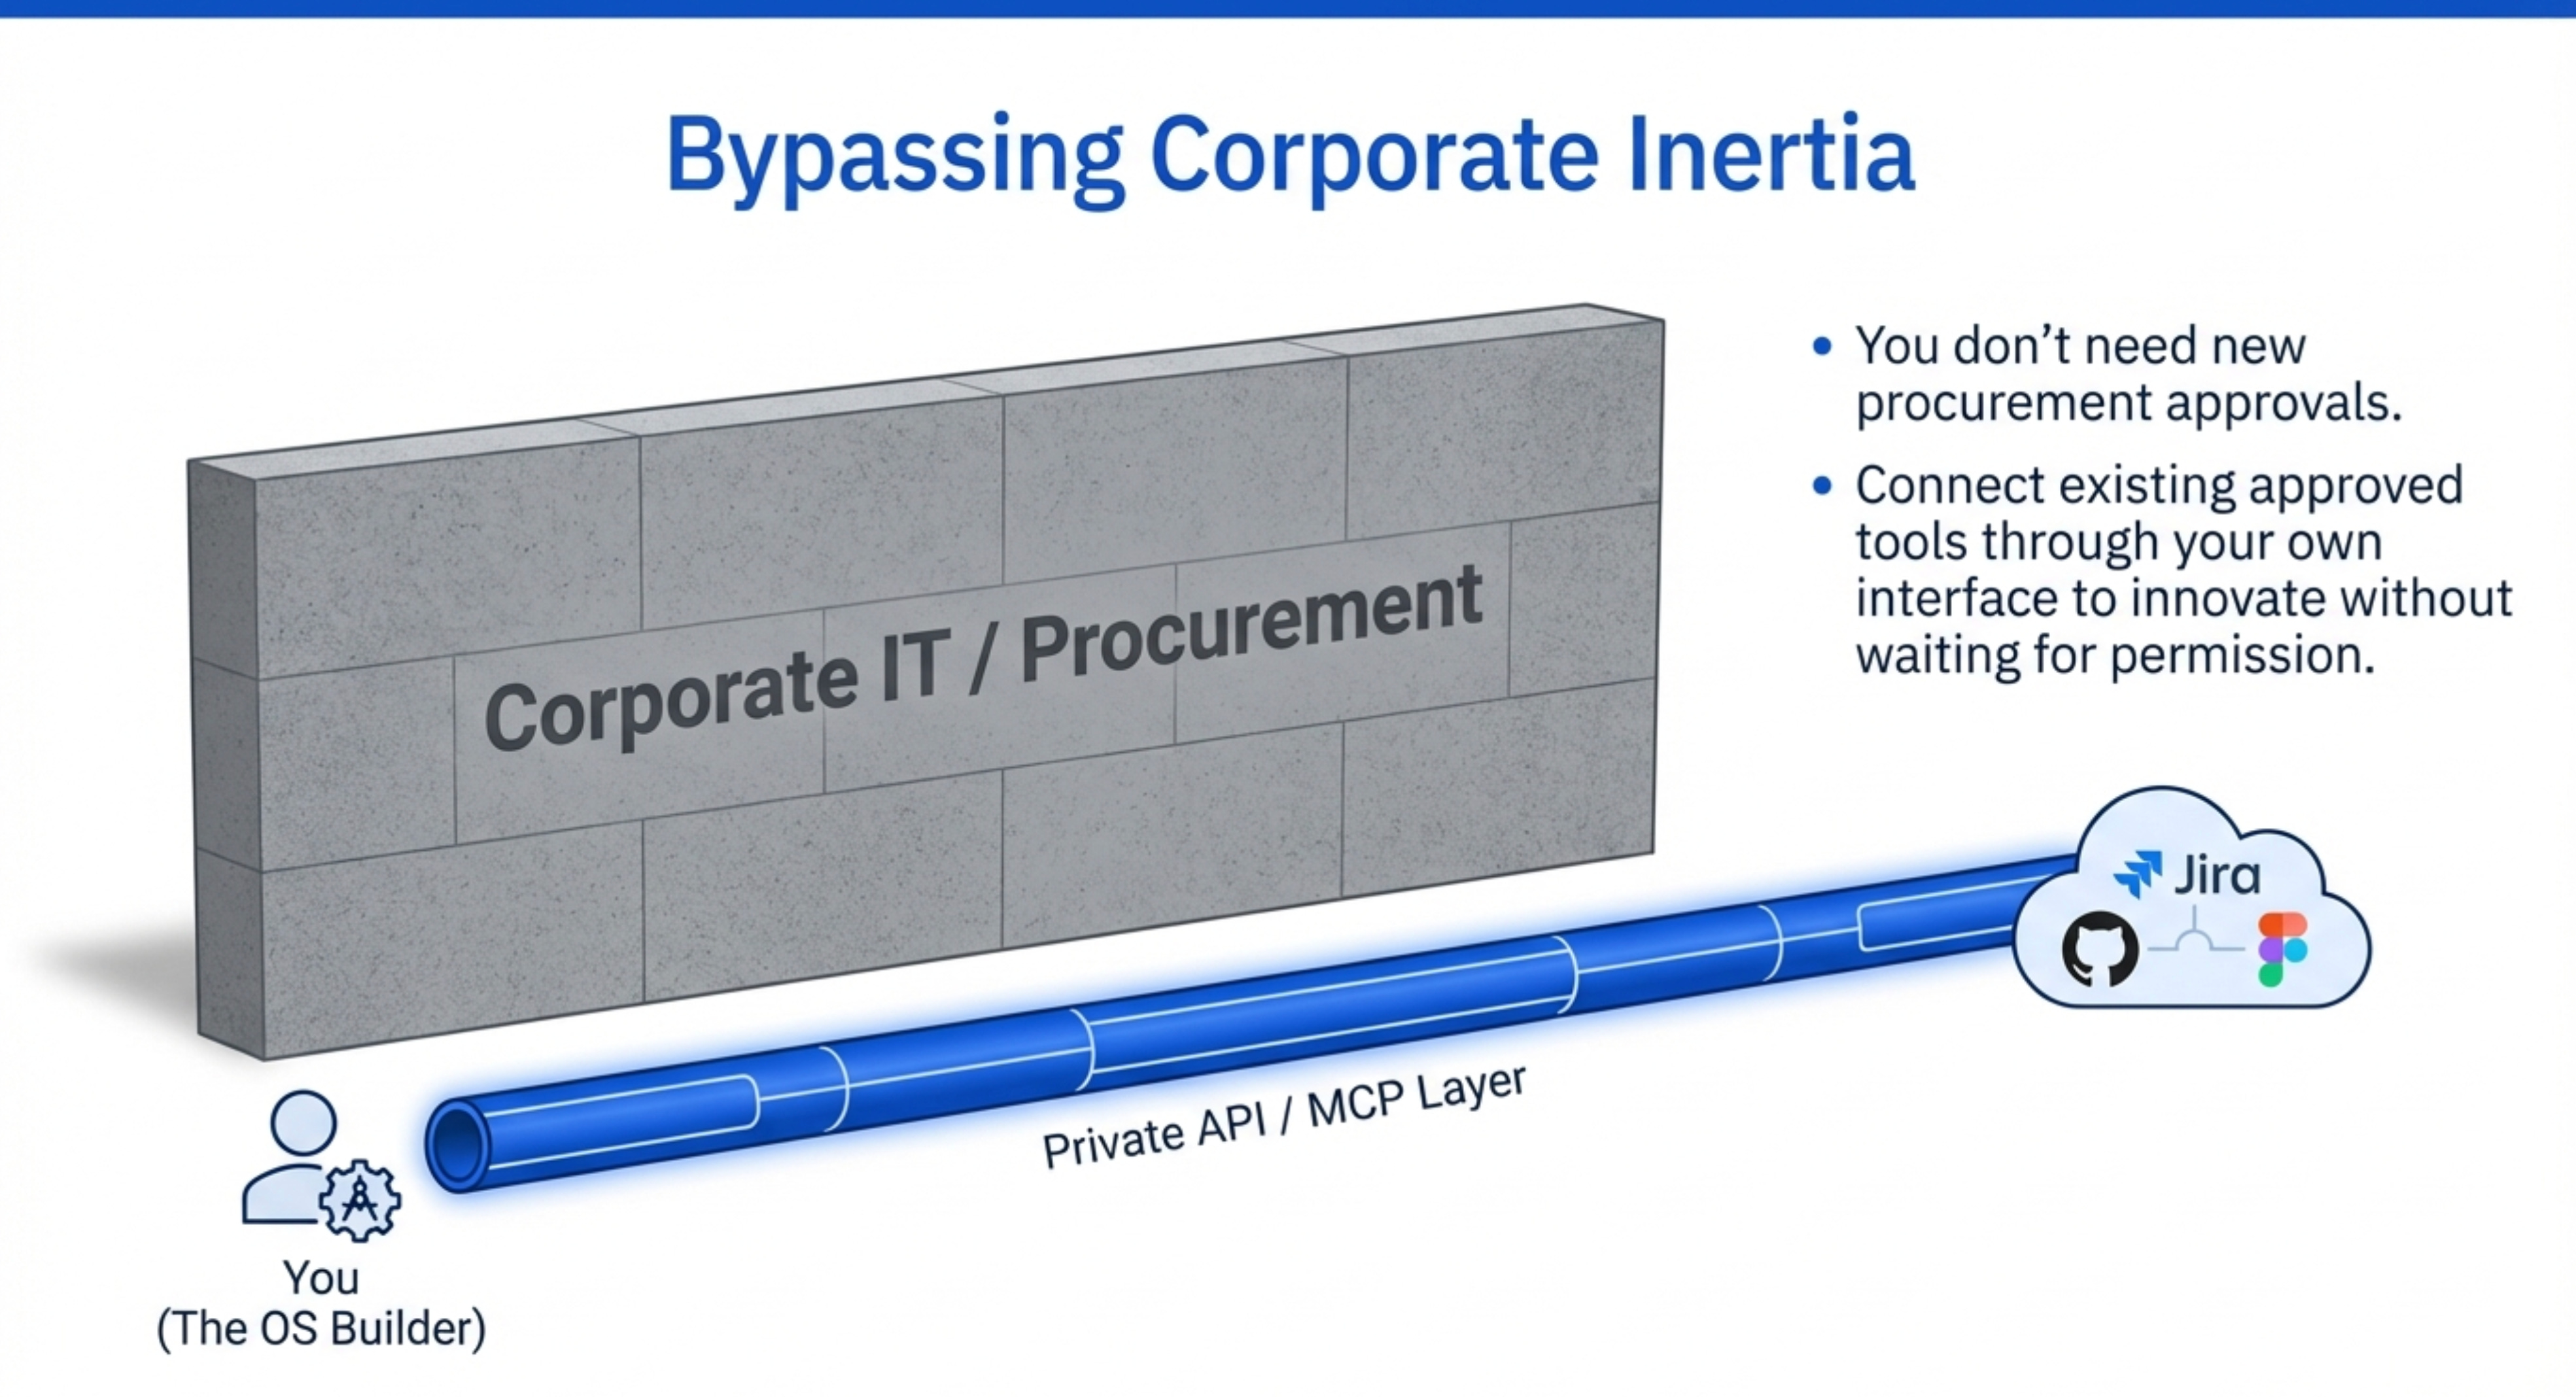
Corporate IT departments are slow.
You can’t get approval for new tools. Security reviews take months. Enterprise licenses are expensive.
The operating system approach bypasses much of this.
You get access to Cursor or Claude Desktop. Then you connect it to what you already use: JIRA, Figma, GitHub, Confluence, etc.
Instead of asking for new tools, you’re connecting existing tools through a better interface.
2. Building Your Core with Cursor and Claude Desktop
The foundation of the operating system is simple.
Cursor and Claude Desktop sit at the center. Everything else connects to them.
Let’s walk through how this actually works.
Setting Up Your Core
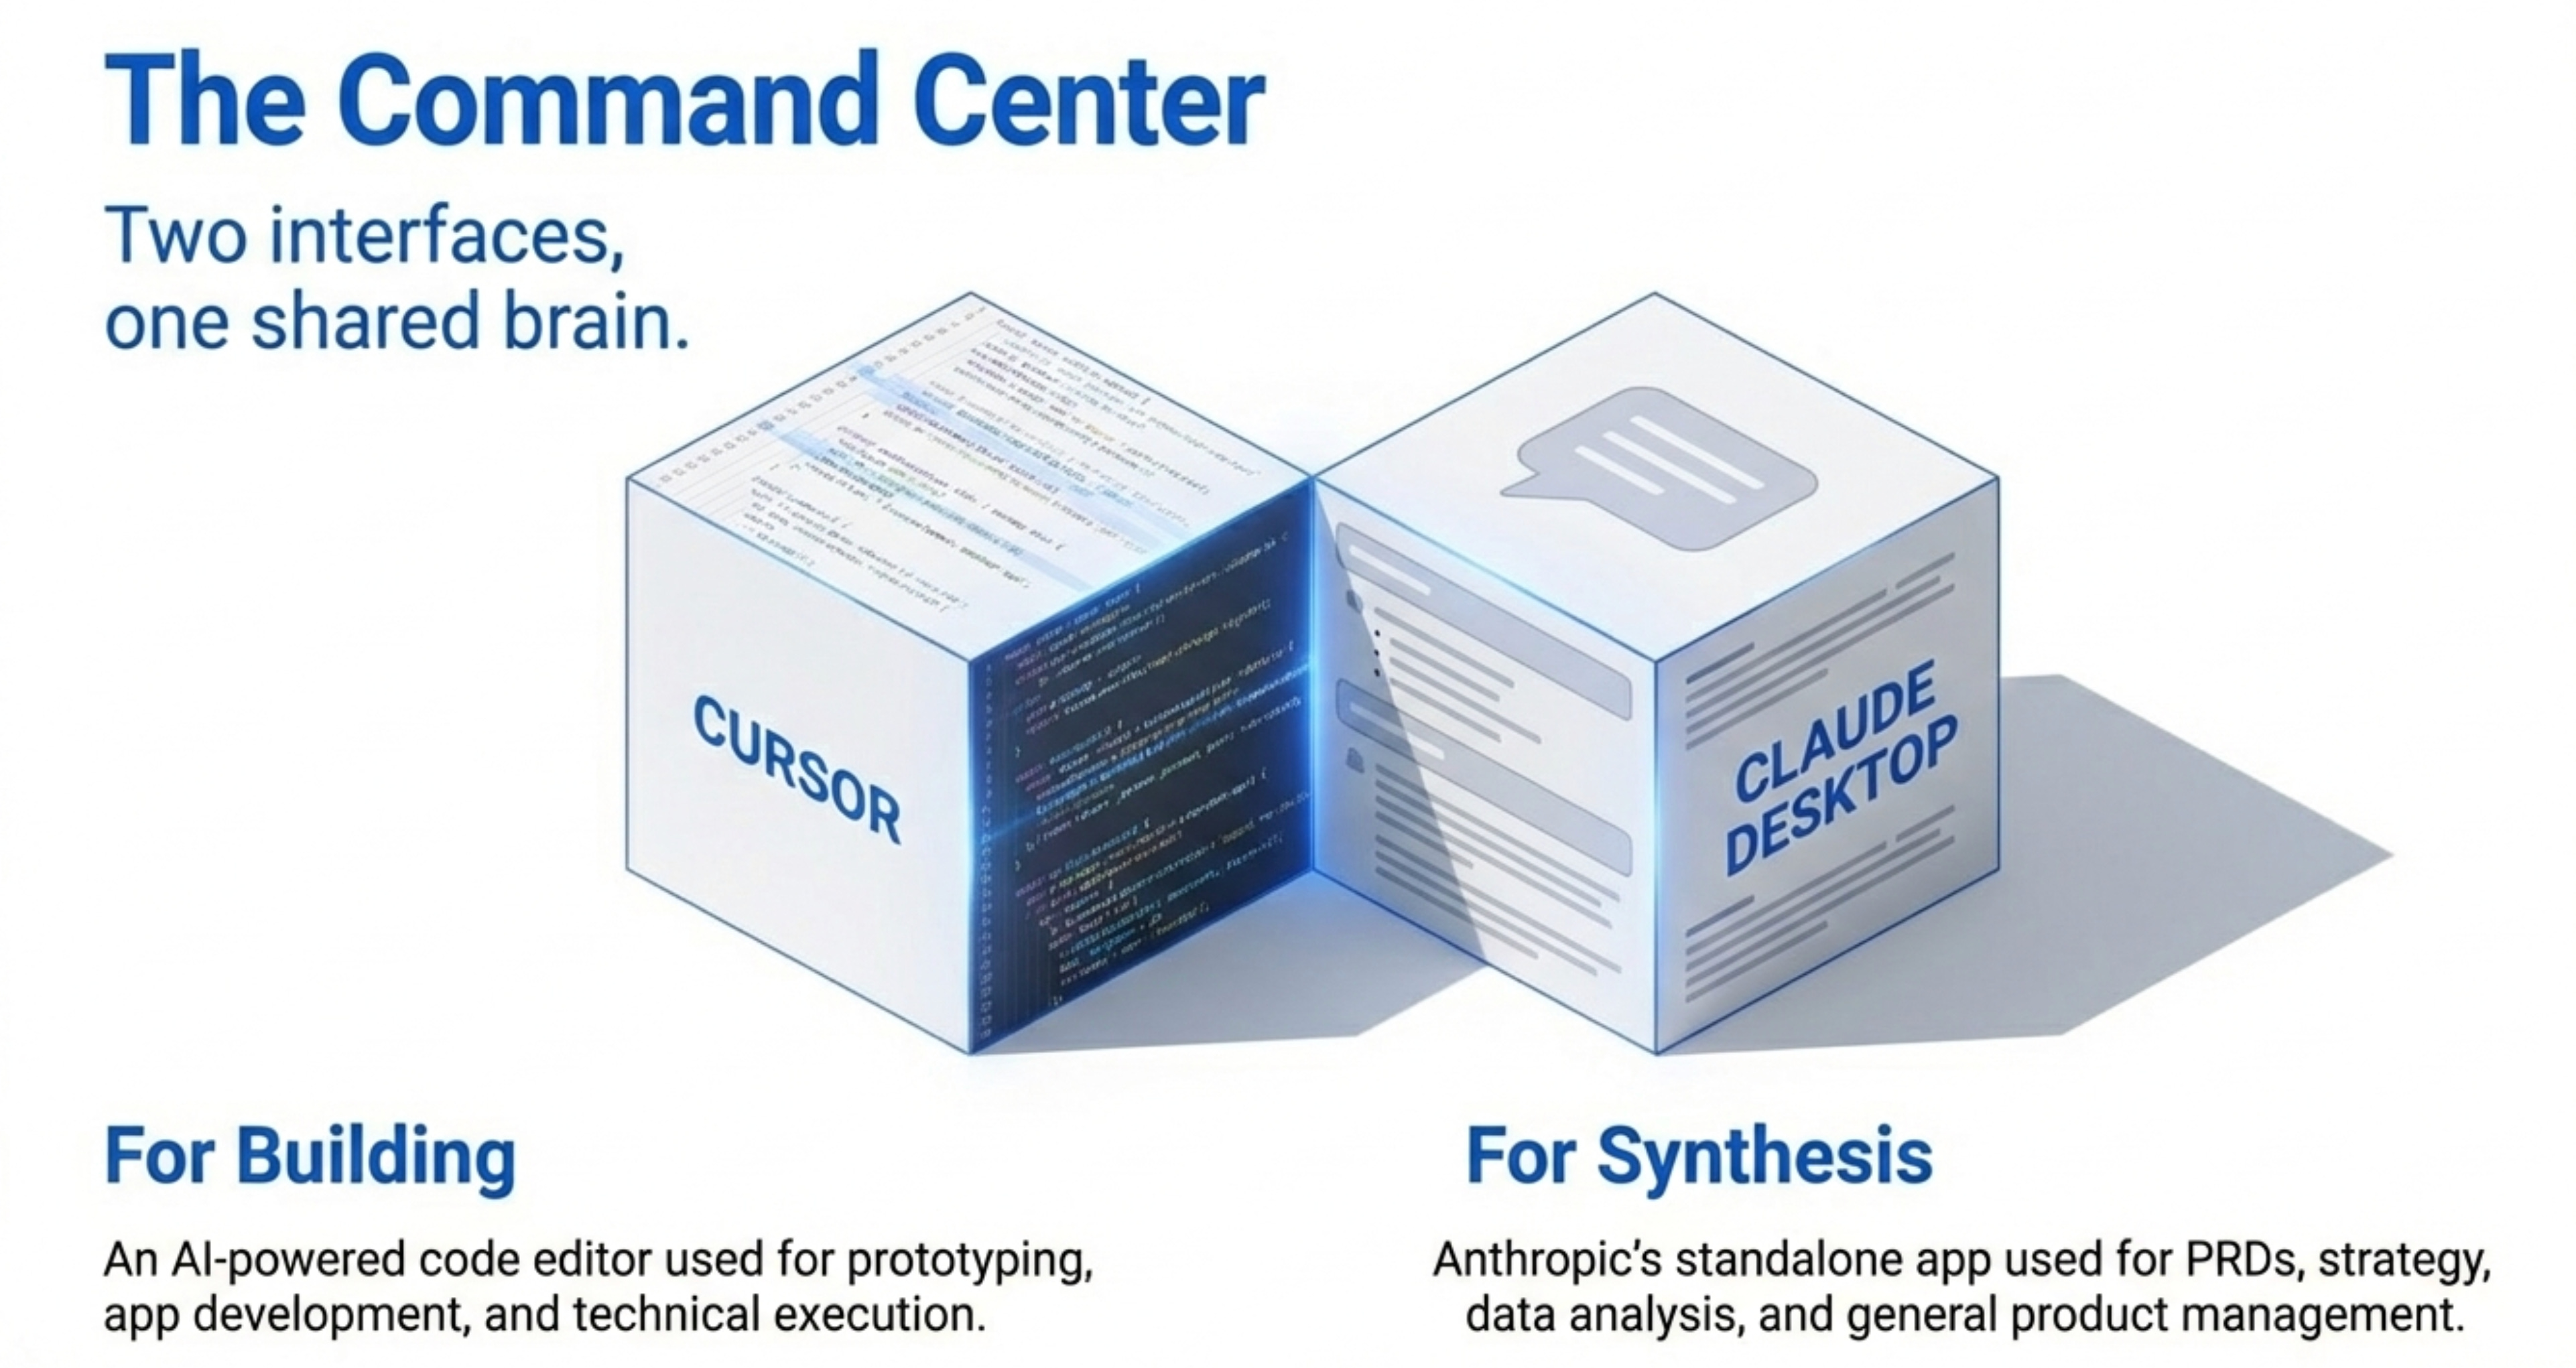
First, you need either Cursor or Claude Desktop installed. Or both.
Cursor is an AI-powered code editor. Think VS Code but with AI integrated throughout.
Claude Desktop is Anthropic’s standalone app that lets you use Claude outside the browser with full MCP support.
Both have the same superpower. They connect to everything else through MCP (Model Context Protocol).
We recommend this separation:
If building something, prototyping an app, or working with code, use Cursor.
If writing PRDs, analyzing data, doing research synthesis, or general PM work, use Claude Desktop.
What MCP Actually Does
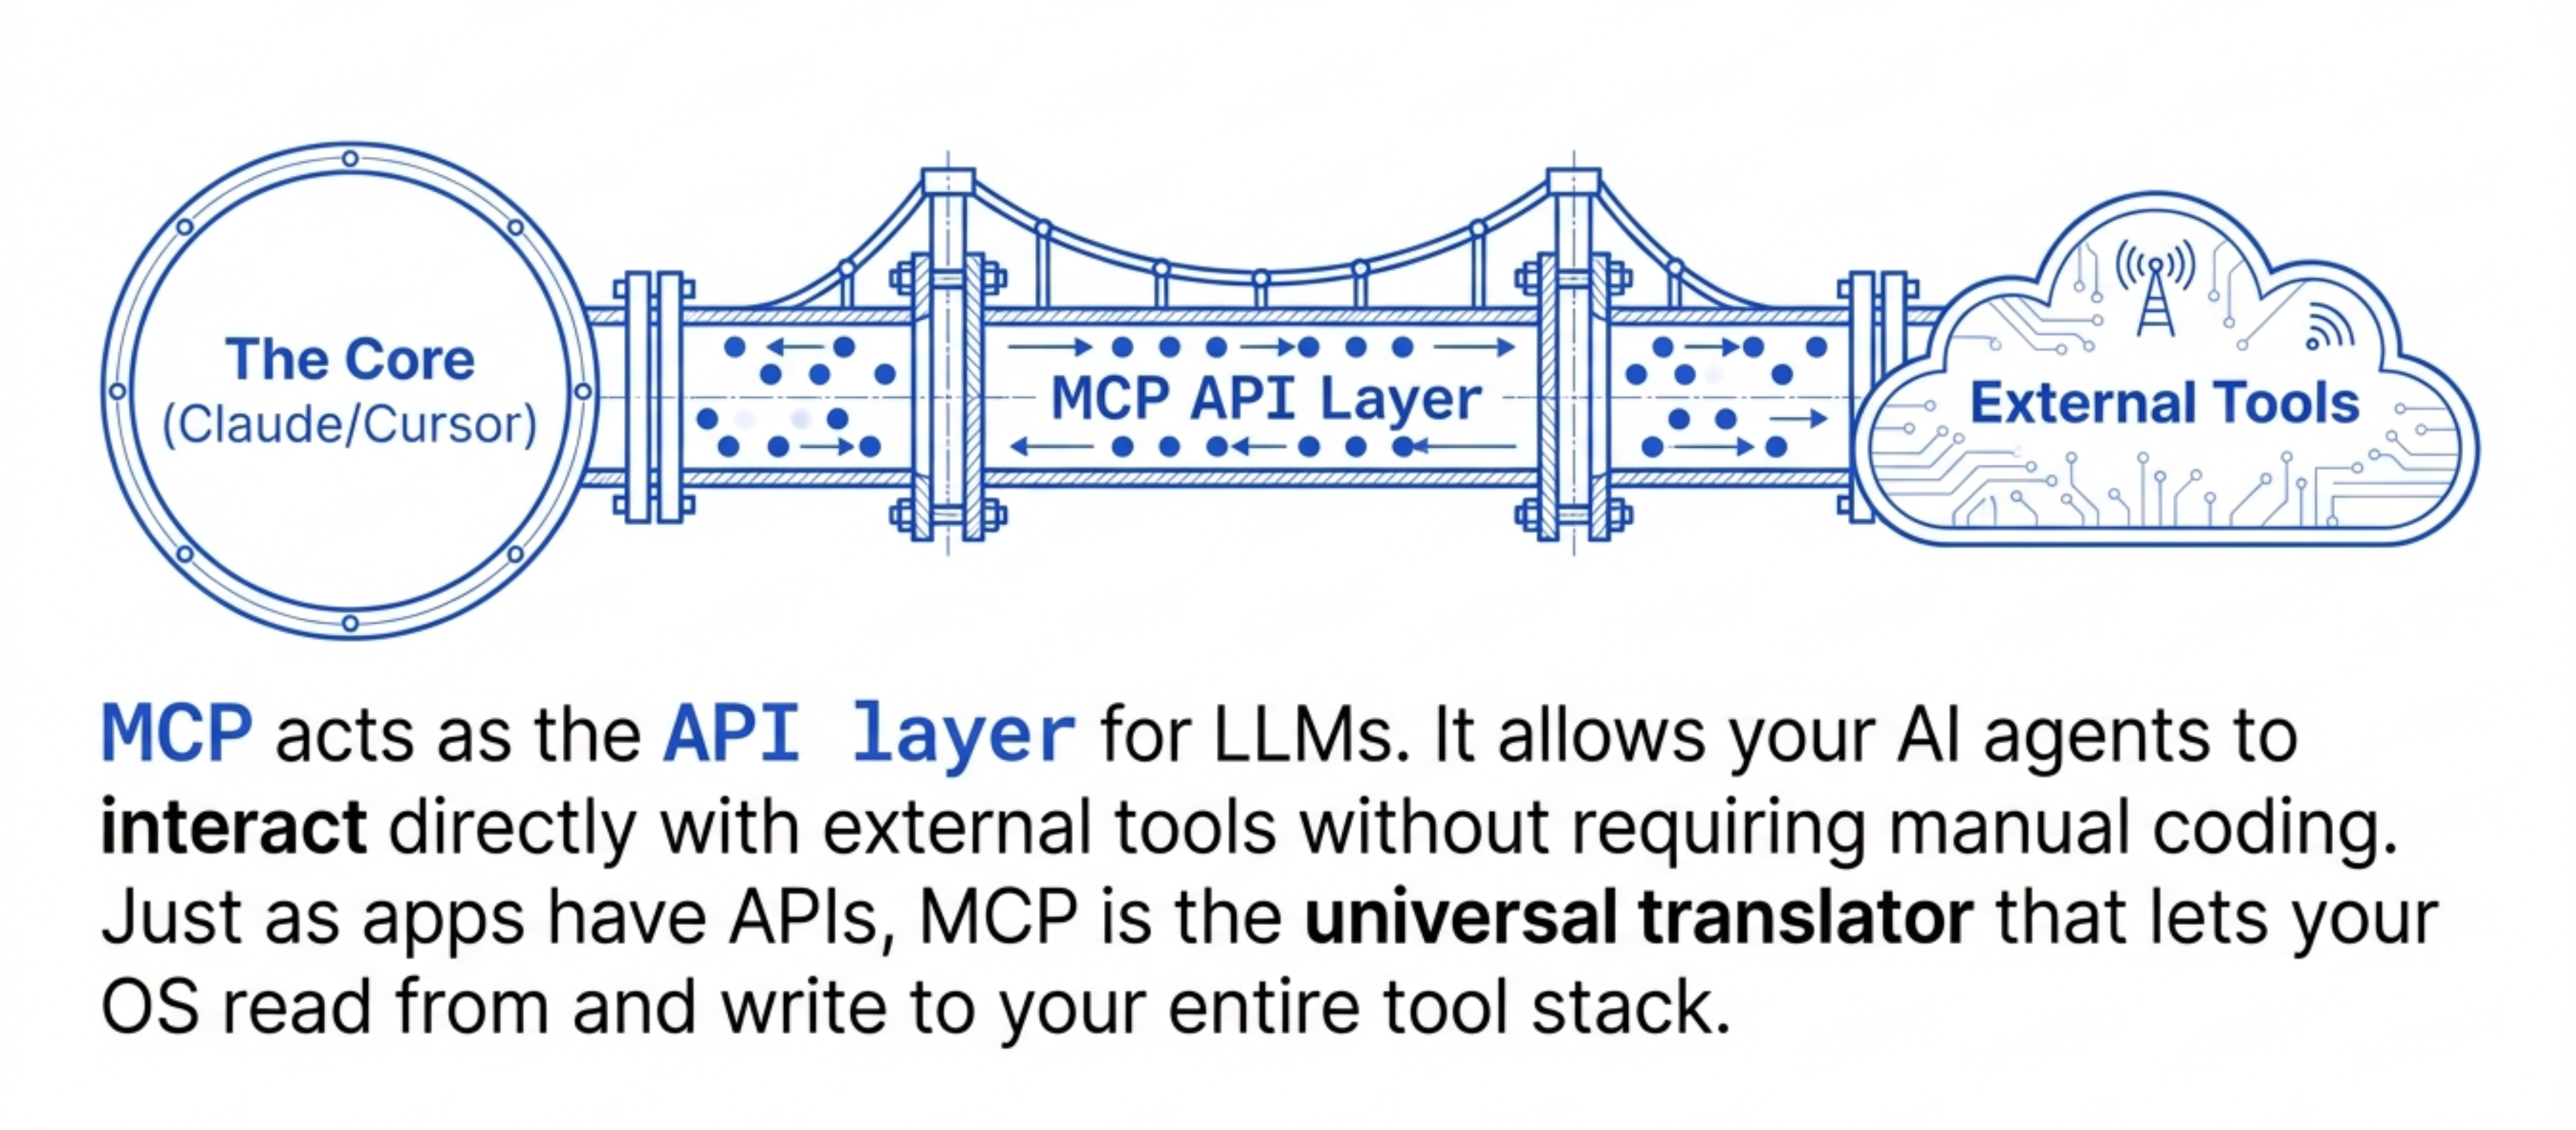
MCP is Anthropic’s protocol that lets AI agents call external tools.
It’s like APIs for LLMs.
Your JIRA has an API. Your GitHub has an API. Your Figma has an API. Your Notion has an API.
MCP is the protocol that lets Claude and Cursor talk to all those APIs without you needing to code integrations manually.
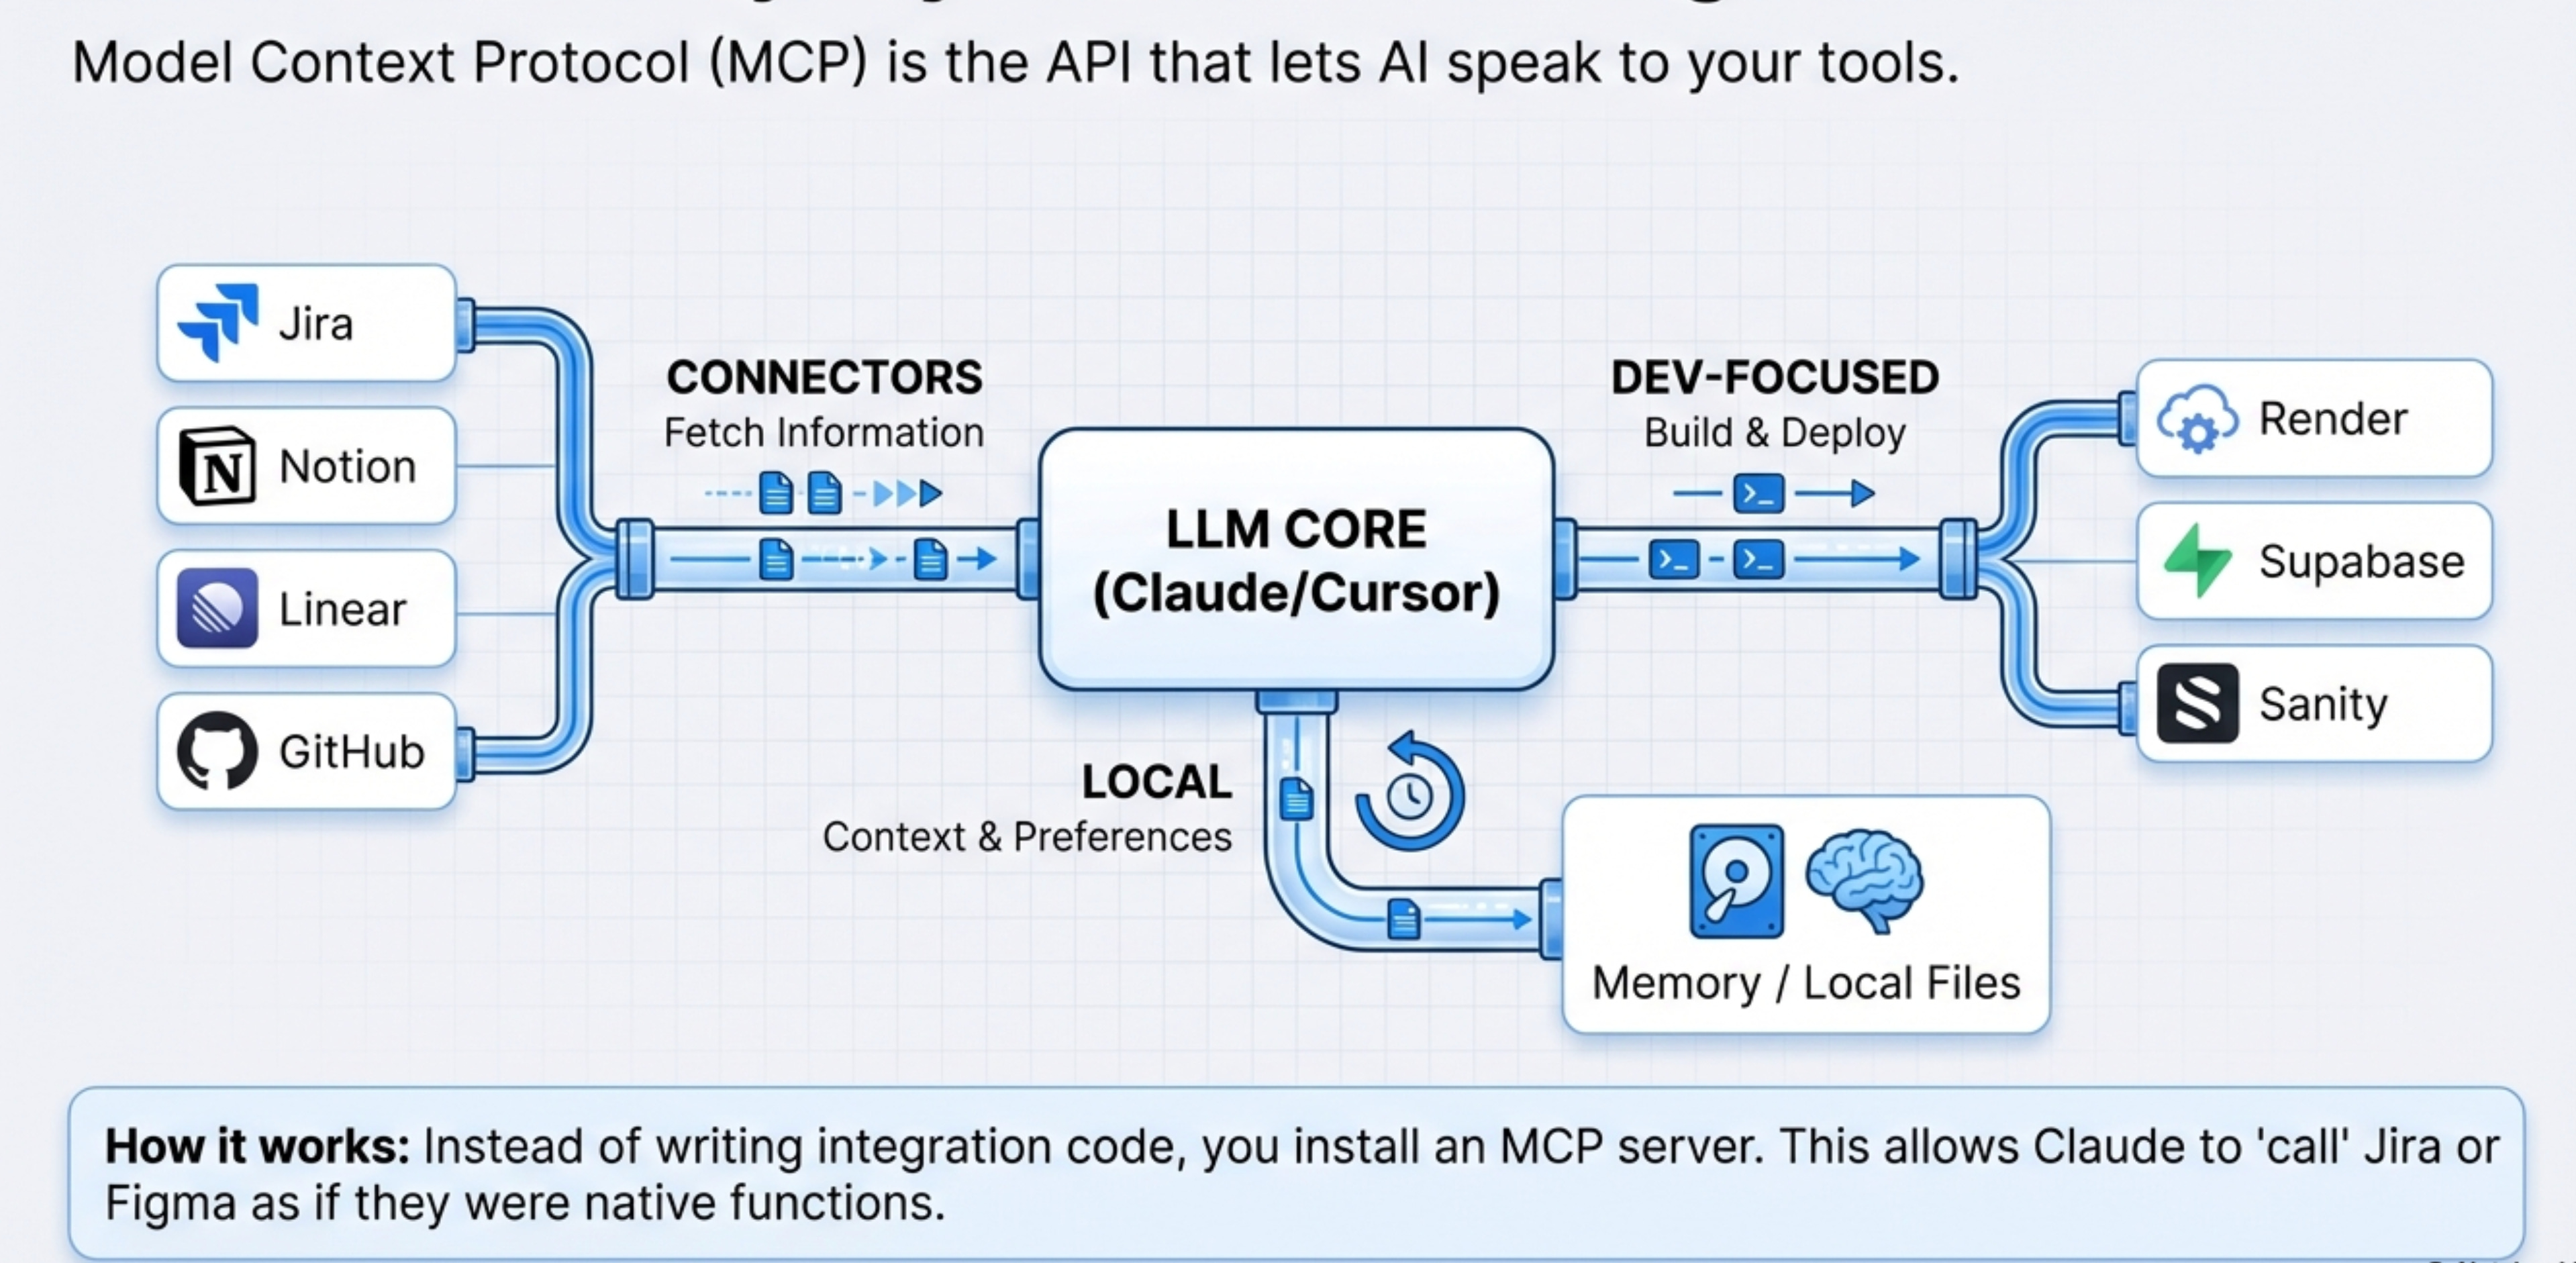
There are three categories of MCPs:
Connectors are what Claude and ChatGPT are calling them now. These let you connect to tools like Figma, JIRA, Linear, Notion, Confluence, GitHub.
You tell Claude “I want to be able to talk to Figma” and it connects through MCP.
Now you can say “find my doc in Confluence about the X feature” and Claude pulls it. Or “grab this Figma design URL and compare it to the feature requirements.”
Developer-focused ones give you dev superpowers without being a real developer.
Mike migrated an app using Render’s MCP. He plugged it in, told Claude he wanted to move the app and get it launched, sent a couple error messages, and Claude figured it out and got it launched.
SuperBase has an MCP. Sanity has an MCP. These let you interact with databases, CMSs, and backend infrastructure through natural language.
Local ones are the secret weapons Mike raves about.
Mike uses memory MCP for his vacation planning. When he was planning a trip with his family, Claude remembered his 5-year-old likes crystals.
Claude suggested a place to mine for crystals between stays. It's $30 for a bucket, and it's positioned between Lake Tahoe so they don't have to drive 4 hours straight. They can break it up and get some exercise.
This kind of contextual memory across projects and conversations is what makes local MCPs powerful.
The Practical Workflow
Here’s what it looks like in practice.
Mike opens Cursor. He has a project for his wedding planning app.
In that project, he’s stored content in a spreadsheet. Running the spreadsheet is a pain. He wants to move it into a CMS.
From inside Cursor, without leaving the interface, he can:
Check if a JIRA issue was completed for this project
Pull in the old Figma design to compare against feature requirements
Ask “what did I miss?” and get a comparison
Connect to Sanity CMS and migrate the data
Test the implementation
All from one interface.
The file browser is on the left. The chat is on the right. The code is in the middle.
He’s not opening JIRA. He’s not opening Figma. He’s not manually cross-referencing.
Everything flows through Cursor.
The same workflow applies in Claude Desktop for non-code work.
Writing a PRD? Pull in past docs from Confluence. Check stakeholder feedback from Notion. Verify what shipped from JIRA. All without leaving Claude.
Why Context Limits Are BS
“Exposing users to context limits is complete BS.”
Most AI tools show you a context window. When you hit the limit, they tell you to start a new chat or summarize your conversation.
This is lazy product design.
Tools like Manus and Claude Code handle this better on the backend. They manage context automatically without exposing the user to technical limitations.
You shouldn’t have to think about context windows. The system should handle it.
3. Connecting Everything Through MCP
Now let’s get practical. How do you actually connect all your tools?
Here’s how each one works.
Design Tools
Figma has official MCP support through Claude and ChatGPT connectors.
How to set it up
Go to Claude Desktop settings. Find the connectors section. Search for Figma. Click connect.
Claude will ask for your Figma credentials. Authorize access. Done.
Now you can say “pull in this Figma file” and paste the URL. Claude loads the design directly.
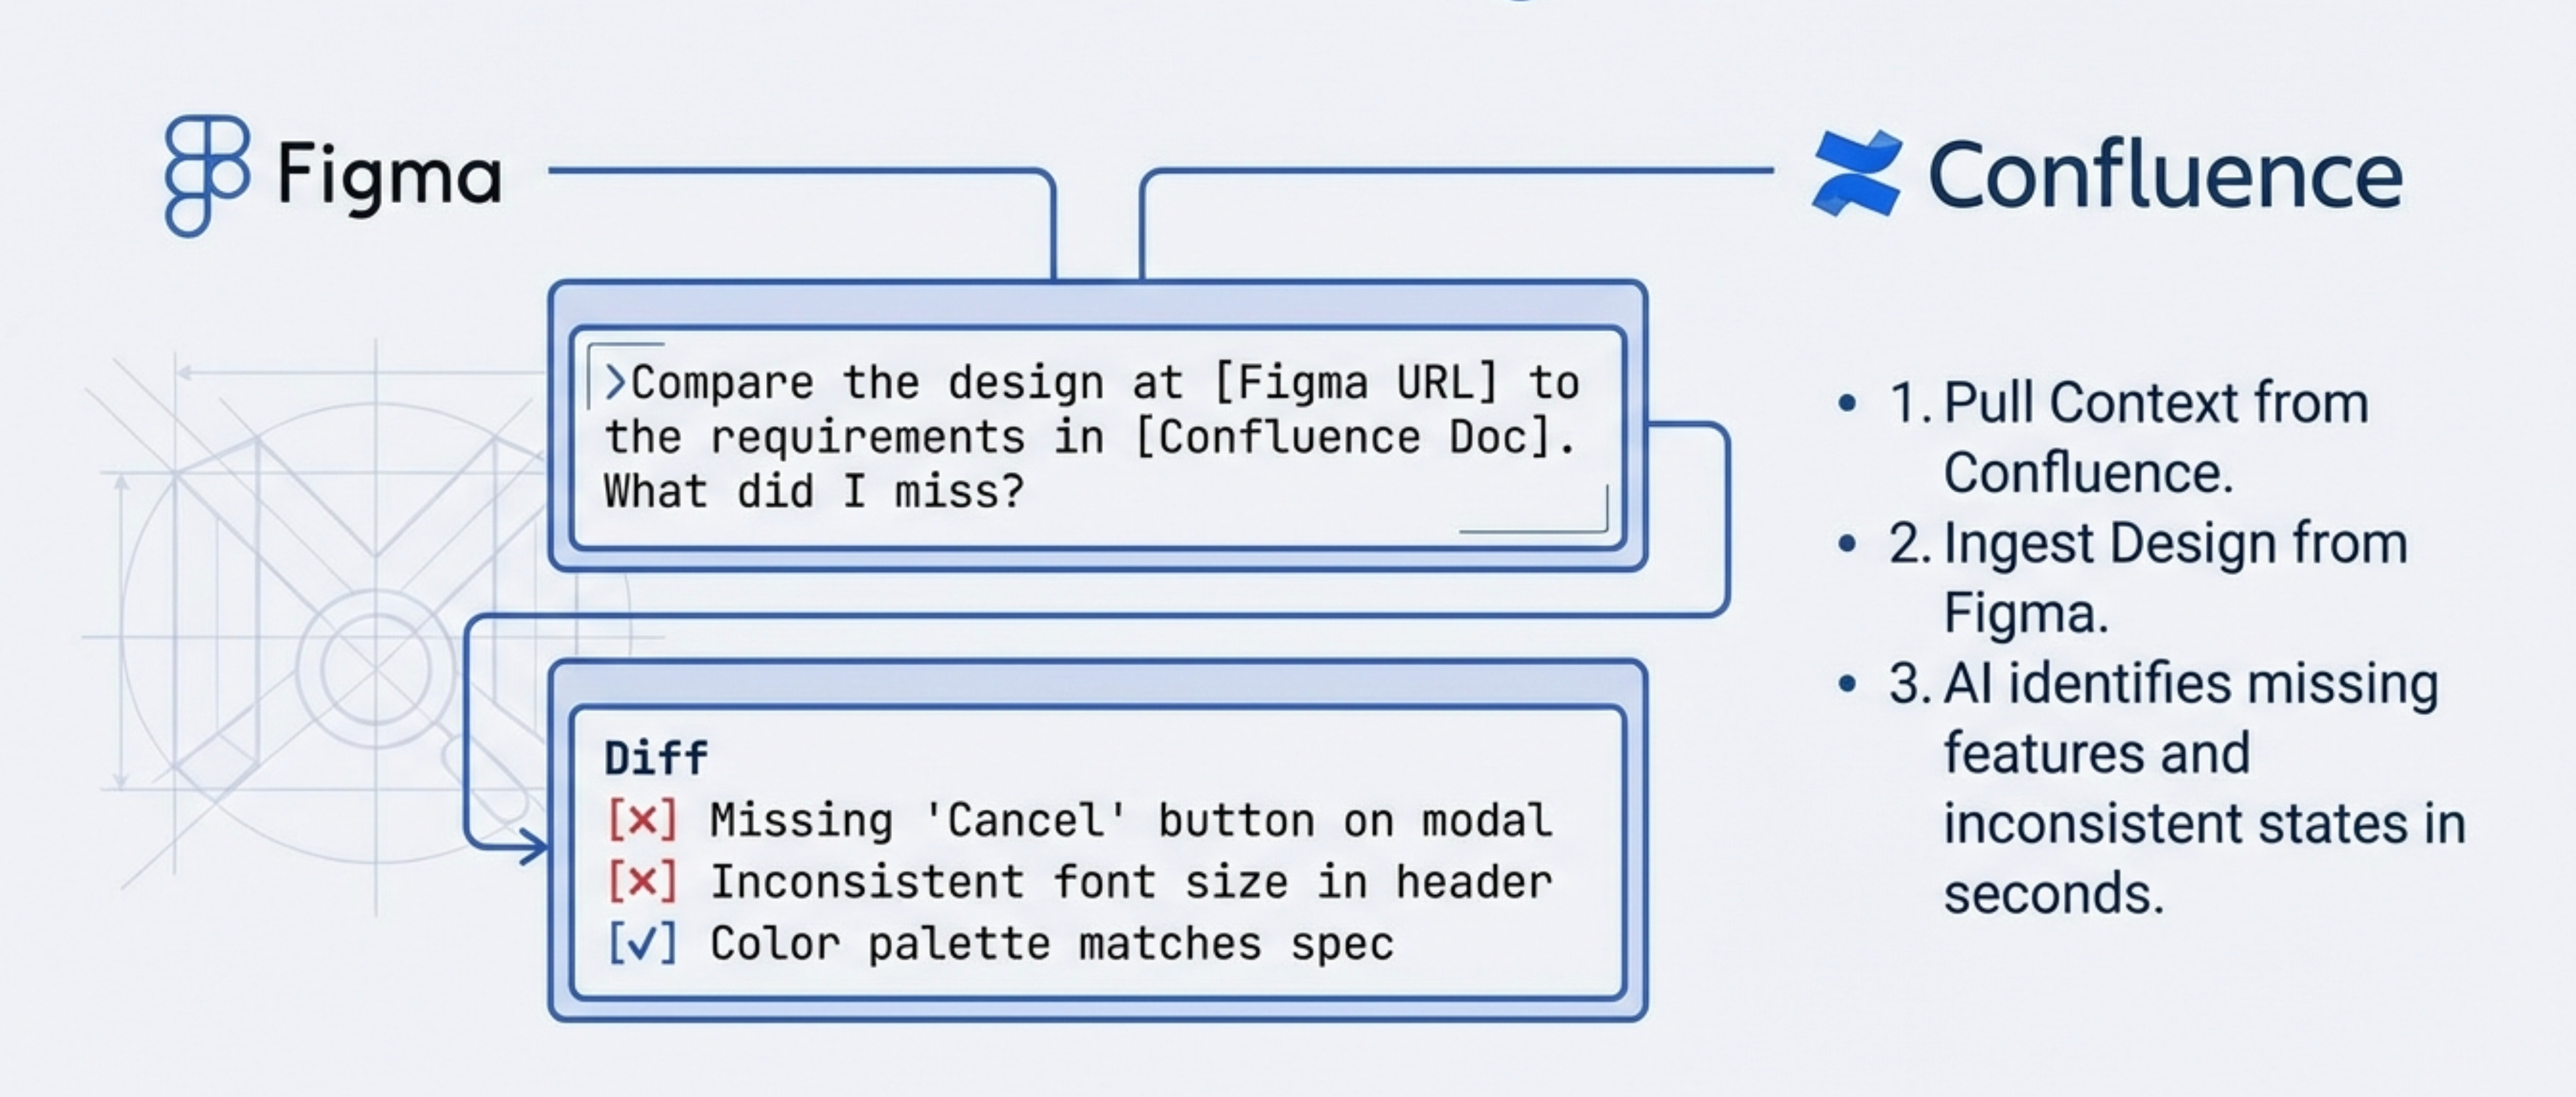
The use case Mike showed was brilliant.
He had an old PRD in Confluence about a specific feature. He pulled that doc in. Then he grabbed an old Figma design URL and had Claude load that too.
Then he asked “compare the design to the feature requirements. What did I miss?”
Claude analyzed both. It found gaps where the design didn’t match the requirements. It flagged missing elements.
Alternative workflow
Mike also showed a Figma Make integration.
Copy an image. Go into Figma. Paste it. Send to Figma Make.
Figma Make generates code from the image. You can specify React, HTML, whatever you need.
This is useful for quick prototypes or when you want to turn a screenshot into working code.
Project Management Tools
JIRA, GitHub, Notion, Confluence all have MCP support.
The workflow is the same. Connect through Claude Desktop or Cursor settings. Authorize access. Start querying.
Common PM workflows
“Find my doc in Confluence about the X feature” pulls the document.
“Check if this JIRA issue was completed” tells you status without opening JIRA.
“Did that PR for the bug fix ever get pushed?” checks GitHub without leaving your interface.
“What’s our velocity from JIRA?” pulls sprint analytics.
You’re not manually checking status. You’re not copy-pasting between tools. You stay in flow state and let the AI handle the context switching.
Analytics Tools
Analytics is trickier because most tools don’t have clean MCP integrations yet.
Mike uses Clarity at David’s Bridal. It’s a janky setup because they never finished implementing proper tools.
His workflow is to export datasets from Clarity, then run analysis through Cursor or Claude.
The export-and-analyze approach
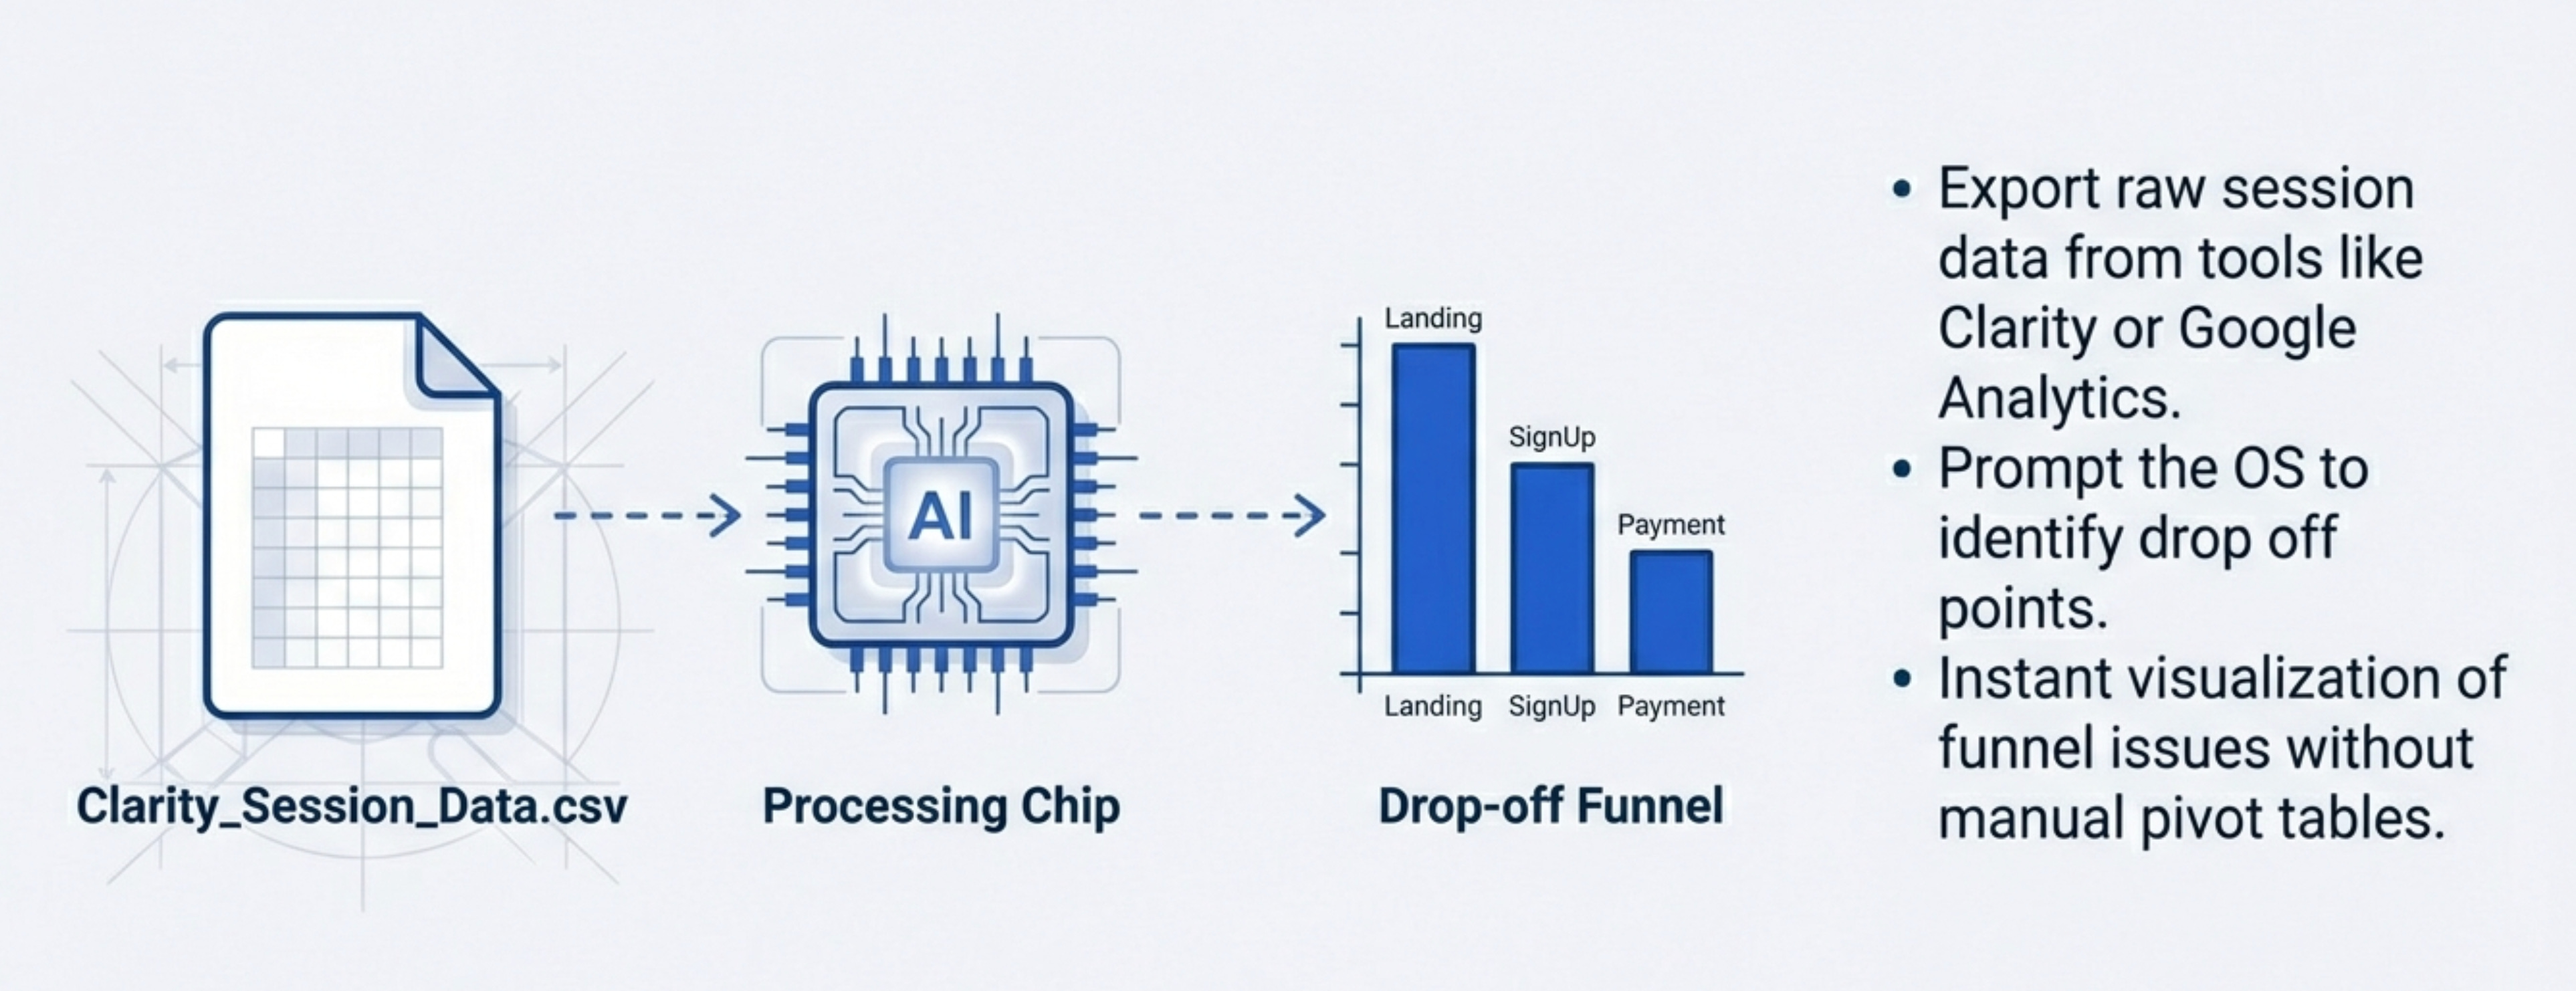
Export user session data from Clarity as CSV.
Upload to Cursor or Claude.
Ask questions like “what’s the most common drop-off point?” or “which features have highest engagement?”
The AI analyzes the data and generates insights.
This works for any analytics tool. Google Analytics, Mixpanel, Amplitude, whatever.
Export the data. Feed it to your AI. Get insights without manual analysis.
DevTools MCP for browser analytics
Mike also mentioned DevTools has a nice MCP.
If you want browser-side analytics like performance metrics, load times, and client-side errors, you can pull that directly into Cursor.
Developer Tools
For PMs who are “brave enough,” developer-focused MCPs unlock serious superpowers.
SuperBase, Render, Sanity are examples Mike uses.
The colorization app example
Mike works on e-commerce at David’s Bridal. They shoot dress products in one color, then need them in 60 different colors.
They were paying an agency to run a script. The agency would only do one product per month.
Mike realized it costs $0.04 to generate with AI. He built a colorization app using Cursor and Render’s MCP.
Now he can process thousands of products for a fraction of the cost.
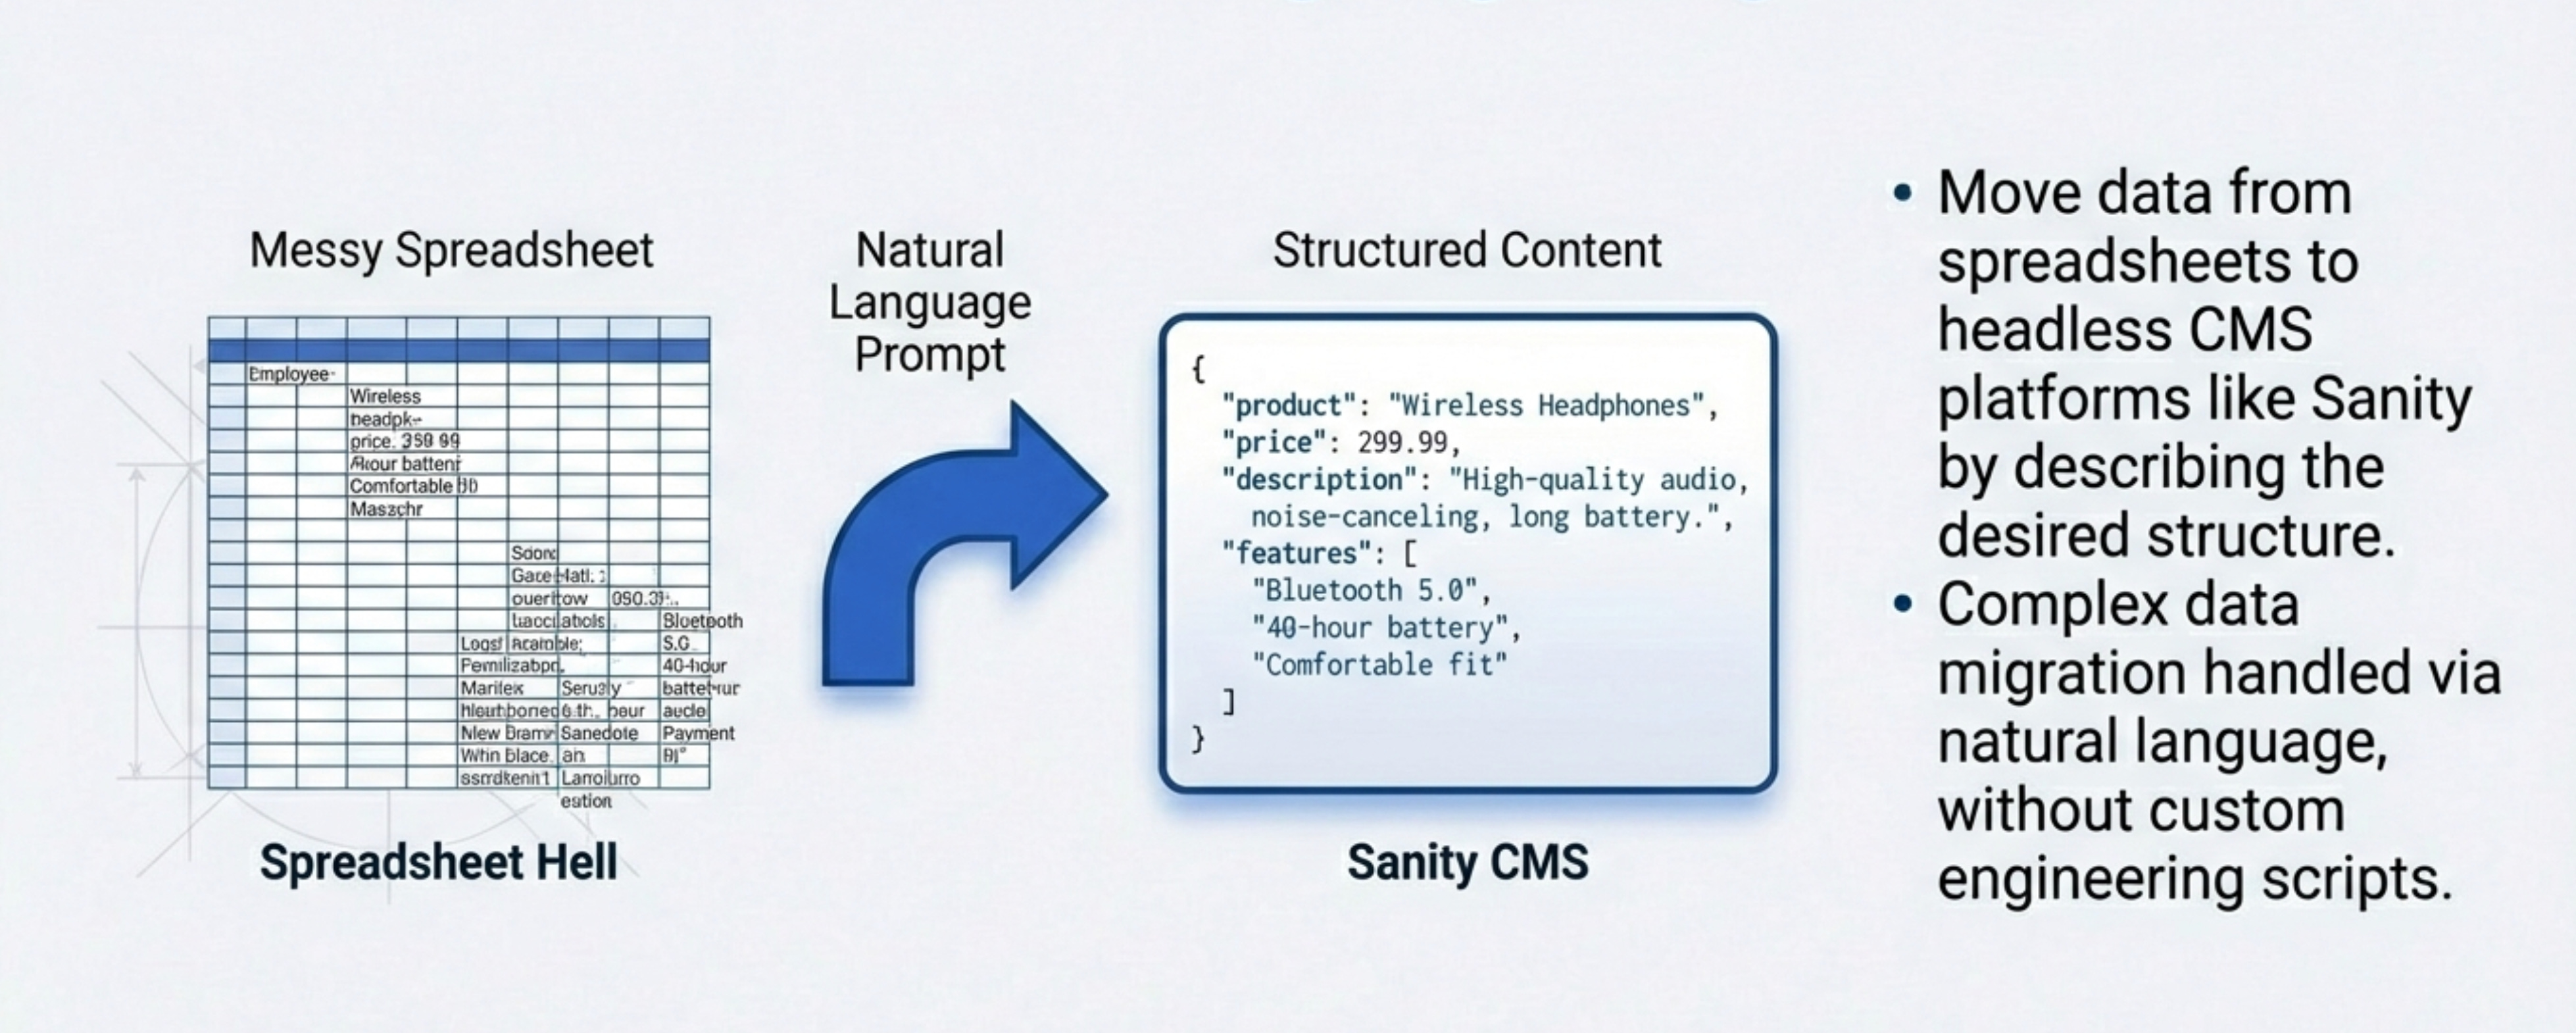
The Sanity CMS migration
Mike’s wedding planning app had all tasks and milestones in a spreadsheet.
They manually synced it through an embedding process. Every update was a pain because he had to go through the entire sheet to make sure everything worked.
He moved it into Sanity CMS using Cursor. The migration happened through natural language prompts.
“Move this spreadsheet data into Sanity. Set up the content structure. Handle the migration.”
Cursor did it. No manual CSV manipulation. No custom scripts.
4. The Research Layer That Changes Everything
Research is where an operating system really shines.
Mike uses Manus for heavy lifting agentic research. Then he brings validated findings into his core system.
Here’s why this matters and how it works.
Why Manus Over ChatGPT Agent Mode
Mike switched from ChatGPT Agent Mode to Manus and immediately switched back.
Why?
“Manus beats OpenAI Agent Mode any time.”
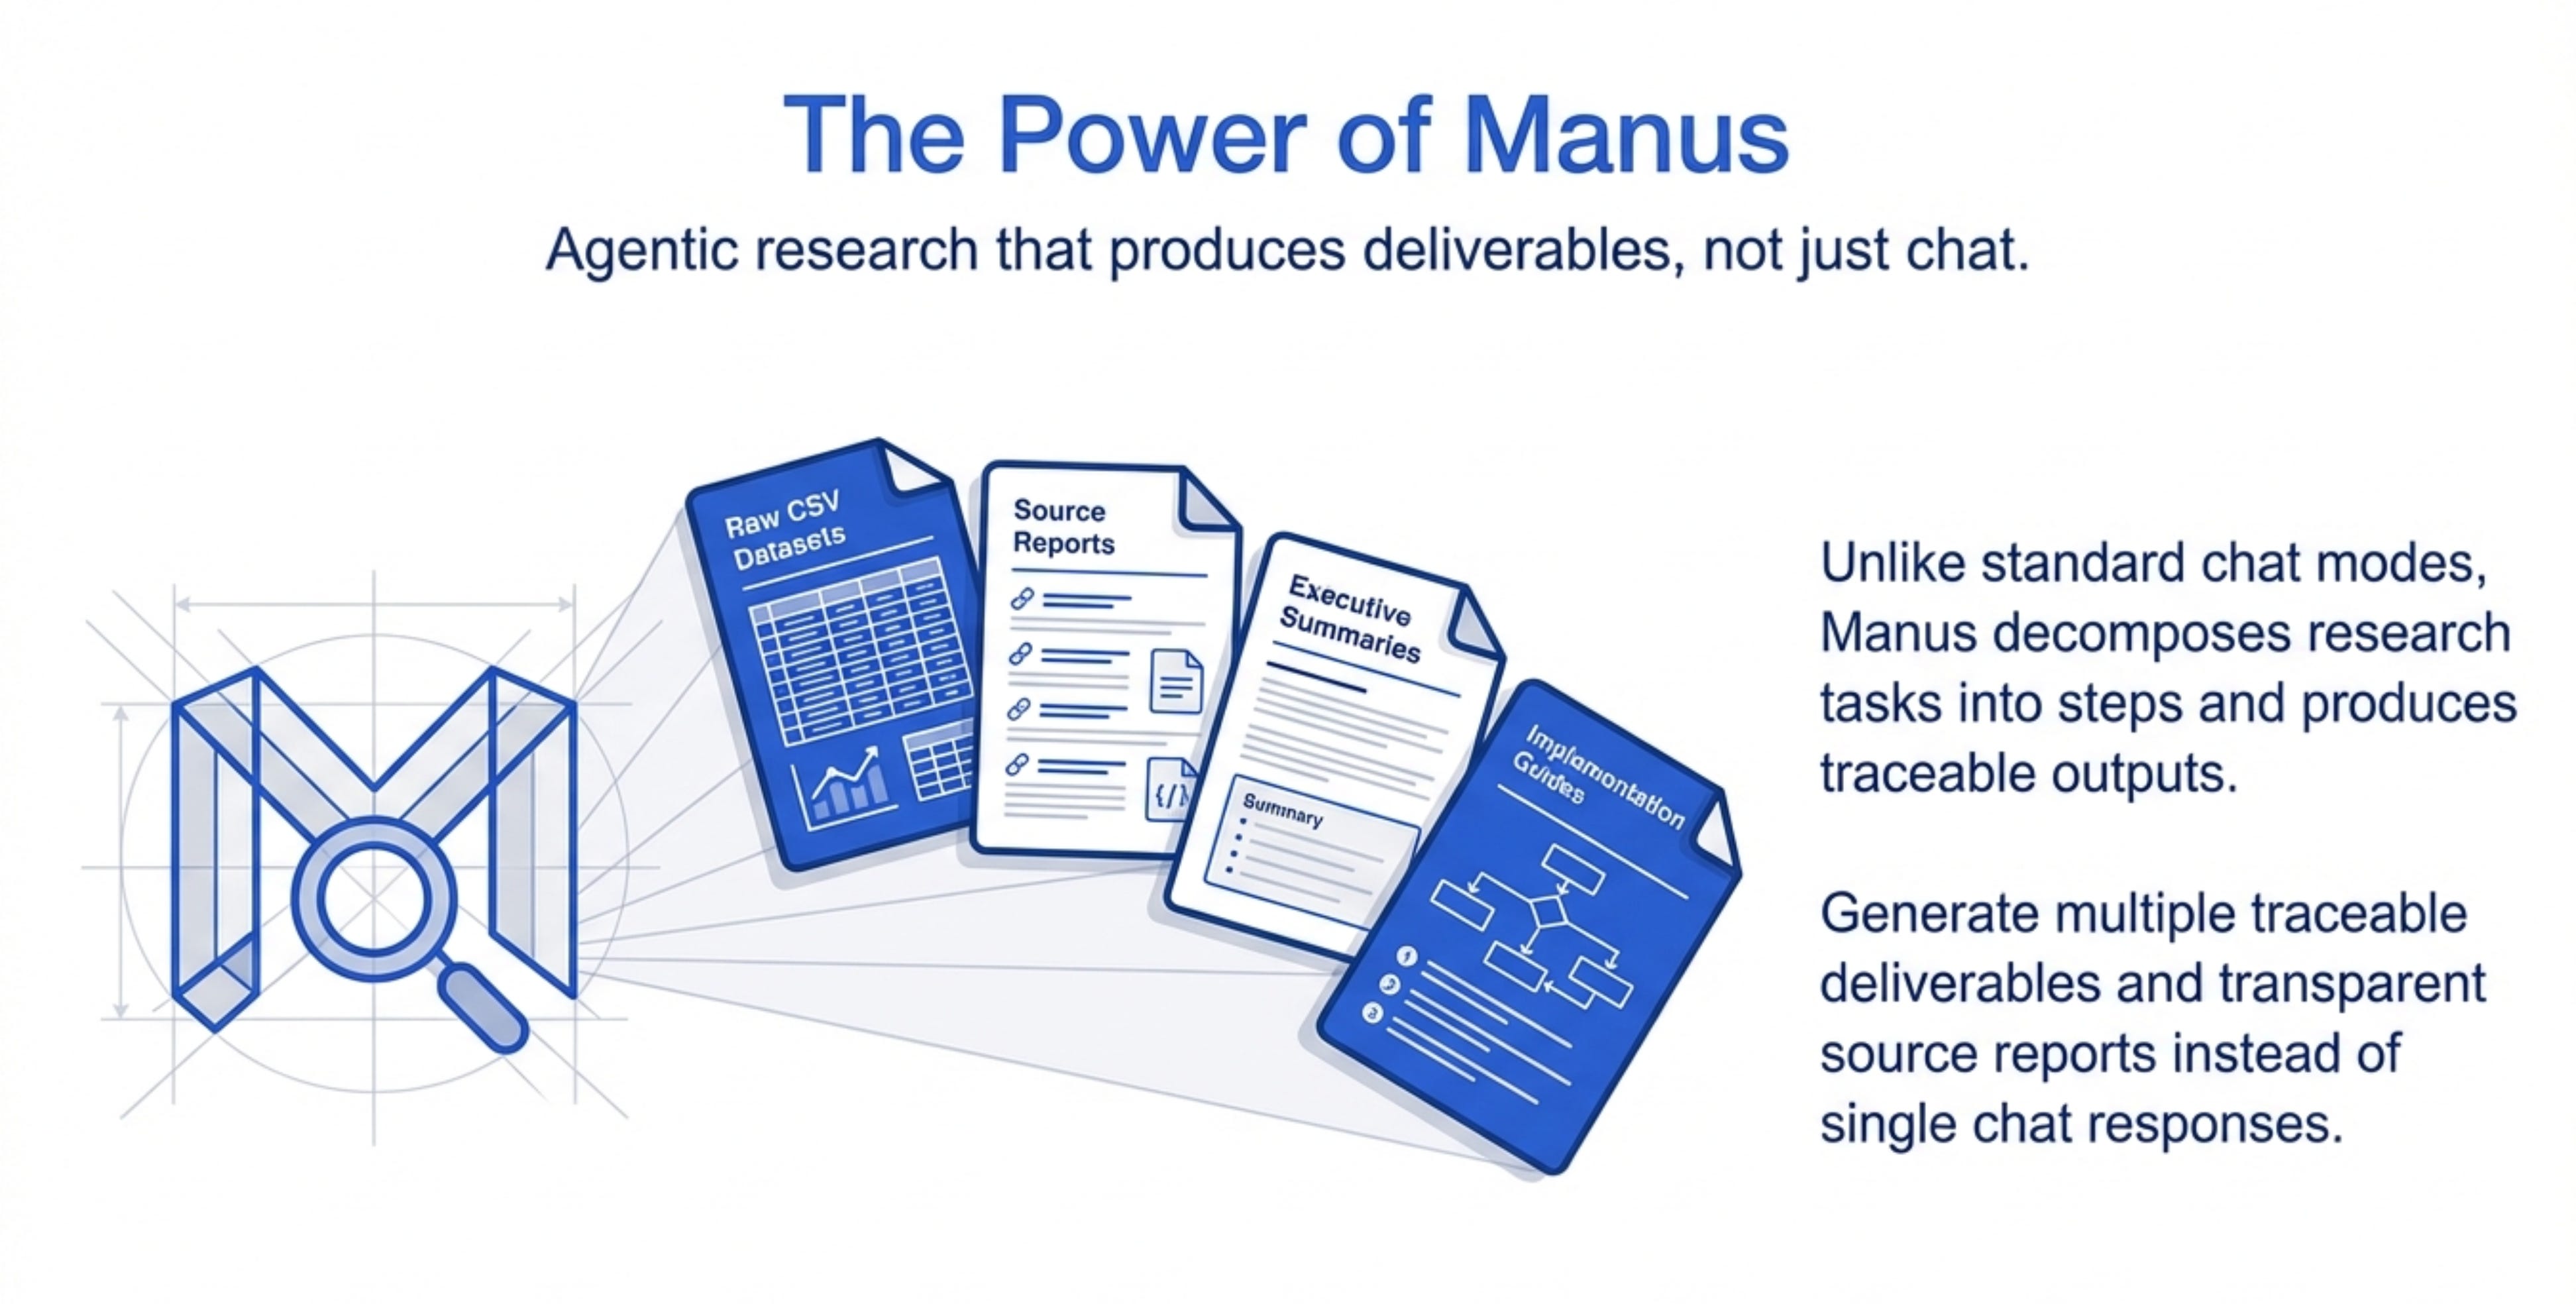
The reason is thoroughness and deliverables.
ChatGPT Agent Mode gives you responses. Manus gives you multiple file outputs for every research task.
When Mike asks Manus to research something, it decomposes the task into steps. Each step produces a deliverable.
Example research project
Mike wanted to evaluate the feasibility of building a ChatGPT app.
He sent Manus to research OpenAI’s SDK documentation, technical approach, capabilities, and limitations.
Manus came back with:
Sample CSV files with different data sources
Combined CSV with analysis
Data sources report showing where information came from
Quick start guide to use the findings
Markdown summary for humans
Five different files. All traceable back to sources.
If Mike only wanted one deliverable, he can access each piece independently. He can download the raw research. He can pull the summary. He can use the datasets elsewhere.
The Verification Workflow
Mike doesn’t trust AI research blindly.
He runs Manus externally. It generates all the deliverables. Then he vets and shapes the information before pulling it into his core projects.
This prevents the “conspiracy theorist LLM” problem.
If you automatically feed everything into your main operating system, the AI might anchor to wrong information. It might prioritize unimportant details.
By keeping research external and vetting it first, Mike controls what becomes canonical knowledge.
The vetting process
Review all deliverables from Manus.
Check sources in the data sources report.
Validate findings against known information.
Shape and refine the insights.
Then pull the validated context into Cursor or Claude Desktop.
Now the AI has good information to work from.
When to Use Claude Research Mode
Claude has built-in research mode. Mike rarely uses it.
Why?
“It just runs and runs and doesn’t do a great job of showing its work.”
Claude Research Mode burns through context and usage limits without giving you the detailed breakdowns Manus provides.
The Use Case Examples
There are plenty of use cases beyond product work!
Date night planning
“Here’s what we’re into. Here’s the weather. Here’s where we live. I want something within an hour drive out, hour drive back.”Manus runs and brings back all the research and different options.
Technical evaluation
When evaluating whether to build on a new platform or use a new technology, Mike sends Manus to research documentation.
“Review this technical documentation. Tell me what this is capable of, what it’s not capable of, and what the implementation approach would look like.”Manus comes back with detailed analysis and specific limitations.
This saves days of manual documentation reading.
5. Live Workflows for Design, Analytics, and Development
Now let’s see how all this comes together in real PM workflows.
Workflow 1 - Design Validation
This is the comparison workflow. Let’s break down every step.
The scenario:
You wrote a PRD six months ago. Design just sent over mockups. You need to verify the design matches the requirements.
Old way:
Open the PRD. Open the Figma file. Manually compare every section. Note differences. Send feedback.
Takes 1-2 hours depending on complexity.
New way with operating system:
Open Cursor or Claude Desktop.
Prompt:
“Find my doc in Confluence about Feature X.”Claude pulls the doc through the Confluence MCP.
Copy the Figma URL from Slack or email.
Prompt:
“Load this Figma design and compare it to the requirements doc. What did I miss?”Claude loads the design through Figma MCP, analyzes both, and returns gaps.
Takes 30 seconds.
What Claude catches:
Missing features from the requirements.
Design elements that weren’t in the spec.
Interaction patterns that contradict the PRD.
Edge cases that weren’t designed for.
This is a high-value PM task that used to require manual attention. Now it’s automated.
Workflow 2 - Analytics Deep Dive
This is the Clarity analytics workflow.
The scenario:
You need to understand why conversion dropped last week. You have Clarity session data but your analytics tool doesn’t have the exact report you need.
Old way:
Export CSV from Clarity. Open Excel or Google Sheets. Pivot tables. Manual analysis. Make charts.
Takes hours if you’re fast.
New way:
Export the dataset from Clarity.
Upload to Cursor or Claude Desktop.
Prompt:
“Analyze this user session data. What are the most common drop-off points? Which features have highest engagement? Are there patterns in failed conversions?”Claude analyzes the entire dataset and generates insights.
Then prompt:
“Create visualizations showing drop-off by funnel stage.”Claude generates charts.
Takes 10 minutes.
This works for any dataset. Product analytics, marketing data, user research survey results.
Export it, feed it to AI, get insights.
Workflow 3 - Building and Deploying
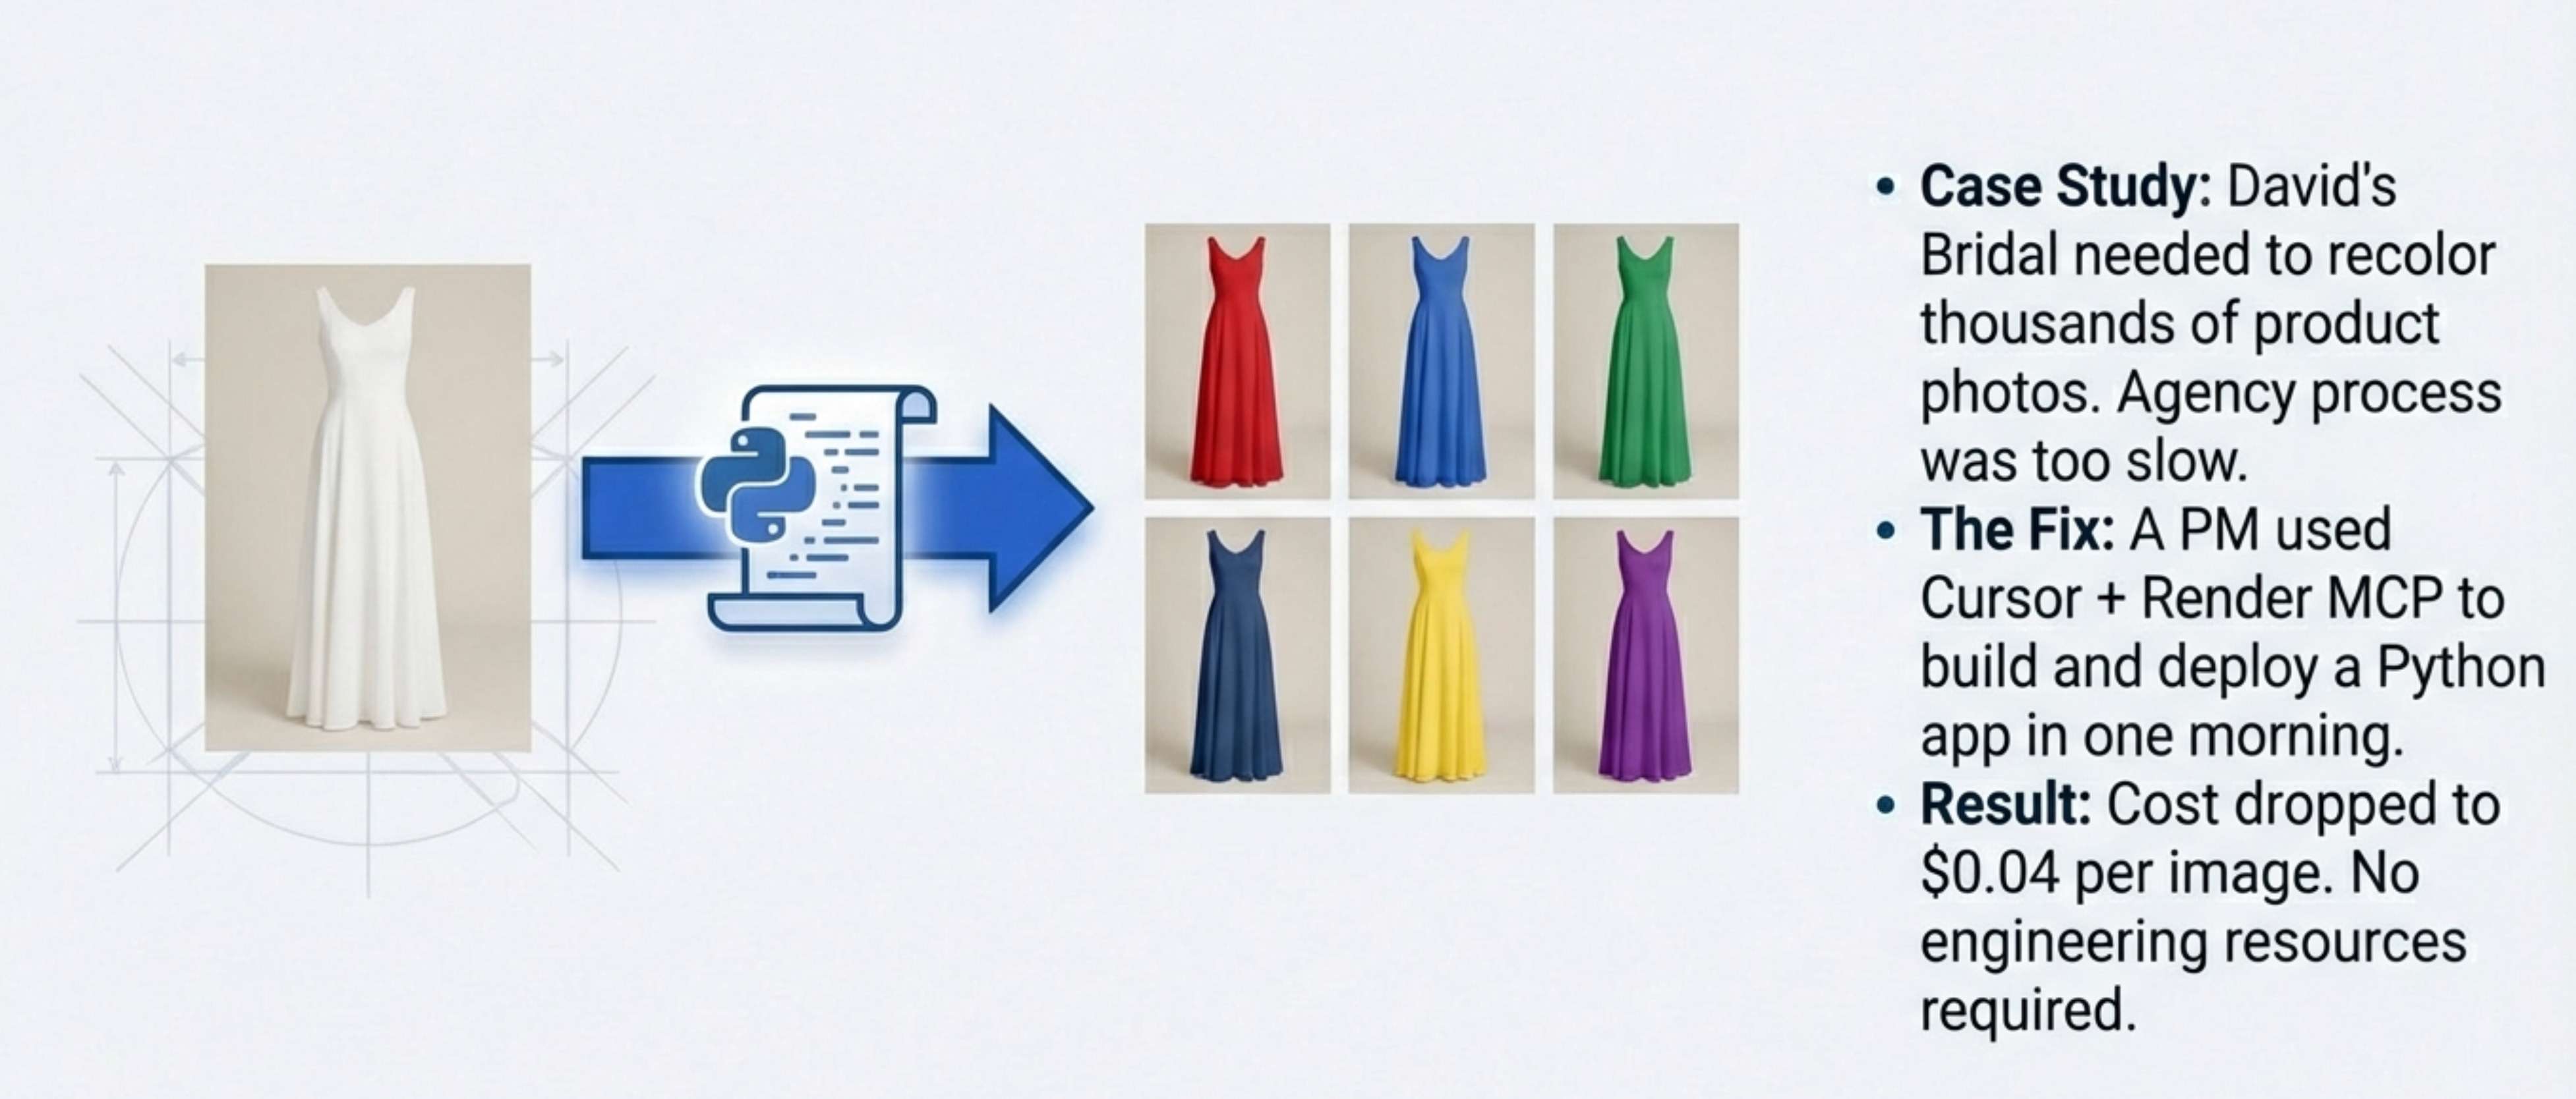
This is the colorization app Mike built.
The scenario:
Your e-commerce team needs thousands of product photos recolored. You’re paying an agency that only processes one product per month.
Old way:
Hire an engineer. Spec out the requirements. Wait for development. Test. Deploy.
Takes weeks or months. Costs thousands in engineering time.
New way:
Open Cursor. Start a new project.
Prompt:
“I need to build a colorization app. We shoot dresses in one color and need to generate 60 color variants. Use [specific image API]. Set up deployment on Render.”Cursor builds the app. Uses Render’s MCP to handle deployment.
When errors pop up, copy-paste them into Cursor. It fixes them.
When deployment needs configuration, Cursor handles it through the MCP.
Total time: One morning.
Total cost: $0.04 per image generated.
Mike deployed this to production. It’s running at David’s Bridal right now.
This is PM work that crossed into engineering territory. The operating system made it possible.
Workflow 4 - Content Management Migration
This is the Sanity CMS example.
The scenario:
Your product data lives in a spreadsheet. Every update requires manual work. You want to move to a proper CMS.
Old way:
Hire engineer. Build migration scripts. Test data integrity. Deploy. Fix bugs.
Takes weeks.
New way:
Open Cursor. Connect Sanity MCP.
Prompt:
“Migrate this spreadsheet data into Sanity CMS. Set up the content structure with these fields. Handle the data transformation.”Cursor does the migration through the MCP.
When issues come up, describe them. Cursor fixes them.
Total time: A few hours.
Mike’s wedding planning app now runs on Sanity. Updates are easy. No more spreadsheet hell.
Where to Find Mike
Related Content
Newsletters:
Podcasts:
PS. Please subscribe on YouTube and follow on Apple & Spotify. It helps!