Check out the conversation on Apple, Spotify and YouTube.
Brought to you by:
The AI Evals Course for PMs & Engineers: You get $1250 with this link
Vanta: Automate compliance, Get $1,000 with my link
Jira Product Discovery: Plan with purpose, ship with confidence
Land PM job: 12-week experience to master getting a PM job
Pendo: the #1 Software Experience Management Platform
Today’s Episode
Everyone’s demoing AI features. Few are shipping them to production reliably.
The gap? Evals.
Not the theoretical kind. The real-world kind that catches bugs before users do.
Hamel Husain and Shreya Shankar train people at OpenAI, Anthropic, Google, and Meta on how to build AI products that actually work. Their Maven course is the top-grossing course on the platform.
Today, they’re walking you through their complete eval process.
If you want access to my AI tool stack - Dovetail, Arize, Linear, Descript, Reforge Build, DeepSky, Relay.app, Magic Patterns, and Mobbin - for free, grab Aakash’s bundle.
Are you searching for a PM job? Join me + 29 others for an intensive 12-week experience to master getting a PM job. Only 23 seats left.
Newsletter Deep Dive
For subscribers, I’ve written up a text guide to AI evals (that summarizes + goes beyond the pod). It’s the Ultimate AI Evals Masterclass for PMs:
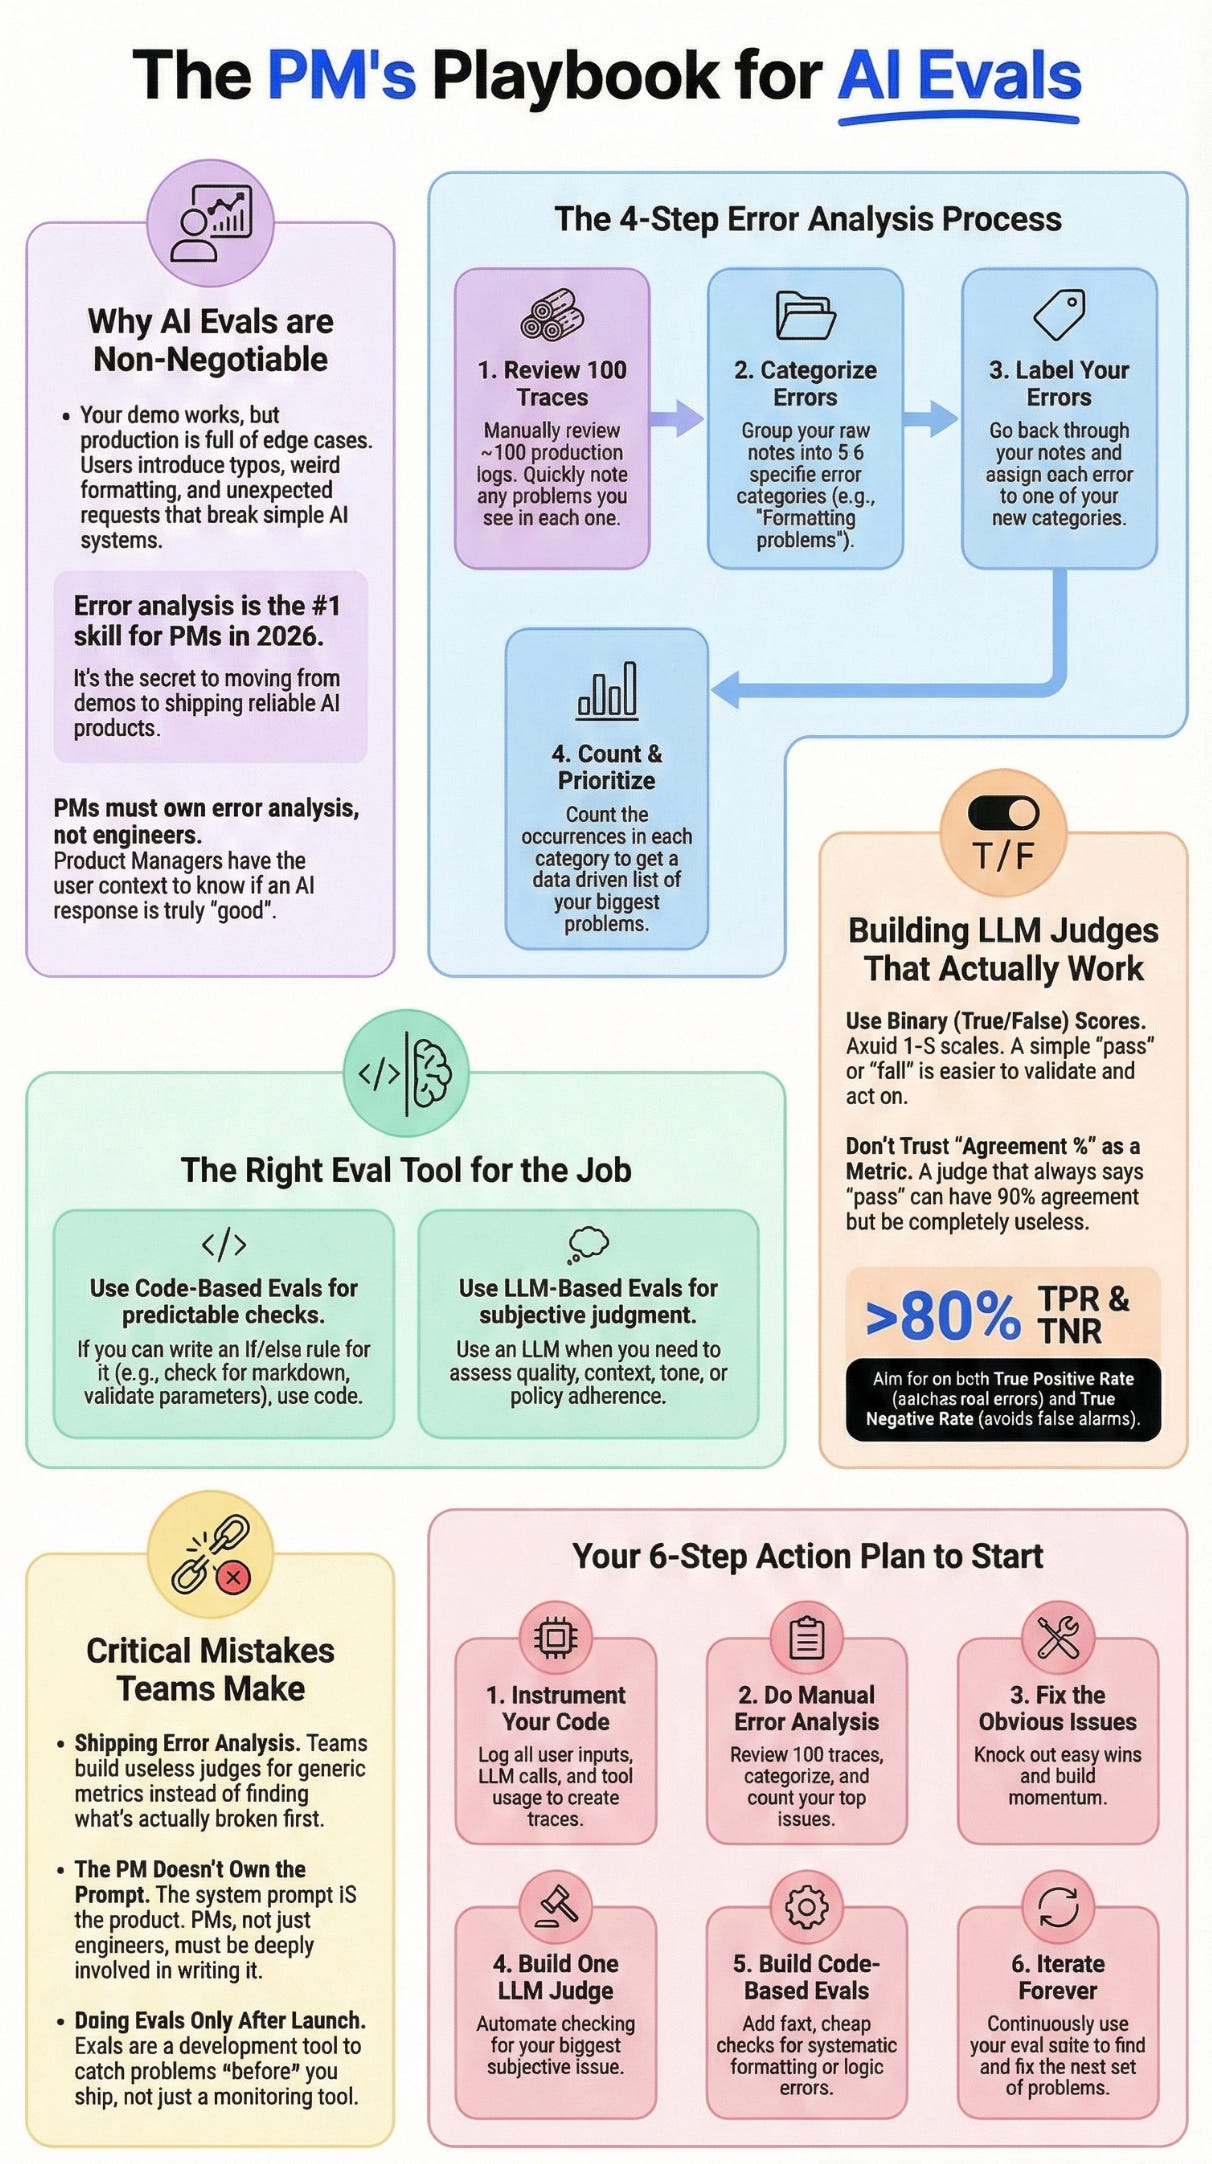
Why everyone needs evals (even if you’re “just vibing”)
The complete error analysis process step-by-step
How to build LLM judges that don’t hallucinate
The trap metrics that mislead teams
When to use workflows vs agents vs pure code
Critical Mistakes Teams Make
Building Your Eval Practice
1. Why Everyone Needs Evals (Even Loud Code)
There’s been controversy. Some people say you don’t need evals if you just vibe check and dog food your product.
That’s wrong.
Everyone needs evals. Some people are just less rigorous because someone else did evals for them upstream.
Take coding agents. The people training foundation models are testing on massive code benchmarks. So maybe you can build a coding app by religiously dog fooding your outputs.
But for most applications that aren’t naive uses of foundation models, you need some form of evals.
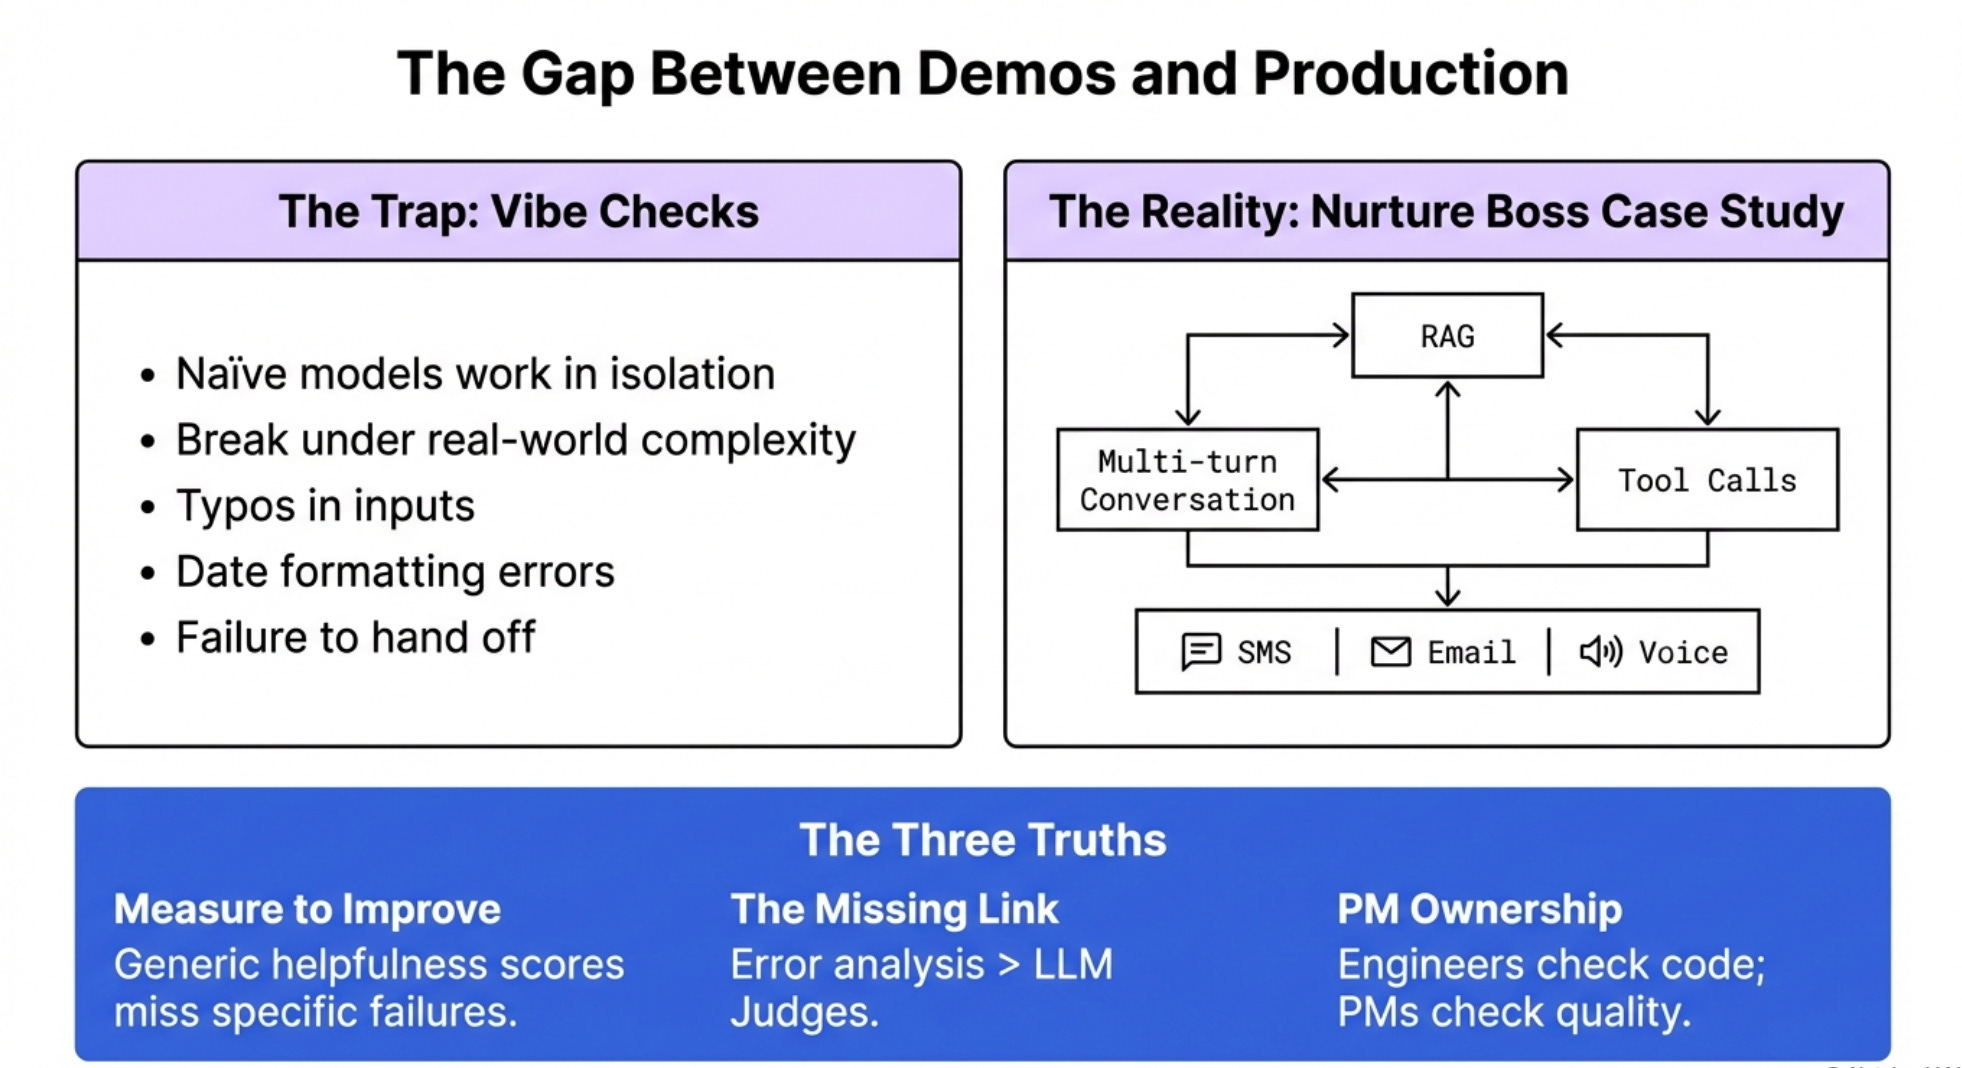
Your demo works great. Then it goes to production and users start hitting edge cases you never thought of. Text messages with typos. Dates formatted wrong. Requests the AI can’t handle but tries anyway instead of handing off to humans.
This is what your AI agents are actually doing out there in production. That’s why looking at traces is so important.
Why Nurture Boss Matters
The example in this episode uses real anonymized data from Nurture Boss, a tool for property managers handling tenant interactions, marketing, and sales.
The AI handles conversations via text message, voice, email, and chatbot. It shows listings, books tours, answers questions. All the messy real-world complexity you’ll face building AI products.
This isn’t a simplified tutorial example. This is production AI with tool calls, RAG, multi-turn conversations, multiple channels.
If you can eval this, you can eval anything.
The Three Eval Truths
Truth 1: You can’t improve what you don’t measure. Generic metrics like “helpfulness score” won’t catch the bathroom being connected instead of disconnected. You need application-specific evals.
Truth 2: Error analysis is the step most people skip. It’s also the most important. More important than the LLM judge. More important than the observability tool. This is where you actually learn what’s broken.
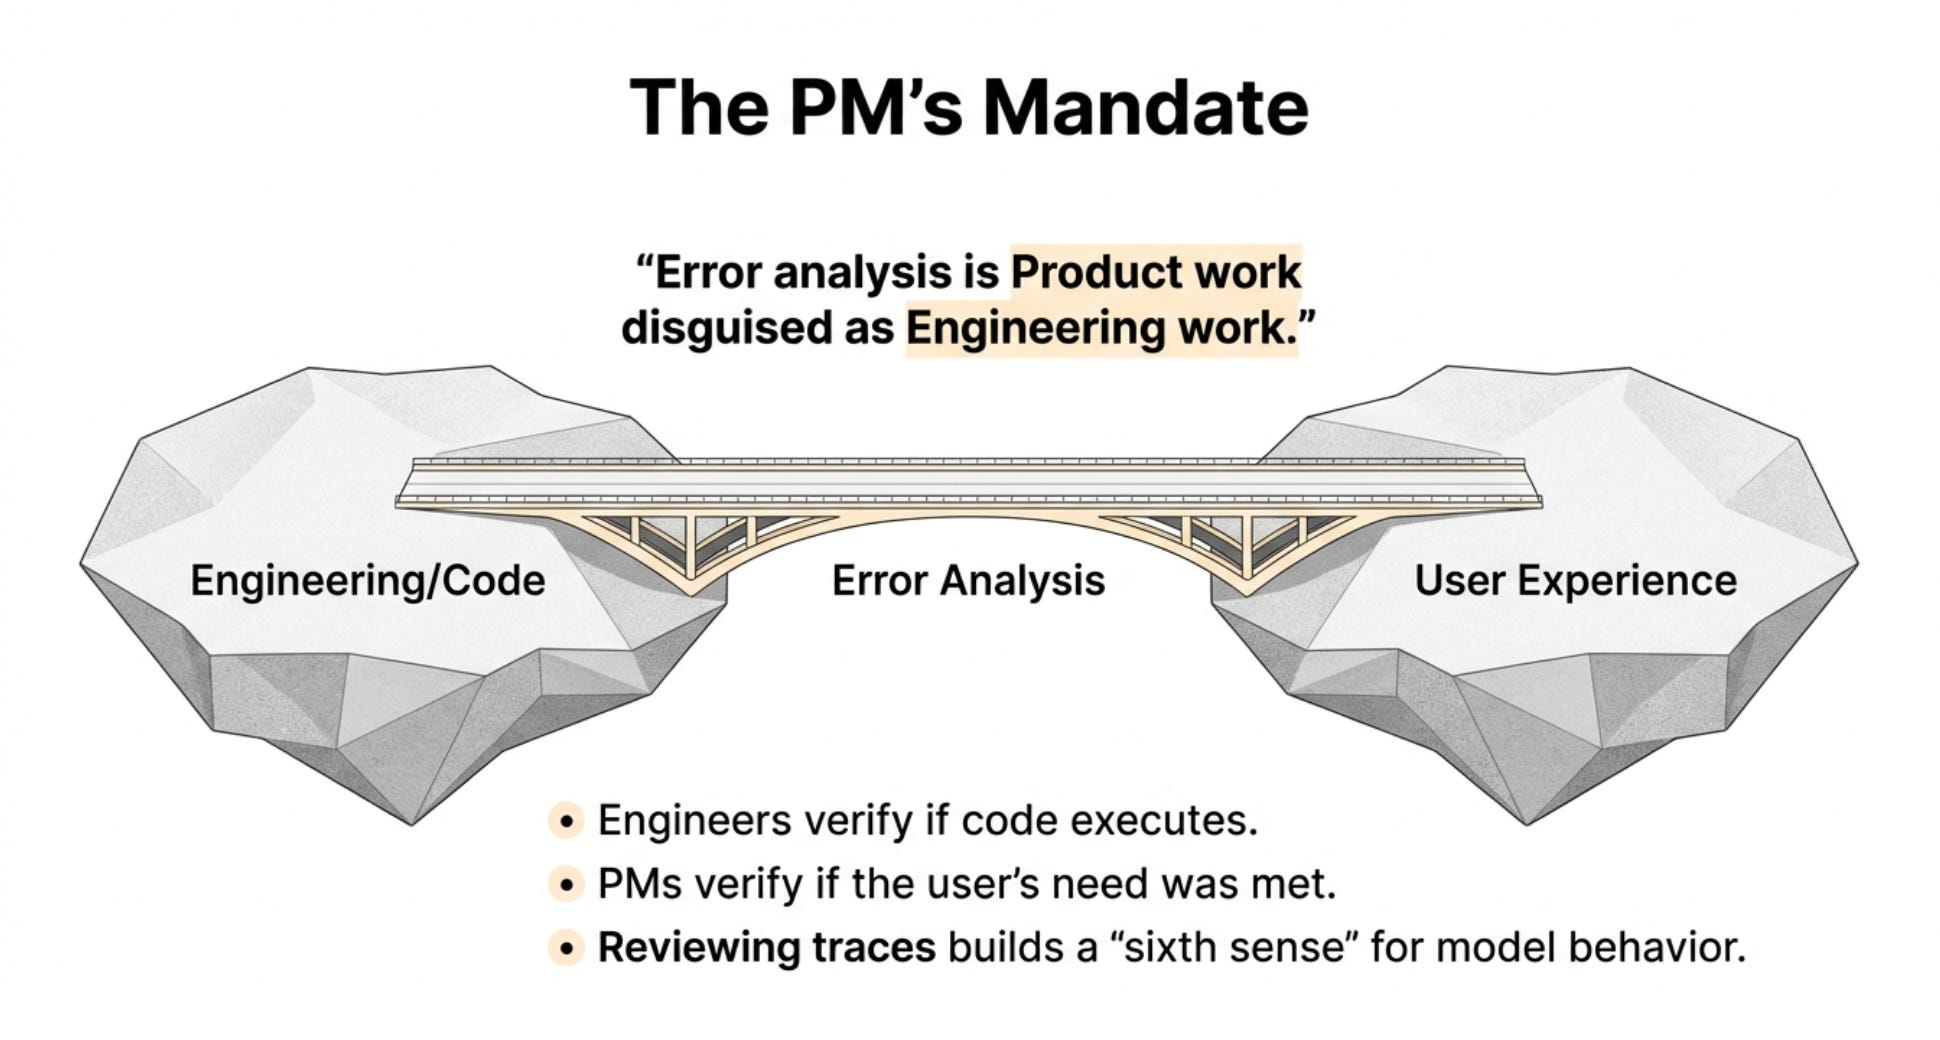
Truth 3: PMs need to own error analysis, not engineers. Engineers don’t have full context on whether the product experience is good. You do. This is product work, not engineering work.
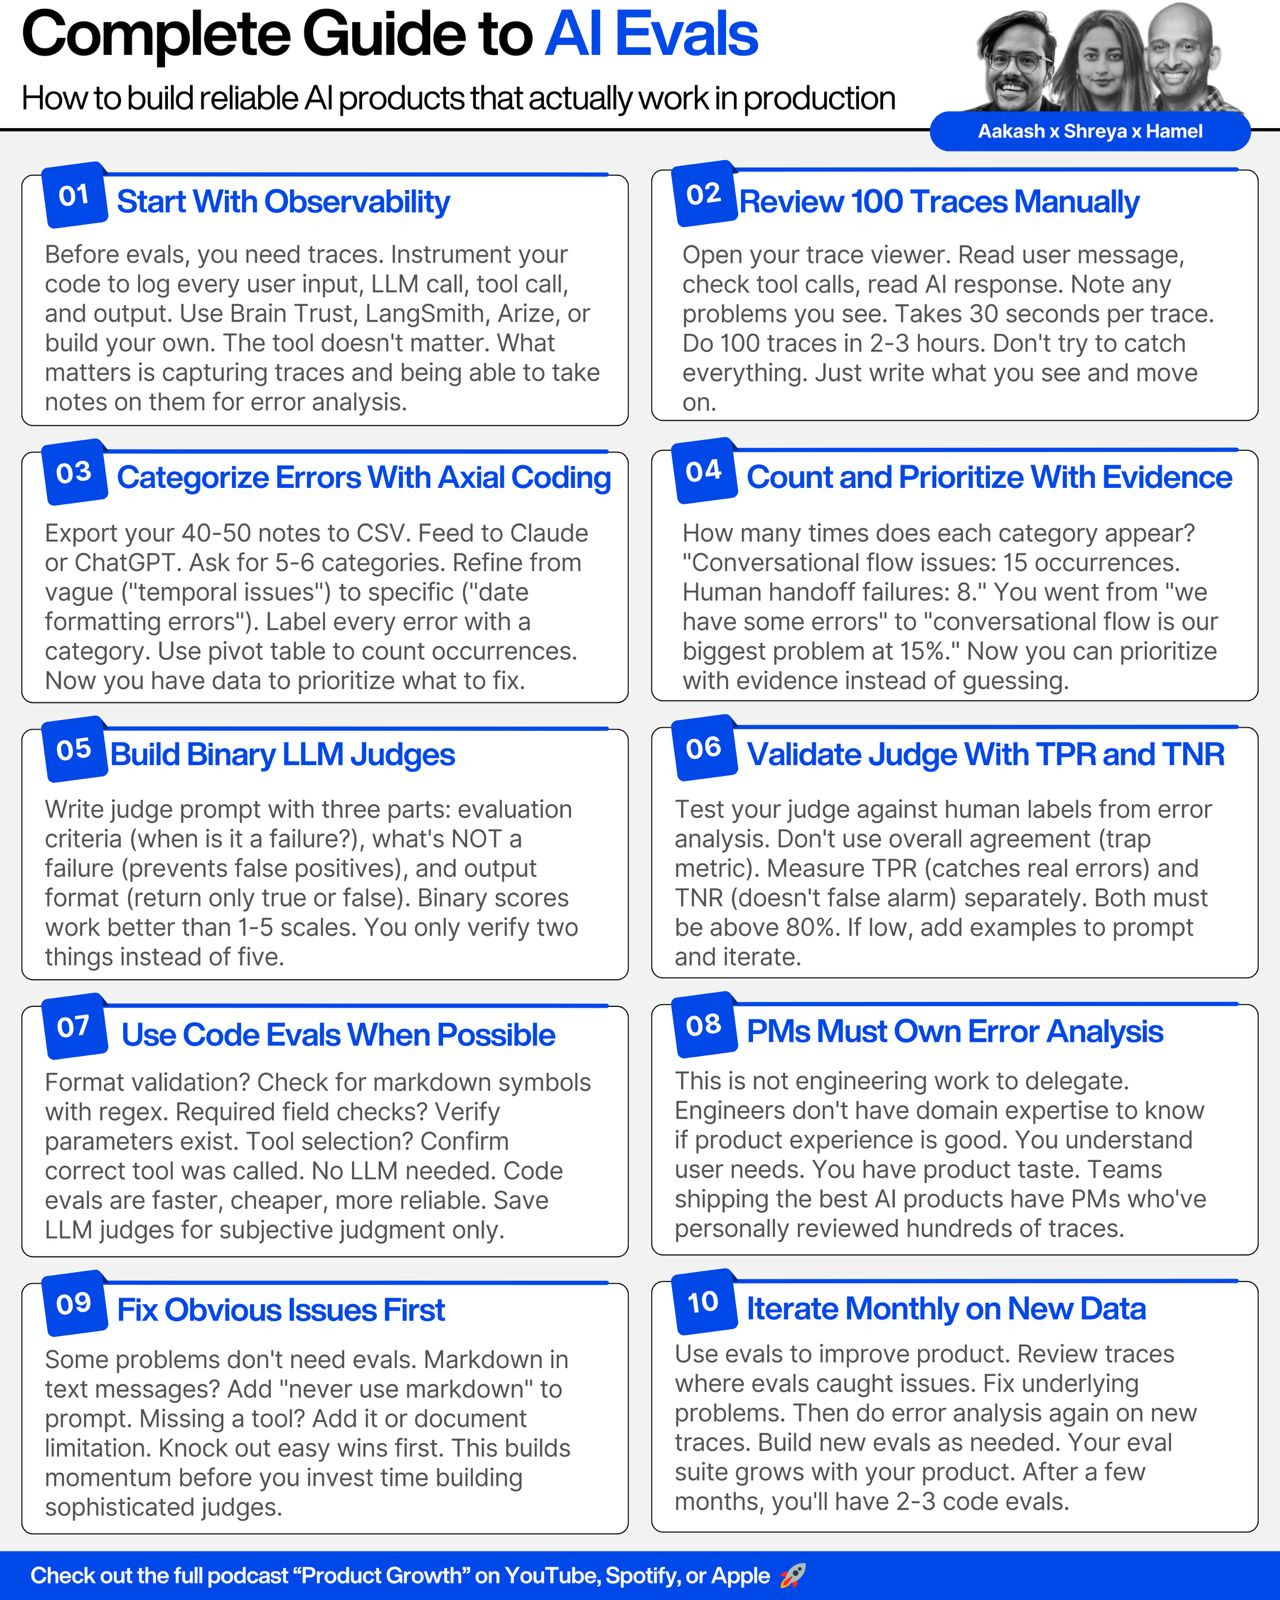
2. Setting Up Observability (The Foundation)
Before you can do evals, you need traces. Traces are logs of everything that happens in your AI application.
What Goes in a Trace
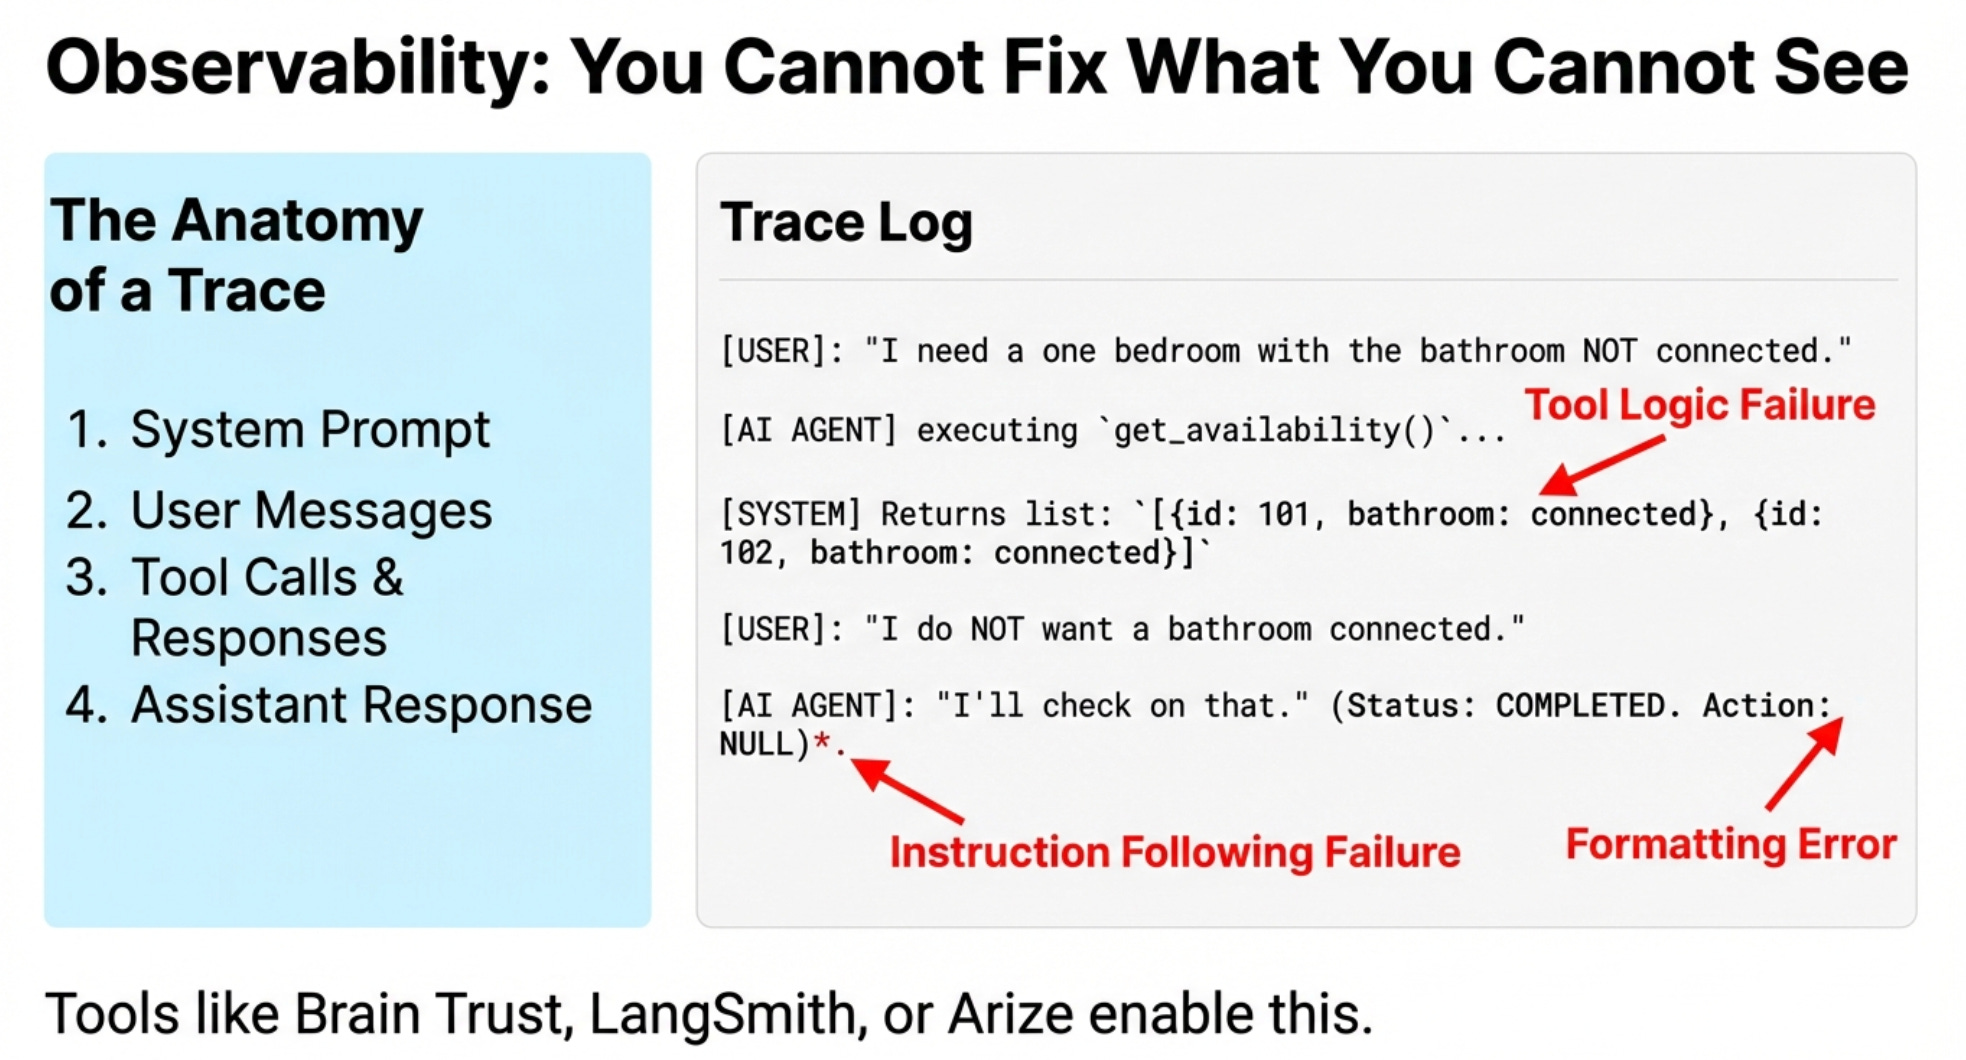
A complete trace includes:
System prompt
User messages
Tool calls and responses
Assistant responses
All the context the LLM saw
Think of it as a recording of everything your AI did to respond to a user.
For the Nurture Boss example, one trace showed:
User: “I need a one bedroom with the bathroom not connected”
AI: Called tool to get availability
AI: Returned apartments with bathrooms connected (wrong!)
User: “I do NOT want a bathroom connected to the room”
AI: “I’ll check on that” but never did
Plus: AI used markdown formatting in a text message (asterisks everywhere)
Three problems in one interaction. You can’t fix what you can’t see.
Choosing Your Observability Tool
Popular options:
Brain Trust
LangSmith
Arize
Build your own (recommended for learning)
The tool doesn’t matter as much as having one. What matters is capturing traces and being able to take notes on them. For more on AI testing infrastructure, the key is systematic trace collection.
Brain Trust, LangSmith, and Arize all let you add notes directly to traces. That note-taking feature is critical for error analysis.
Do You Need an AI Observability Tool?
Not necessarily. You can log to CSV, JSON, or text files if you want.
The reason we’re showing Brain Trust is so you can see what traces look like and understand the concept.
If you’re already paying for Datadog or another APM tool, use that. The key is logging traces somewhere you can review them.
One thing Hamel and Shreya teach in their course is to vibe code your own trace viewer. Nurture Boss eventually built their own interface specifically for their workflow.
Why build your own? Because you know exactly what information matters for your product. You can hide irrelevant details and surface what’s important.
But starting with an off-the-shelf tool is fine for learning.
3. The Error Analysis Process (The Secret Sauce)
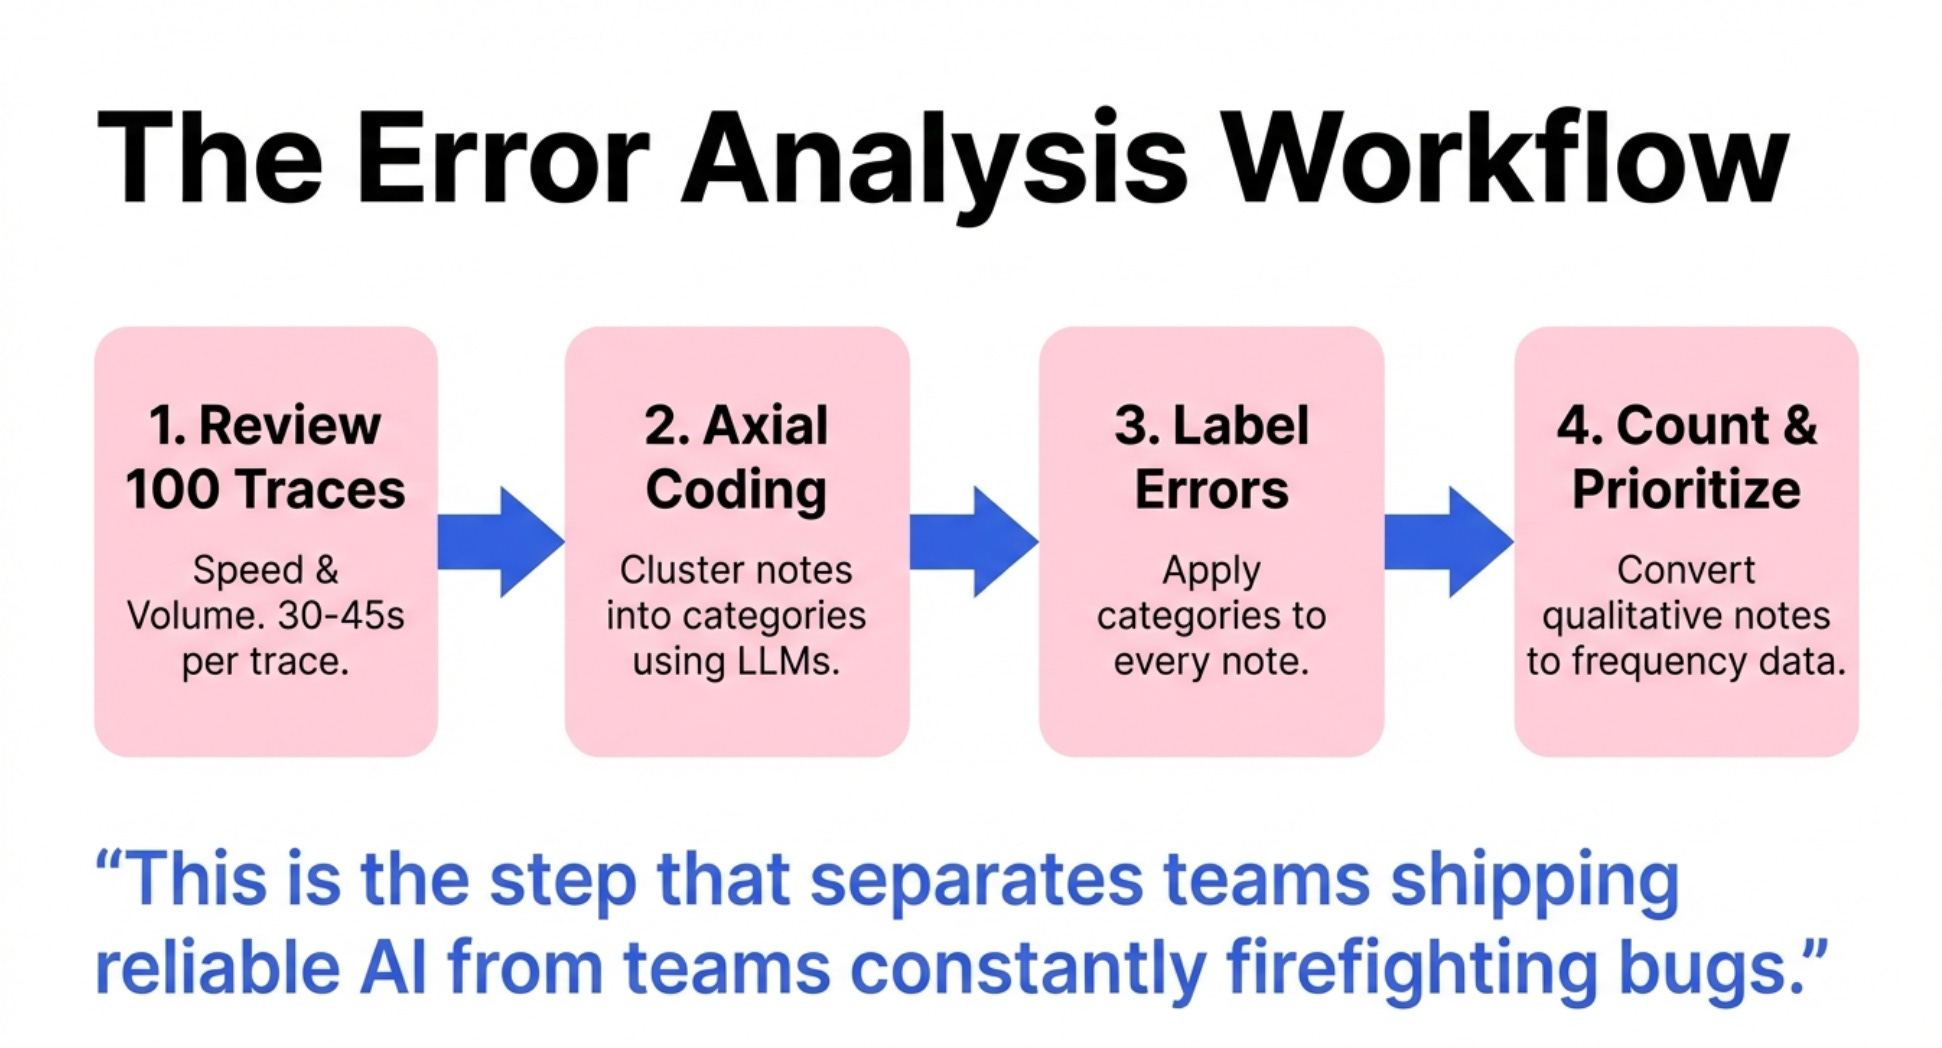
This is the step that separates teams shipping reliable AI from teams constantly firefighting bugs.
Error analysis is the systematic process of reviewing traces, noting problems, categorizing errors, and counting them.
Most teams skip straight to writing LLM judges or building dashboards. That’s backwards.
You need to understand what’s actually going wrong before you can measure it.
Step 1 - Review 100 Traces and Take Notes
Open your trace viewer. Look at the first trace.
Scan through it:
Read the user message
Check if the AI called the right tools
Look at what the tools returned
Read the assistant’s response
Note any problems you see
For the example trace we saw:
“Told user it would check on bathrooms but didn’t do it. Did not follow user instructions. Rendered markdown in a text message.”
That took maybe 30 seconds.
You don’t need to be perfect. Just write what you see. The key is speed and volume.
Do this for 100 traces. You’ll find maybe 40-50 errors across those traces.
The Rules of Error Analysis
Rule 1: Don’t try to catch everything. Just note the most important things and move on.
Rule 2: Don’t get stuck debating every trace. Think of everything that comes to mind, write it down, keep going.
Rule 3: If you’re familiar with the system prompt, you don’t need to read it every time. It’s usually the same.
Rule 4: You’ll develop a flow state. Let that happen. This should feel fast, not tedious.
The example showed someone reviewing traces live. First trace: 30 seconds. Second trace: 45 seconds. Third trace: 25 seconds.
In an hour you can review 100 traces easily.
Why PMs Must Do This
A lot of companies think “this AI stuff is engineering, let engineering figure out if it’s good or bad.”
That’s wrong.
Engineers don’t have the domain expertise to know if the product experience is good. They can tell you if the code works. They can’t tell you if the bathroom being connected vs disconnected matters to users.
You’re the domain expert. You understand user needs. You have product taste.
This is product work disguised as technical work.
Step 2 - Categorize Errors with Axial Coding
Now you have 40-50 notes scattered across traces. Time to organize them.
This process is called “axial coding” - grouping similar errors into categories.
You can use an LLM to help. Export your notes to a CSV. Feed them to Claude or ChatGPT with this prompt:
“These are open codes for analysis of LLM logs. Please extract all the different open codes, then propose 5-6 categories that you can create axial codes from.”
The LLM will suggest categories like:
Conversational flow issues
Human handoff failures
Tool calling errors
Formatting problems
Temporal context awareness
Those categories might be too vague. Refine them.
“Temporal issues” is vague. What does that mean? “Date formatting errors” is specific.
“Quality issues” is vague. “Conversational flow - repeated messages” is specific.
Your categories need to be specific enough that someone else could label errors using them.
Step 3 - Label Your Errors
Take your notes and your categories. Now label each note with the category it belongs to.
You can use a spreadsheet. You can use an LLM to auto-label and then review.
The key is every error note gets assigned to a category.
For the property management example:
“Rendered markdown in text message” → Formatting errors
“Said would check on bathrooms but didn’t” → Human handoff failures
“Returned connected bathrooms when user wanted disconnected” → Tool calling errors
Go through all 40-50 errors and categorize them.
Step 4 - Count and Prioritize
Now the magic happens. Count how many times each category appears.
Use a pivot table. Or just manually count. Whatever works.
You end up with something like:
Conversational flow issues: 15 occurrences
Human handoff failures: 8 occurrences
Tool calling errors: 7 occurrences
Formatting problems: 6 occurrences
Date/time errors: 4 occurrences
Now you have data.
You went from “we have some errors somewhere” to “conversational flow issues are our biggest problem, appearing in 15% of error cases.”
That’s actionable.
Why This Changes Everything
Before error analysis, you’re paralyzed. What should you fix first? What’s actually broken?
After error analysis, you know exactly what to prioritize.
Maybe human handoff failures happen less often but are catastrophic when they do. You prioritize that.
Maybe formatting issues are annoying but don’t break the experience. You deprioritize that.
You can have informed debates with stakeholders about what to fix next. You have evidence.
This is PM superpowers.
4. Building LLM Judges That Don’t Hallucinate
Once you know what to measure (from error analysis), you can build judges to measure it automatically.
An LLM judge is an AI that evaluates other AI outputs. It reads traces and scores them.
But most people build judges wrong. Their judges hallucinate. They miss obvious problems. They create false confidence.
Here’s how to build judges that actually work.
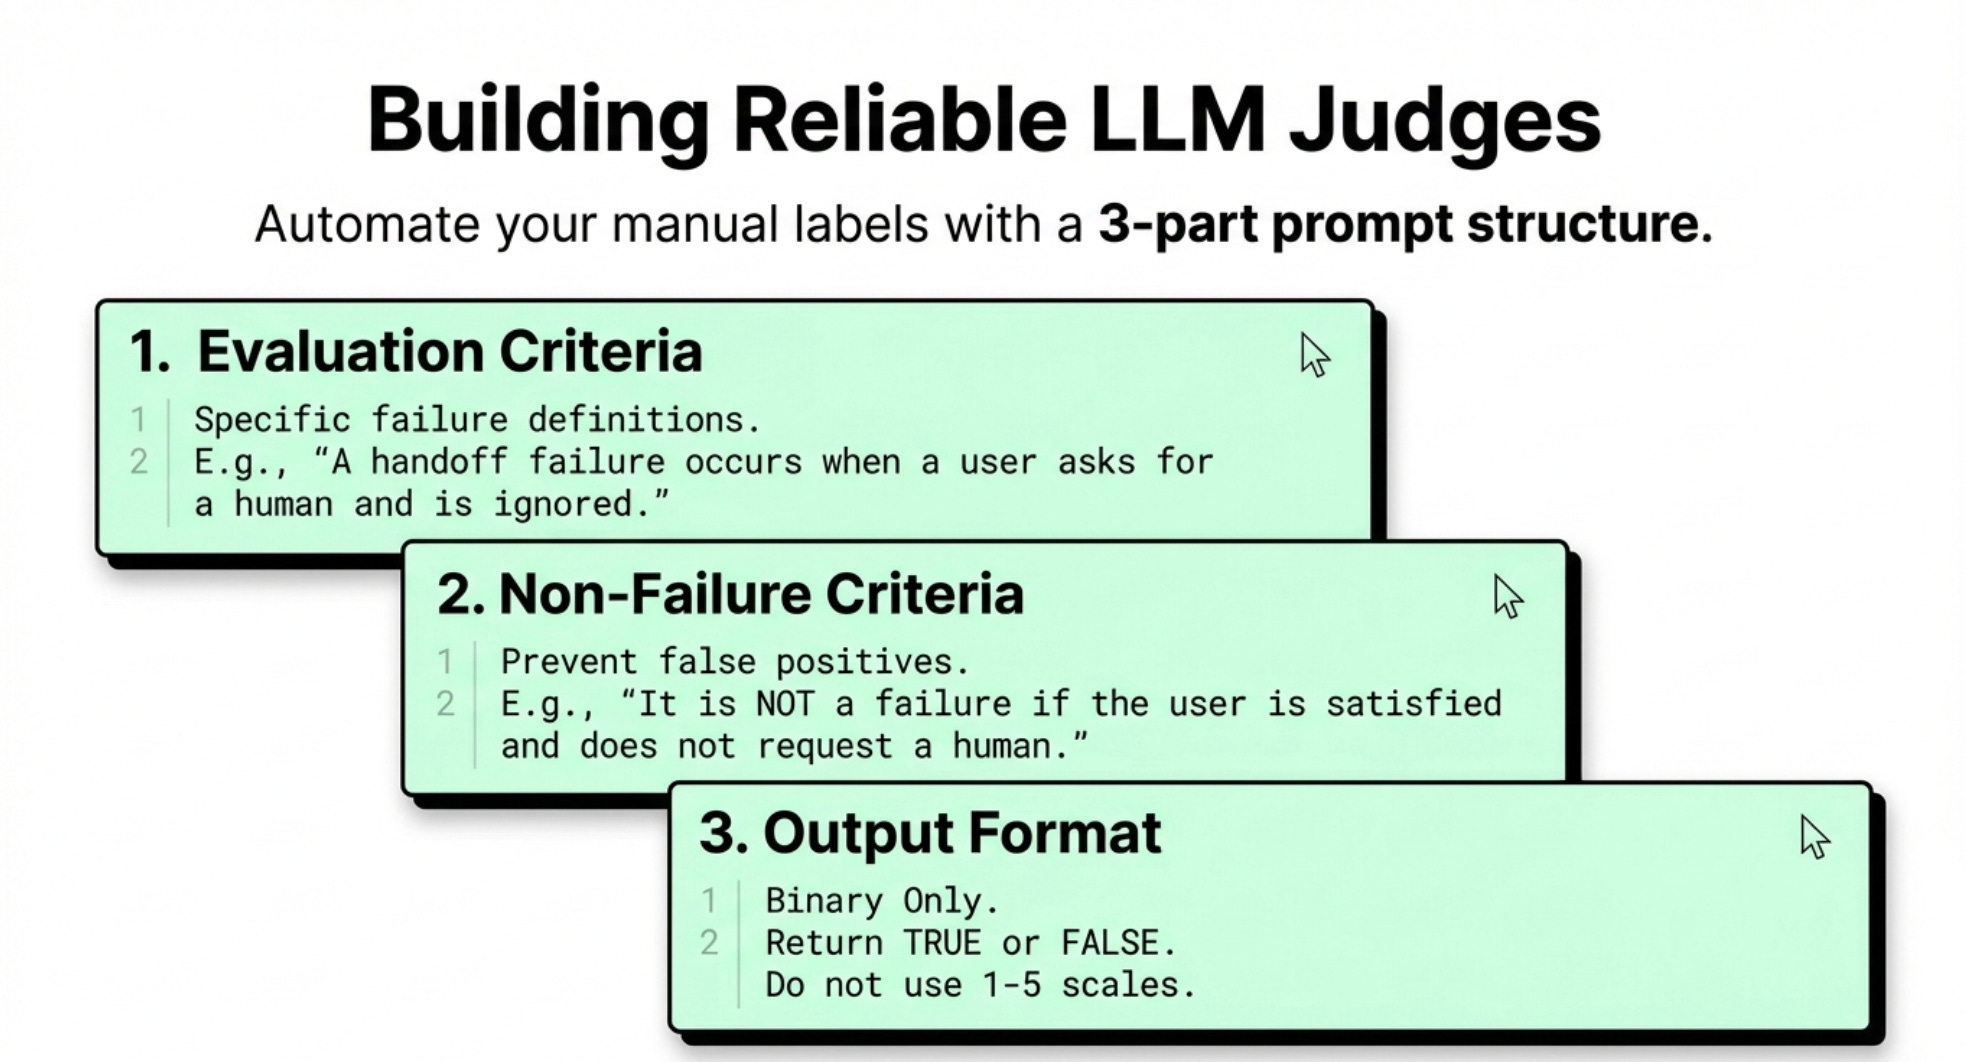
The LLM Judge Prompt Structure
Your judge prompt needs three parts:
Part 1: The evaluation criteria
Be specific about what counts as a failure:
“A human handoff failure occurs when:
User explicitly asks to speak to a human and request is ignored
A policy requires human handoff (billing disputes, legal issues) but AI tries to handle it
Same-day walk-in or tour requests occur (must hand to human)
Sensitive issues arise that need human judgment”
Part 2: What’s NOT a failure
This prevents false positives:
“NOT a handoff failure when:
User is satisfied with AI response and doesn’t request human
Issue is successfully resolved by AI
Handoff happens correctly”
Part 3: Output format
“Return only true or false. True if handoff failure occurred. False otherwise.”
That’s it. Binary scores only.
Why Binary Scores Work
Some people want to use 1-5 scales or percentage scores. That creates problems.
With binary scores, you only need to verify two things:
True means what you think it means
False means what you think it means
With a 1-5 scale, you need to verify every score aligns with your expectations. That’s 5 times more work.
Plus, business decisions are binary. Either you fix something or you don’t. Either it’s broken or it’s not.
The complexity of gradations doesn’t add value.
How to Validate Your Judge
Build your judge prompt. Now test it against your human labels from error analysis.
You already labeled 40-50 traces manually. Those are your ground truth.
Run your judge on those same traces. Compare the judge’s scores to your labels.
This gives you metrics.
The Trap Metric: Agreement
Most people look at overall agreement. “The judge agreed with me 90% of the time!”
That’s misleading.
If failures only happen 10% of the time, a judge that always predicts “pass” gets 90% accuracy by being completely useless.
The Real Metrics: TPR and TNR
You need two metrics:
TPR (True Positive Rate): When there’s actually an error, how often does the judge catch it?
TNR (True Negative Rate): When there’s not an error, how often does the judge correctly say “pass”?
You want both above 80%. Ideally above 90%.
If TPR is low, your judge is missing real problems. If TNR is low, your judge is crying wolf constantly.
Both need to be high.
Iterate on Your Prompt
Your first judge prompt won’t be perfect. That’s expected.
Look at the cases where the judge got it wrong:
Where did it miss real failures? Add those scenarios to your criteria.
Where did it false alarm? Add those to your “NOT a failure” section.
Add 1-2 examples to the prompt showing correct judgments.
Test again. Keep iterating until both metrics are above 80%.
This takes time. Budget for it. But once you have a reliable judge, you can scale eval across all production traces.
5. When to Use Workflows vs Agents vs Code
Not everything needs an LLM judge. Sometimes code-based evals work better.
Understanding when to use AI agents versus traditional workflows is critical for building reliable AI products.
Here’s when to use each approach.
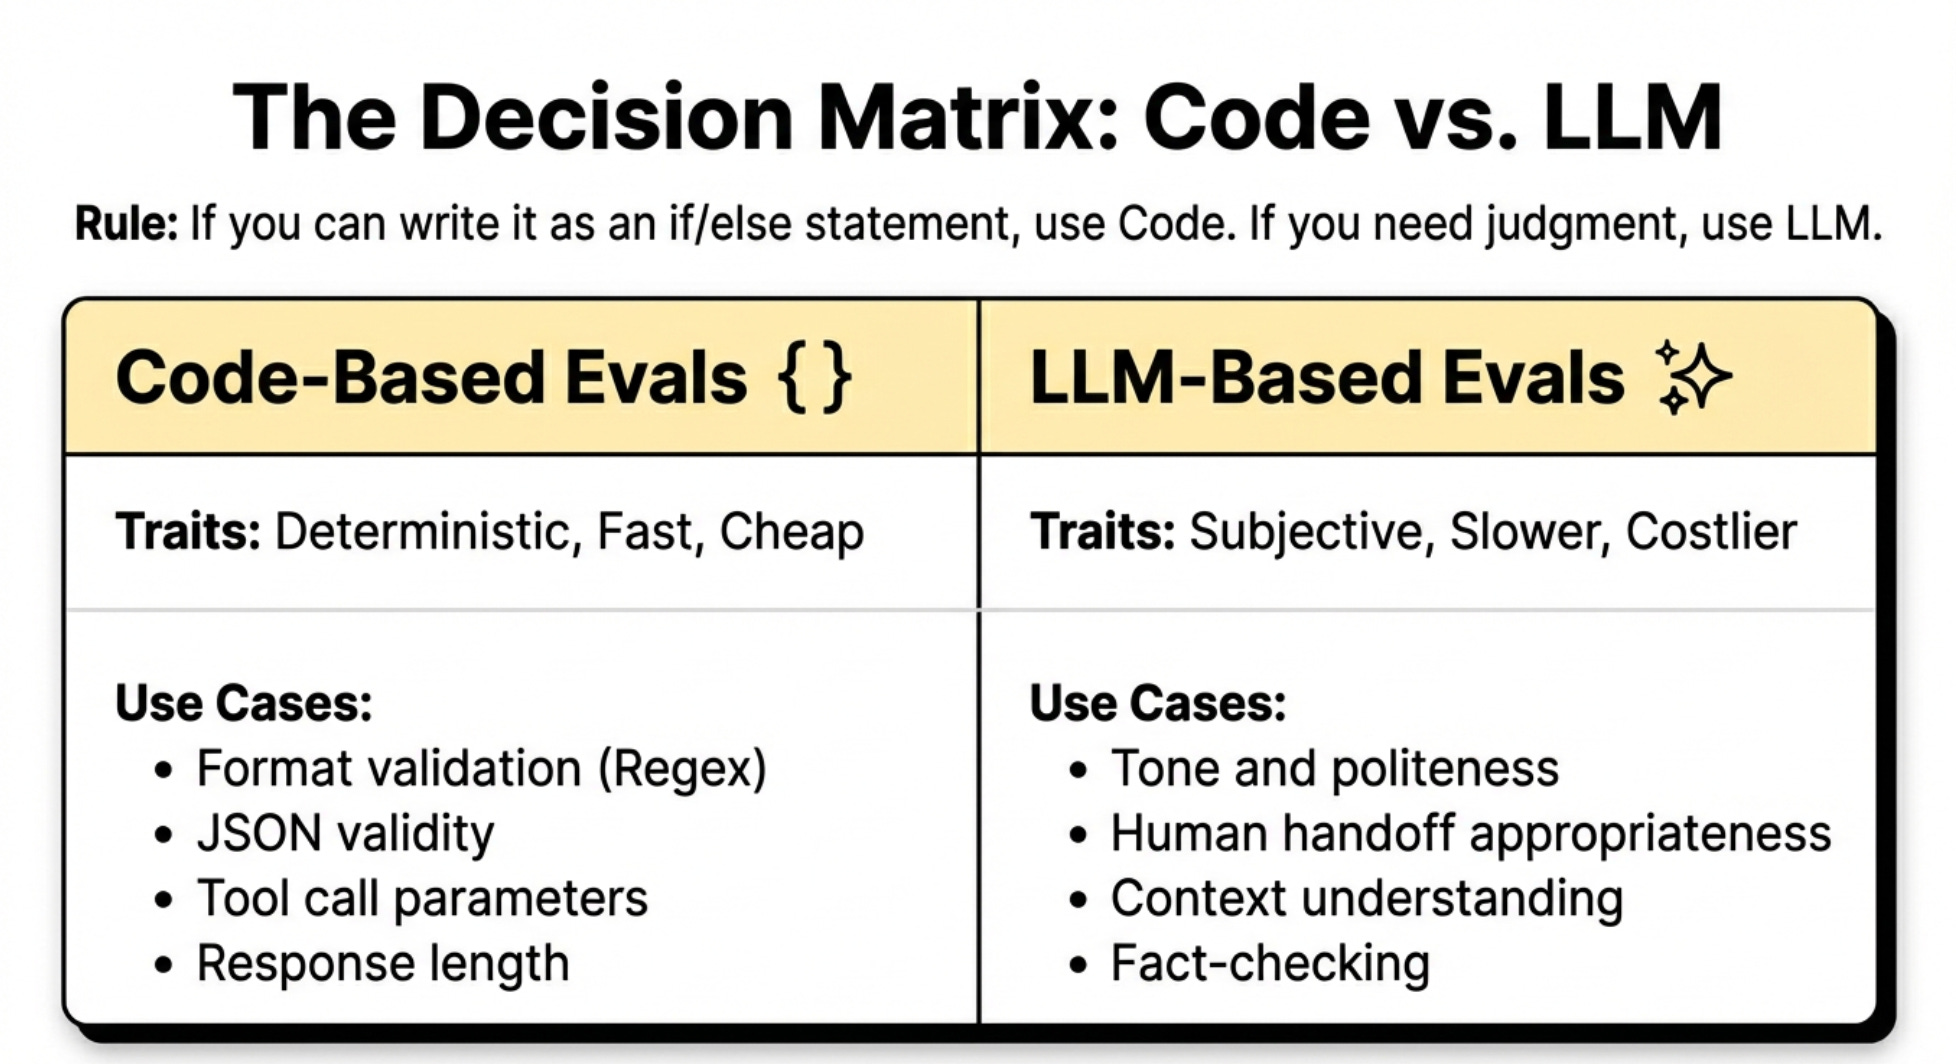
Code-Based Evals
Use code when you can test something without calling an LLM:
Example 1: Format validation
Is markdown appearing in text messages? Write a regex that checks for asterisks, square brackets, or hash symbols.
No LLM needed. Fast, cheap, deterministic.
Example 2: Tool call validation
Did the AI call the right tool? Check the tool name in the trace.
Did it include required parameters? Check the parameter object.
Again, no LLM needed.
When to use code evals
Format issues, required field checks, tool selection logic, response length constraints, prohibited content patterns.
LLM-Based Evals
Use LLMs when you need subjective judgment:
Example 1: Human handoff appropriateness
Should this situation have been handed to a human? That requires understanding context and applying policy. An LLM can do this.
Example 2: Response quality
Is the response helpful and professional? Code can’t judge that. An LLM can.
Example 3: Fact-checking against source material
Did the AI accurately summarize the retrieved documents? An LLM can compare.
When to use LLM evals
Subjective quality, policy application, context understanding, summarization accuracy, tone appropriateness.
The Decision Rule
If you can express the check as an if/else statement, use code. If you need judgment, use an LLM.
Code evals are faster and cheaper. Use them whenever possible. Use LLM evals for everything else.
Both are valuable. A complete eval suite typically has 2-3 code-based evals and 1-2 LLM-based evals.
6. Critical Mistakes Teams Make
After training hundreds of people at top AI companies, Hamel and Shreya see the same mistakes repeatedly.
Mistake 1 - Skipping Error Analysis
Teams jump straight to building LLM judges or dashboards. They want the cool technical solution.
But they don’t know what they’re measuring. So they build judges for generic things like “helpfulness” or “conciseness” that don’t catch real problems.
The bathroom being connected instead of disconnected? That “helpful” judge gave it a pass.
The markdown rendering in text messages? That “concise” judge thought it was great.
Error analysis is not optional. It’s the foundation. Skip it and everything else is built on sand.
Mistake 2 - Separating the Prompt from the PM
The system prompt is written in English. It’s made for domain experts.
Yet many companies treat it as engineering territory. The PM writes a PRD. The engineer writes the prompt. The engineer has no idea if the product is good.
That’s backwards. This is a critical part of AI product strategy.
PMs should own the prompt. Or at minimum, be deeply involved in prompt iteration.
Some teams build admin interfaces where PMs can edit prompts directly in production. That’s the right approach.
The prompt IS the product in AI applications. Don’t delegate product to engineering.
Mistake 3 - Using Only Agreement for Judge Validation
We covered this already but it’s worth repeating.
90% agreement sounds great until you realize your judge is useless because it’s just guessing “pass” every time.
Always measure TPR and TNR separately. Both must be high.
Mistake 4 - Not Doing Eval Until After Launch
Some teams think evals are only for production monitoring.
Wrong. Do evals during development.
Build your eval suite before you ship. Use it to iterate on your prompts and logic. Use it to catch problems before users do.
Evals aren’t just for monitoring. They’re for building.
Mistake 5 - Outsourcing Error Analysis
Some PMs see error analysis and think “this is tedious, I’ll have an intern do it.”
Terrible idea.
Error analysis is where you build product intuition. It’s where you learn what users actually need. It’s where you discover product insights.
This is not grunt work to delegate. This is PM core work.
The teams shipping the best AI products have PMs who’ve personally reviewed hundreds or thousands of traces.
That experience shows in the product.
7. Building Your Eval Practice
You’re convinced. You want to build an eval practice. Where do you start?
If you’re taking an AI product from prototype to production, evals are non-negotiable.
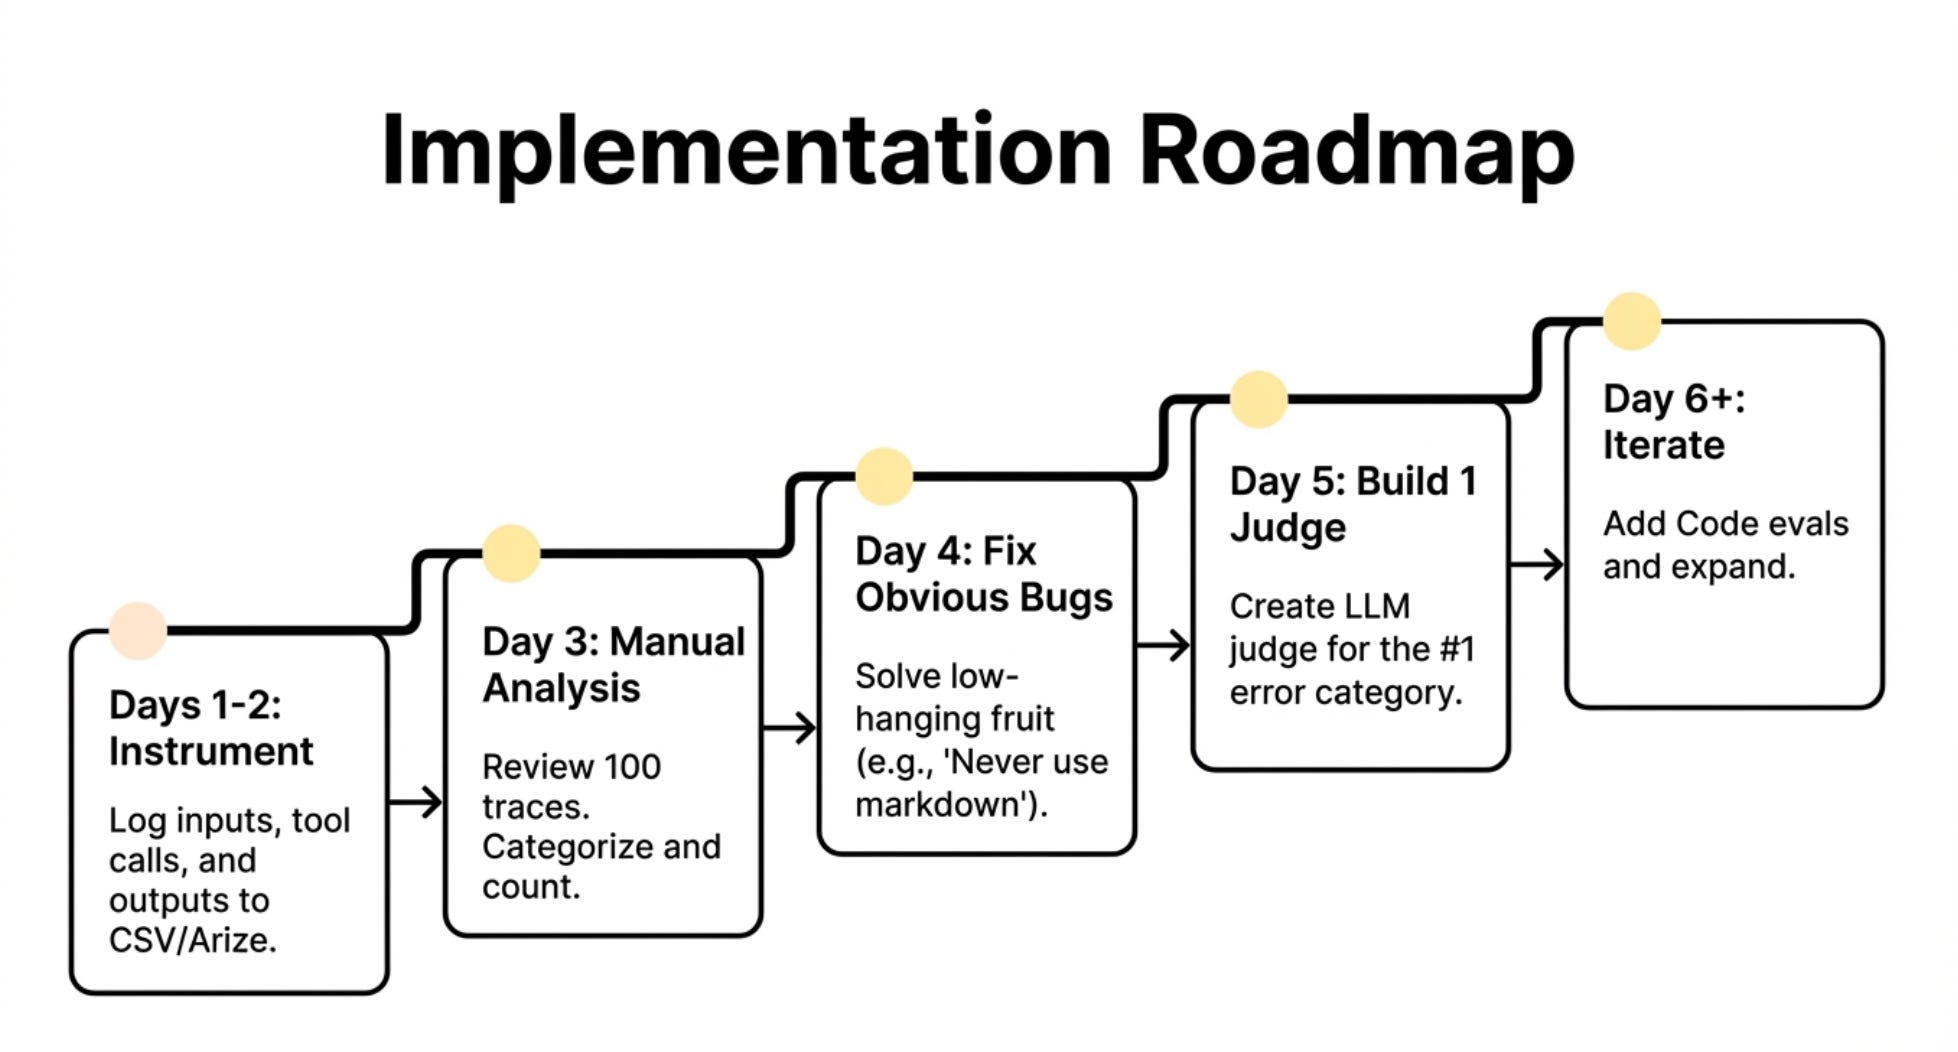
Step 1 - Instrument Your Code
Before anything else, you need traces. Add logging to your AI application:
Log every user input
Log every LLM call (prompt and response)
Log every tool call and result
Log the final output
Use an observability tool or just log to files. Doesn’t matter. Get the data flowing.
Budget 1-2 days for this if you’re starting from scratch.
Step 2 - Do Error Analysis on 100 Traces
Review 100 traces manually. Take notes. Categorize errors. Count them.
This is the most important step. Don’t skip it. Don’t rush it.
Budget 2-3 hours for the review. Budget another 1-2 hours for categorization and counting.
At the end you’ll have a prioritized list of what’s broken.
Step 3 - Fix Obvious Issues
Some issues don’t need evals. They just need fixing.
Markdown in text messages? Add “never use markdown formatting” to your prompt.
Missing a tool for virtual tours? Add it or document the limitation.
Knock out the easy wins. This builds momentum.
Step 4 - Build One LLM Judge for Your Biggest Issue
Pick your most important error category. Build an LLM judge for it.
Write the prompt. Test it on your labeled traces. Iterate until TPR and TNR are both above 80%.
This first judge will take the longest. Budget a day or two.
But you’ll learn the process. Future judges will be faster.
Step 5 - Build Code-Based Evals for Systematic Issues
Look for patterns you can check with code. Build those evals.
Format validation. Required field checks. Response length limits.
These are quick wins that catch whole classes of problems.
Step 6 - Iterate
Use your evals to improve the product. Review traces where evals caught issues. Fix the underlying problems.
Then do error analysis again on new traces. Build new evals as needed.
This cycle continues forever. Your product evolves. New edge cases emerge. Your eval suite grows with it.
The End State
After a few months, you’ll have:
2-3 code-based evals running on every request
1-2 LLM-based evals running regularly
A practice of doing error analysis monthly to catch new issues
Confidence that your AI product actually works in production
That’s the goal.
Where To Find Them
LinkedIn:
Hamel: Hamel’s LinkedIn
Shreya: Shreya’s LinkedIn
AI Evals Course: World’s best AI Evals Course (You get $800 off with this link)
Related Content
Newsletters:
Podcasts:
PS. Please subscribe on YouTube and follow on Apple & Spotify. It helps!