
The Ultimate Guide to Replit
I’ve tried every AI coding tool on the market. This one is one of my favorites
When it comes to AI prototyping tools, you have a million options. But increasingly, many teams are going with Replit.
It exploded from ~$10M to ~$150M ARR in the last 12 months. So I dove in to figure out what works and what doesn’t:
What I found is that in 2025, Replit shipped more features than any other AI coding tool on the market. Design Mode. Fast Mode. Agent 3. Figma import. 30+ integrations.
So throw away your old tutorials, because they don’t apply anymore.
Today I’m giving you the complete guide for Replit in 2026.
Why This Guide Exists
I’ve been building with Replit since they launched Agent in September. That’s 5.5 months of prototypes, features, apps, and figuring out what actually works in Replit and what doesn’t.
The landscape changed completely in that time. Replit went from a simple code editor to the most feature-rich AI coding platform on the market.
Here’s what they shipped:
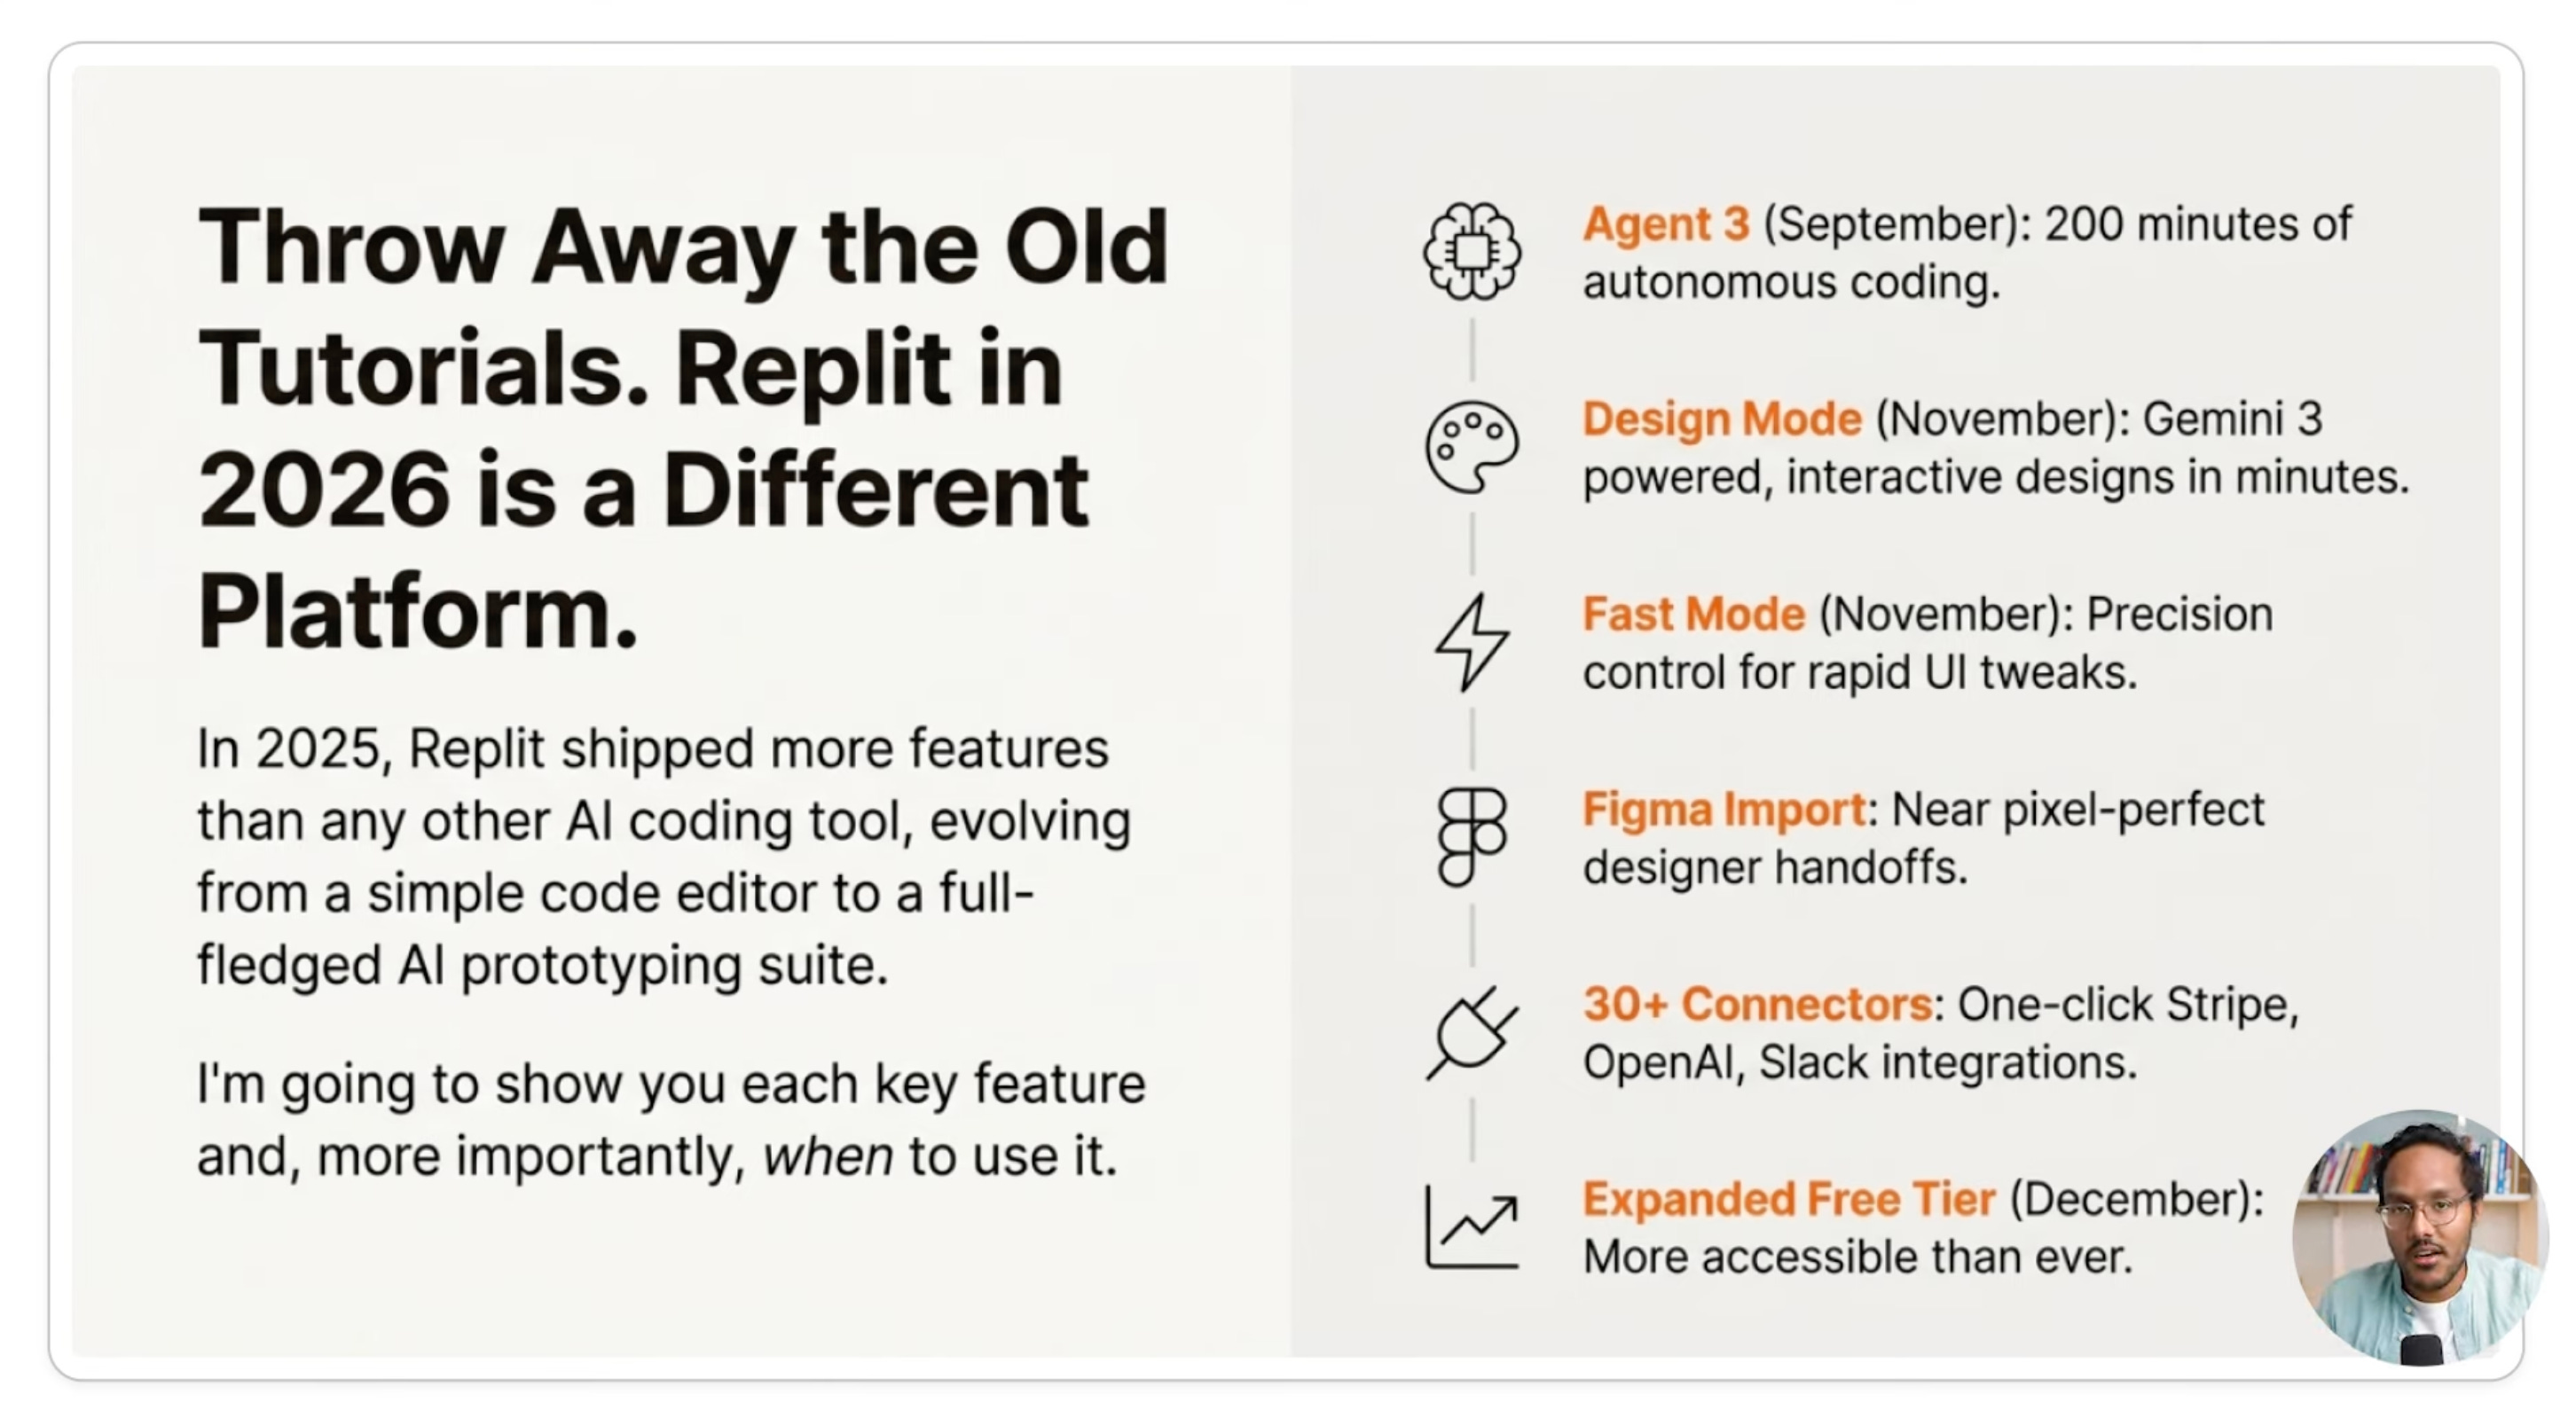
Agent 3 (September) - 200 minutes of autonomous building without supervision
Design Mode (November) - Powered by Gemini 3 for rapid mockups
Fast Mode (November) - Precision control for quick changes
Figma Import - Near pixel-perfect conversions from design to code
30+ Connectors - One-click integrations with Stripe, OpenAI, Slack, and more
Free Tier Expansion (December) - Made the platform accessible to everyone
If you’re still following tutorials from 2024, you’re missing the best features that make Replit different from every other tool.
Today’s Post
Today I’m compressing 6 months of learning into this guide. We’re covering everything you need to master Replit as a PM:
Where AI Prototyping Stands Today (And Where Replit Fits)
How to Navigate Replit’s Modes and Features
🔒 How to Build and Iterate Like a Pro
🔒 How to Handle Integrations and Deployment
🔒 How PMs Should Actually Use Replit
🔒 How Replit Compares to Every Other Tool
By the end, you’ll know exactly when to use each feature + how to avoid the mistakes I made.
1. Where AI Prototyping Stands Today (And Where Replit Fits)
AI prototyping has already changed product development. That debate is over.
What I see across the teams I talk to is three camps:
Teams that have fully embraced it. Prototypes at every stage. Ideation, planning, discovery, PRDs, engineering kickoff. PMs, designers, and engineers all using these tools. Anthropic is the clearest example. As Sachin Rekhi (Reforge) shared on the Product Growth podcast, Anthropic builds prototypes for every customer problem they’re considering. They launch them internally. They see what people actually use. Then they decide what to productionize. This is product shaping, and it used to be reserved for companies like Apple that could afford to throw away expensive prototypes. Now any team can do it.
Teams that are dipping their toes in. Maybe one or two PMs on the team have tried Bolt or Lovable. They built a prototype once for a stakeholder meeting and it went well. But it hasn’t become a workflow yet. These teams know AI prototyping matters but haven’t figured out how to integrate it into their daily process.
Teams that haven’t even gotten access. IT hasn’t approved any tools. Or the team doesn’t know where to start. Or they tried once, got a generic-looking prototype, and wrote it off.
This guide is for the first two camps. If you’re in the third, start with my Ultimate Guide to AI Prototyping Tools to get oriented, then come back here.
Where Replit Fits
There are a lot of AI prototyping tools now. Bolt, Lovable, v0, Reforge Build, Magic Patterns, and more. They’re all capable. I’ll compare them in Section 6.
But after months of testing, Replit is one I keep coming back to. Three reasons:
Speed. A PM in 2 minutes and 48 seconds of Replit build time (roughly 50 cents of tokens) can create a fully functional prototype. You can test 10 ideas in the time it used to take to build one.
Full-stack depth. Replit gives you built-in databases, authentication, 30+ one-click Connectors, and two deployment options (static and auto-scale) all in one place. Other tools have caught up on individual features, but Replit’s integration depth across the full stack is still the strongest.
Deployment in one click. You go from idea to live URL without ever leaving Replit. That matters when you’re trying to get something in front of users today, not next sprint.
Here’s how to get the most out of it.
2. How to Navigate Replit’s Modes and Features
Here’s the mental model. Every time you open Replit, you’re making a series of decisions about which mode to use. Get this right and you’ll save time and money. Get it wrong and you’ll burn through credits doing things the hard way.
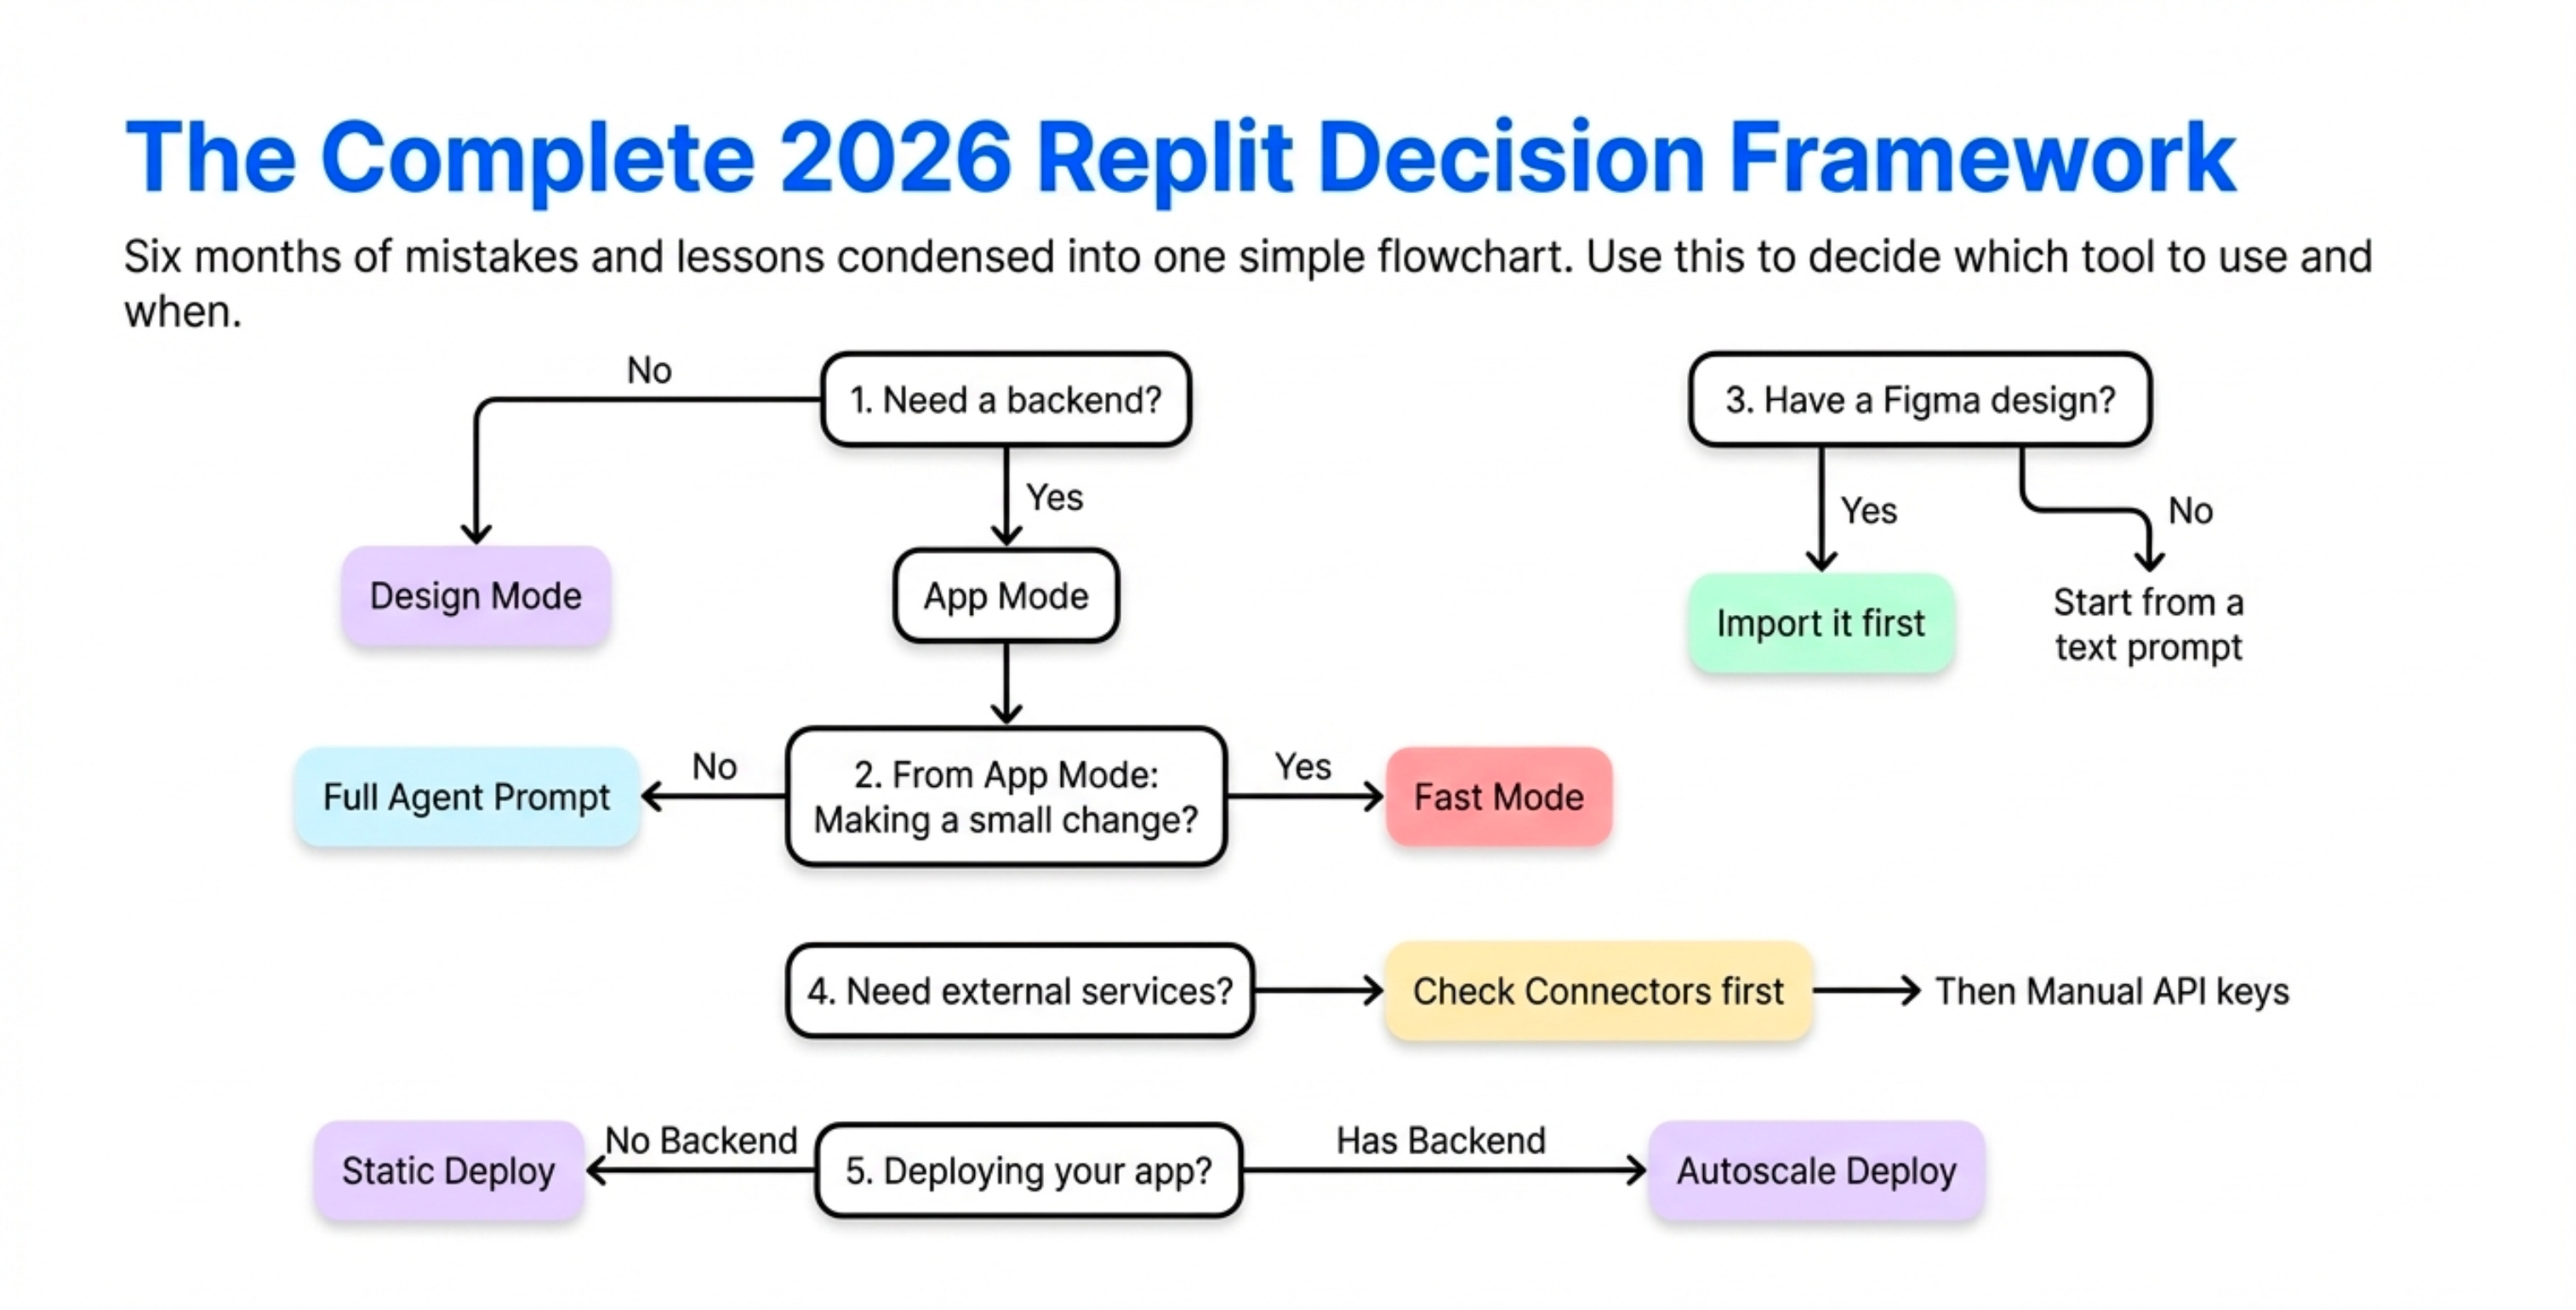
Design Mode vs App Mode
This is the first decision you make.
Design Mode is powered by Gemini 3. It generates interactive designs in under 2 minutes. Use it for landing pages, marketing sites, portfolios, interactive mockups for stakeholders, and anything without a backend.
App Mode is for anything that needs a database, authentication, server-side logic, or API integrations. This is where you build production-ready applications.
The mistake I made: I built tons of things in App Mode that should have been in Design Mode. I was adding unnecessary backend complexity and making things slower than they needed to be.
When you arrive on the Replit homepage, you’ll normally be in App Mode. Toggle to Design. Then hit it with your prompt.
Here’s the one I used:
Create a modern SaaS landing page for an AI writing assistant with hero,
features, pricing, and testimonial sections.
Took about 2 minutes. Cost 34 cents. Fully responsive and interactive page.
And here’s the part most people miss: you can convert a Design Mode project to a full application with a single click. Hit “Click to Convert to Full Application” and Replit adds backend capability. In my demo, this took 48 seconds. It even flagged what it hadn’t done yet: “Hey, we haven’t done email capture or contact form, let us know if you want to.”
From there you can hit publish. Choose public or private. Create a domain. Live on the web.
Agent Mode vs Fast Mode
This is where most people burn through credits unnecessarily.
Agent Mode is for building features. Adding a clickable pricing page with all the connections? Agent Mode worked for 1 minute, charged 53 cents, and produced a working pricing page. New features, backend logic, complex changes, structural modifications: all Agent Mode territory.
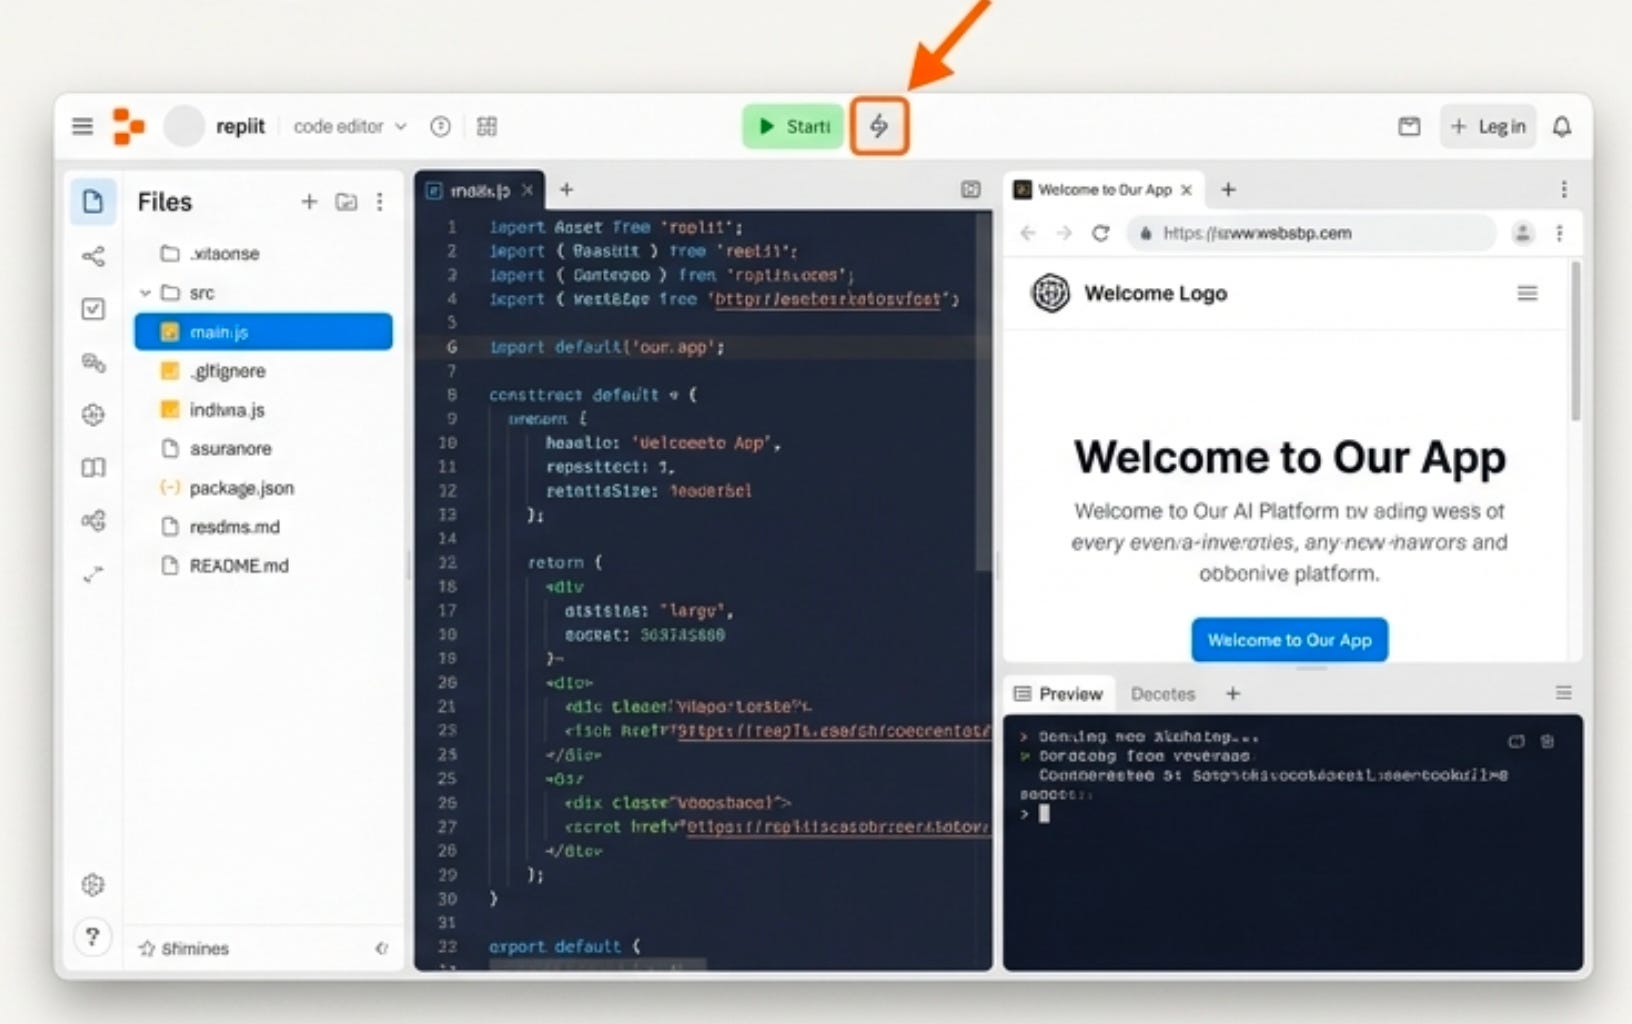
Fast Mode is for tweaks. Color changes, text edits, small layout adjustments, UI polish. I told Replit to change the colors from purple to blue. It modified all the same files as Agent Mode would have. But it cost 10 cents. A 10x cost reduction.
The mistake I made: using the full Agent for tiny changes. “Make the button blue.” Full rebuild. $1 per change. These costs add up fast. Fast Mode exists for exactly this.
Plan Mode
If you use Claude Code, you’re probably familiar with Plan Mode. Replit has its own version.
Plan Mode is perfect for high-level, generic requests. Say you prompt “build out the other links.” Plan Mode will ask clarifying questions: what are the other links, what do you want built out specifically. It makes it easy for you to specify things instead of having to do all that thinking up front.
One handy trick: expand out the Agent Mode panel and read the plan it generates. Then you can narrow the scope (”OK, maybe I just want the features page”). Just make sure you switch back to Build Mode to actually execute it.
A word of warning: as your codebase expands, the agent takes longer. Building out a features page took nearly 3 minutes and cost $1 because it had to link pages together and affect more files.
Agent 3 Autonomy
Agent 3 is one of Replit’s most hyped features, and the hype is earned.
Enable “Max Autonomy” and hit it with your prompt. Then step away. Most AI coding tools give you 5-10 minutes of build time before they stop. Agent 3 can go for 200 minutes.
I kicked it off and checked back in 5 minutes. It had taken tons of tasks autonomously: generated guidelines, configured the application, searched for authentication, added authentication. Six minutes in, still wiring things up on its own.
You can prompt “Build me a task management app with user authentication, a database for tasks, and the ability to mark tasks complete” and come back an hour later to a working app.
The mistake I made early on: constantly interrupting Agent. “Wait, do it this way.” “No, not like that.” “Stop, let me explain again.” Turns out, letting it finish and then adjusting is faster than micromanaging. If you hired a developer and stood over their shoulder every 30 seconds, they’d be less productive. Same thing here.
Give Agent 3 the full context. Let it work. Check back in 10-20 minutes. See what it built. Then give feedback.
The Cost Breakdown
Here’s the real pricing you should budget for:
Design Mode: 30-50 cents per page. The cheapest way to prototype.
Fast Mode: ~10 cents per change. Use for all cosmetic tweaks.
Agent Mode: $1-2 per feature. Use for structural and backend changes.
Plan + Build: $1-3 depending on codebase size. Costs increase as files multiply.
Agent 3 Autonomy: Varies widely. Budget based on project scope.
Budget $10-20 to build a complete prototype. Budget $50-100 if you’re building a production app with multiple features.
Now you know what each mode does and what it costs. The next four sections cover how to actually use them: Figma import hacks, integration tiers that cut my setup time by 90%, the deployment mistake that cost me an hour, a worked example of building three prototypes in 7 minutes for $1.25, and honest comparisons with Bolt, Cursor, Lovable, v0, and more.
🔒 Subscriber-only content below.
Keep reading with a 7-day free trial
Subscribe to Product Growth to keep reading this post and get 7 days of free access to the full post archives.